Summary of DIY a Simple Automatic Humidifier
This article guides users in building a DIY Automatic Humidifier that monitors indoor temperature and humidity, automatically activating a water atomizer when levels drop. The project utilizes Grove modules connected to an Arduino board, housed in a custom acrylic shell. Users must download specific code from GitHub and upload it via the Arduino IDE to complete the setup.
Parts used in the Automatic Humidifier:
- Arduino/Seeeduino
- Grove – Temp&Humi Sensor
- Grove – Button
- I2C_LCD
- Grove – Water Atomization
- Acrylic sheets for the shell
- USB cable
Let’s see the video first.
In today’s society, more and more attention to the quality of life, pursue the healthy and comfortable living environment. So we made this device to monitor the indoor temperature and humidity, when the humidity falls below the safe values, it will automatically open the humidifier.
Step 1: What You Need
Arduino/Seeeduino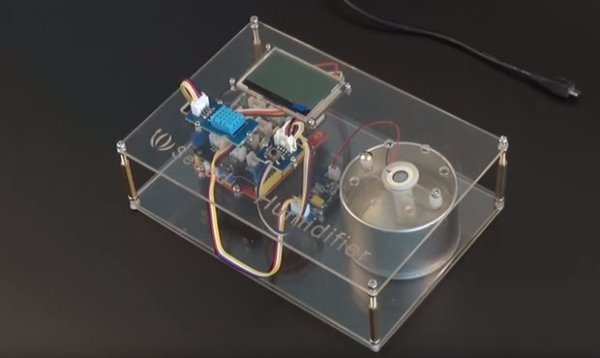
• Grove – Temp&Humi Sensor
• Grove – Button
• I2C_LCD
• Grove – Water AtomizationGrove – Water Atomization is a perfect module for you to develop an atomizer or an atomizer module in your applications easily. With just a few simple steps, you can prototype an atomizer. It has Grove interface which makes it easy to be integrated into plenty of applications. A humidifier is a basic device it can be built with, you can develop more advanced and interesting projects with digital scent technology and any other situations in which atomization required.
Step 2: Make a Shell
This device needs a shell to fix the Grove Modules, So my friend from Seeed help me cutting the acrylic sheets, I guess you don’t have a laser cutting at home, you can find some in the hacker space near from you easily. If there’s no hacker space nearby, you can try the Laser Cutting Service supply by Seeed.
You can download the Design Drawing by click https://github.com/Lee-Kevin/7.AutomaticHumidifier/.
Step 3: Connect the Modules
Connect the module as the below shows:
- Grove – Temp&Humi A0
- I2C_LCD I2C-Port
- Grove – Water Atomization D5
- Grove – Button D2
Step 4: Software Work
We assume you have connected your Arduino board and computer well with USB.
- Download demo code at https://github.com/Lee-Kevin/7.AutomaticHumidifie…
- Click “Download zip” button on right side of webpage to download all codes.
- Decompress the downloaded zip files to“C:\Users\Administrator\Documents\Arduino\” and remove “-master” in decompressed file name.
- Launch Arduino IDE.
- Click Sketch>Add file to add Humidifier1.ino file from“C:\Users\Administrator\Documents\Arduino\7.AutomaticHumidifier\Code\Humidifier1\”
- Press CTRL +U to upload codes to your board. Wait a while, there will be prompt like following figure:
Congratulations, you have already completed the most of the work.
Read more: DIY a Simple Automatic Humidifier
- What is the primary function of this device?
The device monitors indoor temperature and humidity and automatically opens the humidifier when humidity falls below safe values. - How can I obtain the acrylic shell if I lack laser cutting equipment?
You can visit a nearby hacker space or use the Laser Cutting Service supplied by Seeed. - Where can I find the design drawings for the shell?
The design drawings are available for download at the GitHub repository link provided in the article. - Which port does the I2C_LCD module connect to?
The I2C_LCD connects to the I2C-Port. - What steps are required to prepare the downloaded code files?
You must decompress the zip file into the Arduino documents folder and remove -master from the filename. - How do you add the specific code file to the Arduino IDE?
You launch the IDE and click Sketch to Add file to select Humidifier1.ino from the designated folder. - What key combination is used to upload the code to the board?
Pressing CTRL + U uploads the codes to your board. - Can this project be adapted for digital scent technology?
Yes, the Grove – Water Atomization module allows for developing advanced projects involving digital scent technology.