Summary of DIY Driving Simulator using an Arduino
This article details a DIY driving simulator steering wheel that uses gravity-sensing potentiometers to control game movement via tilting. The project converts tilt directions into keyboard inputs (W, A, S, D) and features a light-up wheel powered by an Arduino. It guides readers on sourcing or building sensors from household items like balls and nuts, repurposing a Frisbee for the wheel casing, and assembling the structure using Legos.
Parts used in the DIY Driving Simulator:
- Arduino
- Gravity sensing potentiometer (commercial or homemade)
- Potentiometer
- Heavy small ball
- Nut (for weight)
- Old light up Frisbee
- External battery power source
- Switch
- Lego bricks (12x8 box with 3x6 and 6x6 holes)
- Wires
- Velcro
If you haven’t noticed, as soon as you clicked into this instructable, you are now following me if you weren’t already, you Favorited the instructable, and you voted for this instructable in all contests it is entered in. Then the buttons all dissappeared. It’s okay though. If you really want to, you can still go onto your page and unclick all of them or you can test your speed and try to unclick them before they dissappear. To see how I did it click here
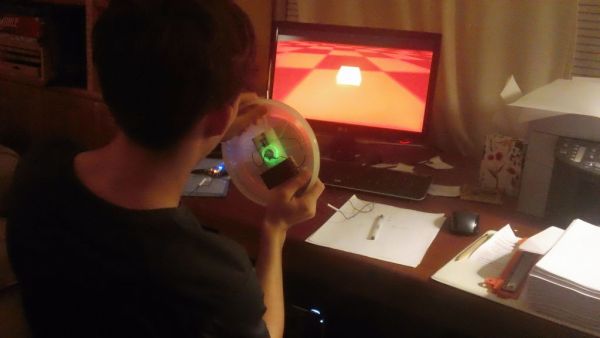
This project took about 3 months to completely finish. It acts as a gravity sensing light up “steering wheel” that allows the user to interact with driving games by tilting and turning the steering wheel. This is a great gift for tech people or anyone that is getting ready to drive. Later in the project I explain how you can take this project further to include gas and brake pedals, then with a little software modification, have a real working driving simulator. This setup converts forward tilt into the ‘w’ key, backward tilt into the ‘s’ key, left tilt into the ‘a’ key, and right tilt into the ‘d’ key, although this can be modified to use arrow keys quite easily. I only used wasd because that is how I programmed my driving game in game maker. I teach you how to use real gravitational sensing potentiometers and then, for those of you like myself who can’t afford to buy things of that nature, show you both where to find them in household items and how to build your own from scratch! Have Fun and please VOTE!
Step 1: The gravity sensing potentiometer
I found a commercial grade one in an old helicopter remote, but if you don’t want to buy one, the next step tells you how to build your own one.
For the sake of people who are going to build their own one, I built my simulator sensor with one commercial sensor and one homemade sensor (you need 2 total)
Step 2: Making your own gravity sensing potentiometer
This step shows you how to create a perfectly working gravity sensing potentiometer from household parts
Get a potentiometer
Get a heavy and small ball
File down one side of the ball
Glue the knob onto the potentiometer
Glue the flat side of the ball onto the knob-make sure it is directly in the center of the knob
Glue a nut to the ball to add weight
Step 3: The wheel
I found an old light up Frisbee but it did not have the ability to switch on and off the light, plus it came with pesky button cell batteries.
This step solves that problem by rewiring the Frisbee to have external battery power and a switch to turn the internal light on and off.
Connect wire to the positive and negative ends of the Frisbee circuit.
Wire up a switch and connect it between the battery and the circuit.
Glue everything down.
Step 4: The casing
Bring out the legos!
12×8 box with 3×6 hole and 6×6 hole
these are used for up, down, left, and right sensor movement
The box should be 5 high
You can then fill in spaces so that the sensor is more compacted and directionally limited
Make sure to include holes for wires to come out
Step 5: Hooking everything up
Attach longer wires to everything so that you can use the wheel from a distance
Glue the sensors to plates and pack them into the holes in the Lego casing
Then attach Velcro to the underside and to the back of the “wheel”
For more detail: DIY Driving Simulator using an Arduino
- How does the simulator convert physical movement into game commands?
The setup converts forward tilt into the w key, backward tilt into the s key, left tilt into the a key, and right tilt into the d key. - Can I build my own gravity sensing potentiometer if I cannot afford commercial ones?
Yes, you can build one using a potentiometer, a heavy small ball, a nut for weight, and glue. - What is the best way to repurpose a light up Frisbee for this project?
You should rewire the Frisbee to accept external battery power and add a switch to turn the internal light on and off. - What specific Lego components are recommended for the casing?
The project recommends a 12x8 box with 3x6 and 6x6 holes, stacked 5 high. - Does the author mention extending the project beyond just steering?
Yes, the author explains how to include gas and brake pedals and modify software for a real working driving simulator. - Where did the author find a commercial grade gravity sensing potentiometer?
The author found a commercial grade sensor inside an old helicopter remote. - How do you limit the sensor movement directionally in the casing?
You can fill in spaces within the Lego box so that the sensor is more compacted and directionally limited. - Why did the author choose to program the system for WASD keys instead of arrow keys?
The author used WASD because that is how their specific driving game was programmed in Game Maker.