
Summary of How To Smell Pollutants using an Arduino
This Instructable shows how to connect a Figaro VOC gas sensor to an Arduino to measure volatile organic compound levels. It explains required parts, Arduino sketch to read analog values, wiring (sensor, potentiometer, power, and analog input), testing procedures (burn-in, breathing and alcohol tests), sample readings, and cautions about temperature effects and calibration. The project is intended for relative VOC comparisons and prototyping, with suggestions for adding thermistors or ppm conversion and expanding to displays or alerts.
Parts used in the How To Smell Pollutants using an Arduino:
- Arduino (or equivalent)
- USB/power cable for Arduino
- Computer to read serial output
- Gas sensor (Figaro 2620 or other Figaro VOC sensor)
- Potentiometer (around 500–1k ohms, tuned ~450 ohms) or known resistor
- Breadboard or soldering tools
- Multimeter (optional)
- Wire stripper (optional)
- Datasheet/pdf from sensor manufacturer (for reference)
This Instructable explains how to use a gas sensor with your Arduino.
This lets your Arduino smell (and hence you program responses to) overall gas levels for a variety of nasties, including ethanol, methane, formaldehyde, and a bunch of other volatile organic compounds.
My cost to make this actual device was under $100, including the full Arduino kit.
And no, I won’t put a shirt on:-)
I’ve got kits / finished versions of this and some other projectsfor sale @ my website
The closest comparable commercial products I can find are:
-a commercial-quality detector: $2500+
-a lab monitor: $295
–a one-off test kit for volatile organic compounds: $234
I learned about this after hearing about some guys who added VOC sensors to toy dogs. Not sure where/if the docs on that project are, but here’s the guide that I followed.
Links explaining what VOCs are and why you might want to care:
–Some symptoms of overexposure to VOCs
–an OSHA regulation on formaldehyde levels
–information on sick building syndrome: ‘A 1984 World Health Organization Committee report suggested that up to 30 percent of new and remodeled buildings worldwide may be the subject of excessive complaints related to indoor air quality (IAQ).’
–The Inside Story: A Guide to Indoor Air Quality: “For pollutants other than radon, measurements are most appropriate when there are either health symptoms or signs of poor ventilation and specific sources or pollutants have been identified as possible causes of indoor air quality problems. Testing for many pollutants can be expensive. Before monitoring your home for pollutants besides radon, consult your state or local health department or professionals who have experience in solving indoor air quality problems in non-industrial buildings.”
Step 1: Gather Your Supplies
-an Arduino (or equivalent)
-a cable to hook the Arduino up to your computer / provide power
-a computer to read values
-a potentiometer or resistor of known value. anywhere from 500-1k ohms should work
-the gas sensor: a pain to buy in small quantities. i bought 2 and they cost like $22 each, but volume orders get way cheaper… the specific sensor i used was figaro sensors’s 2620.Here’s what I used:
–the arduino kit I used
–the different sensors available from Figaro (use different sensors to ‘smell’ different things)It’ useful but not necessary to have a multimeter and wire stripper handy…
The pdf included with this step is the price list from the sensor manufacturer as of March 2008.
 Price 01_08 USA.pdf(612×792) 191 KB
Step 2: Set Up Your Arduino
1. Get your Arduino connected to your computer and functional
This should be pretty straightforward, especially with any newer Arduino. This guide worked for me.
2. Program your Arduino to read the value from an analog input and display this on-screen. I used
–this guide for using a potentiometer with an arduino and basically just modified the frequency with which it reads input value (delay(100) = read 10 times per second) to get the following code, which works for me:
//this outputs pot value to screen in ohms
int gasSensor = 0; // select input pin for gasSensor
int val = 0; // variable to store the value coming from the sensor
void setup() {
Serial.begin(9600);
}
void loop() {
val = analogRead(gasSensor); // read the value from the pot
Serial.println( val );
delay(100);
}
If you’re using this as your first excuse to play with an Arduino, you might want to try just wiring up the potentiometer and reading the value from it before adding the sensor.
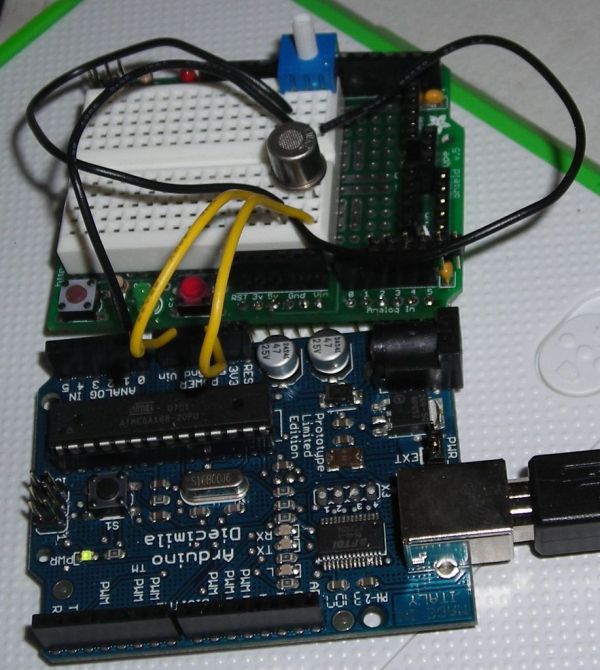
Step 3: Create Your Circuit
The picture attached is an image of the circuit from above (meaning that the sensor’s leads are pointing towards the ground; there’s a little metal tab protruding from the sensor to let you understand which pin is which. Also, check out the figaro guide for the specific sensor you choose. Attached is the datasheet, with some example circuits, for the 2620.
For the 2620, the datasheet specifies at least 450 ohms resistance needed. I tuned my potentiometer to ~right around 450 ohms.
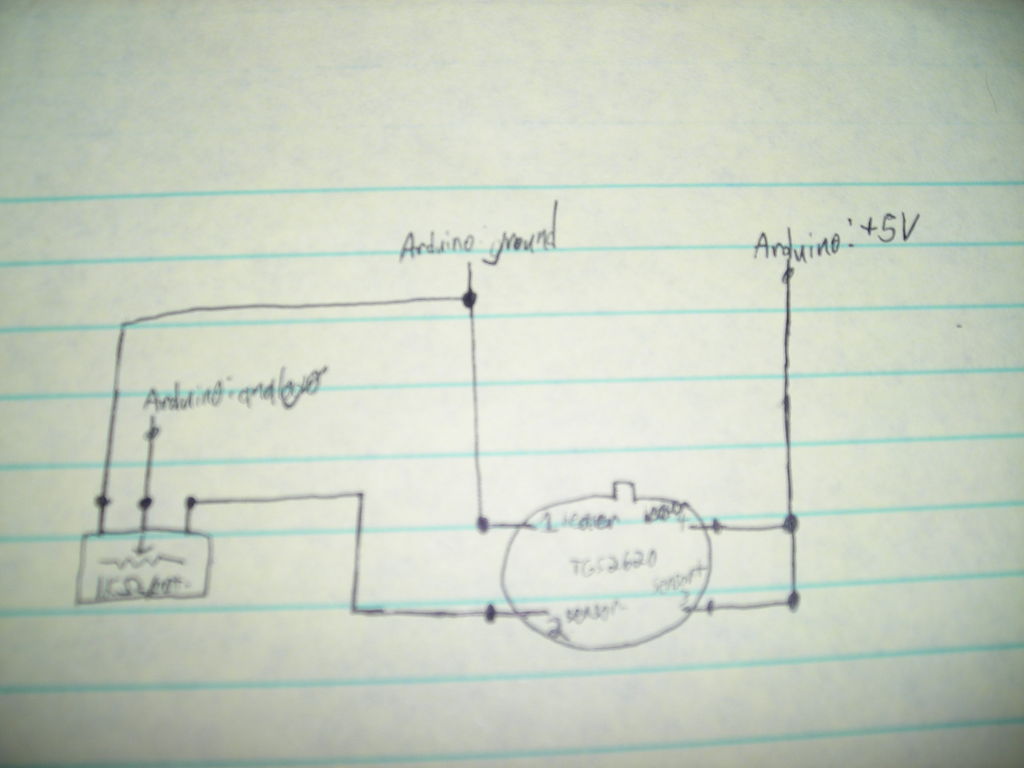
In plain english, here are the connections you’ll want to make:
-sensor pin 1 to an outer pin of potentiometer and ground (arduino ground)
-sensor pin 2 to other outer pin of potentiometer
-sensor pin 3 to arduino +5 v and sensor pin 4
-middle pin of potentiometer to arduino analog 0 input
You can solder this (read Figaro note on which type of solder and temperature exposure of sensors), but a breadboard is good enough for my purposes.
Step 4: Test Your Newfound Sense of Smell

You’ll then begin to see values scrolling in the black space at the bottom of the arduino program. These values are the resistance, in ohms, being read from the circuit.
To test, blow slowly for at least a few seconds over the top of the sensor. The numbers on the screen should change. Also try holding the sensor over a high-concentration chemical that it should detect: my value jumped quite a bit doing this.
With ~4 days burn-in and ambient temperature of 63F, the values I read in my house were (which is reasonably free of chemical use):
-sitting in the open air, after sensor warms up for ~1 minute: 52
-breathing slowly over the sensor for several seconds: 73
-holding sensor directly over an open bottle of grain alcohol: 235
Step 5: Build Away!
Without burning in this circuit for a week and adding a thermistor, this is really only good for reading relative concentrations of chemicals: eg, if you want a ‘lower-VOC’ paint, you could hold this over different open bottles of paint (in a room of constant temperature) and reasonably feel a bit safer using the paint that registers the lowest value. Obviously, there are nasties (and probably some VOCs: I don’t know) that this doesn’t detect, but it’s definitely a bit better than nothing:-)
Attached is a pdf Figaro Sensors provided, detailing the response of thermistors at different temperatures. Definitely not the only thermistor you can use, but may be useful as you explore your own, better version of this project.
A cool expansion I want to see is to display the approximate level in parts per million (ppm) of air pollution on my back as I ride my bike through traffic, maybe with an LED ‘Mr. Yuck’ sign that turns on above a certain concentration as well. Let me know what you build, and have fun!
Source: How To Smell Pollutants using an Arduino
- What sensor was used in the project?
The project used a Figaro sensors 2620 gas sensor (or other Figaro VOC sensors). - Can I read the sensor output with an Arduino?
Yes, the sensor is wired into a potentiometer and the Arduino reads the resulting analog voltage on analog input 0. - What value potentiometer or resistor is needed?
The 2620 datasheet specifies at least 450 ohms; a potentiometer around 500–1k ohms tuned to ~450 ohms was used. - How do I wire the sensor to the Arduino?
Sensor pin 1 to potentiometer outer pin and ground, pin 2 to the other outer pin of potentiometer, pin 3 to Arduino +5 V and sensor pin 4, and middle pot pin to Arduino analog 0. - What does the Arduino sketch do?
The sketch reads analogRead from the gas sensor input and prints the value to the serial monitor at 10 reads per second (delay(100)). - How do I test the sensor once built?
Connect Arduino to computer, open serial monitor, and observe values while breathing over the sensor or exposing it to a known chemical like grain alcohol. - Are the readings absolute concentrations in ppm?
No, without burn-in, thermistor, and calibration the readings are for relative concentrations and not direct ppm values. - Does temperature affect readings?
Yes; the article recommends burn-in and adding a thermistor because temperature affects sensor response. - Is this project expensive compared to commercial monitors?
The author built it for under $100 including an Arduino kit, which is far less than commercial detectors listed.