Now I am lucky enough to work at the greatest company in the world as a University of Waterloo, co-op student. It might not even be a company you’ve heard of yet. They’re named Upverter and we are trying to change the way people design, build, share and collaborate on electronics. My job (also the coolest job in the world) is to find interesting problems that either have been or could be solved with electronics. I showcase what we do at Upverter and what the community is building. And I not only publish and share my experiences but I also design the solutions to these problems and open source my experience, discoveries and my designs. I’m helping to build the core content of a community sharing electronics. Like I said, its a pretty cool job. So one day, here I am at work – doing the coolest job ever, when an email gets sent around the office about a twitter competition. And so I started thinking to myself… What is a problem that twitter and an Arduino can solve? But its even more than that – what REAL problem can I solve, that hasn’t been solved before, or at least hasn’t been open sourced, using twitter and Arduino? I’m gonna come back to this, but at just that very moment here I am deep in brainstorming thought and my co-worker Jaco starts boasting about what a great night sleep he got, how much he loves his Wakemate, yadda, yadda, yadda. WAIT!

It kinda goes without saying, but sleep is very important. All of us need it and for the most part do it differently. Problem is technology still has a ways to go before we can detect exactly what is happening to someone while they sleep without ruining their sleep, or wiring them up like Frankenstien. For example if you go to a professional to analyse your sleep you will be covered in sensors like EEGs, EMGs or EOGs. The up side is they measure everything your body does while you sleep. . . But the down side is they are far from pleasant to wear to bed. Maybe there is something here I can make a little bit better…
As a result of bad tech, Actigraphy has become the more common method of getting a bit of insight into how people sleep and its really the only option when it comes to personal sleep tracking. For Actigraphy there are no head or chest sensors but just a device worn around the wrist on the non-dominant hand. The device normally contains an accelerometer which is then used to determine what sleep state the user is in. All of this data is then synced to your mobile phone, which you can also then upload to their website to analyse your movements during the night. Worst case = a fuzzy wrist widgit, best case keep on going! We have 12 more months of money and we need to use it to the max!
So now that I’ve bored you with the background – I can imagine you know what I’m gonna say next… Why not build my own? Anyone can go buy a WakeMate. But how many people have built their very own, designed in the cloud and open sourced to the world? Zero! Well, that’s not true… I guess its at least one now! haha. And for the haters – as for why to open source it? Because I believe that someday the innovation that becomes possible from me giving back to the community will affect my life in a positive way. Something that never would have been possible otherwise. And thus, the Sleep n’ Tweet was born.
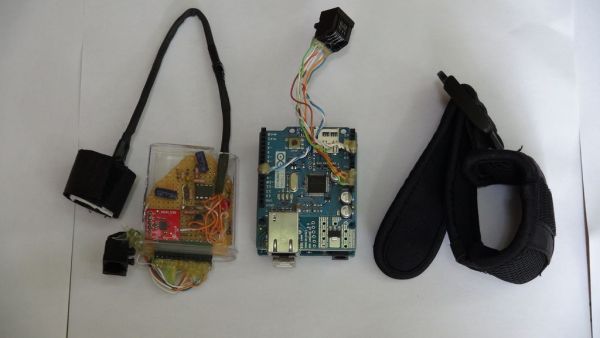
The Sleep n’ Tweet is basically just an Arduino with an Ethernet shield that keeps track of your vitals (movement + heart rate) as you sleep. I haven’t push it nearly as far as it could go, think of it more as a working prototype than a polished product – but the potential is huge! It could be used to track vitals at any time and tweet anything you want according to whatever filters you put on it. It could be manufactured to be very, very small. And it could also be stuck to just about anything to check for movement and IR or flow changes – but for now we’ll stick to sleep.
Step 2: How it works
Overview
So here I’m going to give you a rundown of how the device works and functions so you at least understand what you’re about to make. If you’re just keen on having your own you can skip this section, I won’t be hurt if you do. I’m going to go all engineering lab report here. In 3…2….1….GO! So this device uses the Arduino for its base. The Arduino knows and does all once we program it. It doesn’t know a thing until we do that. On top of the base is the Arduino Ethernet shield which lets the Arduino talk to all the internets out there. Thus allowing the Arduino to communicate with Twitter with a little bit of programming. Steming from the Arduino are two sensor circuits; the accelerometer and the IR heart rate sensor. We’ll get to those in a minute though.
Arduino
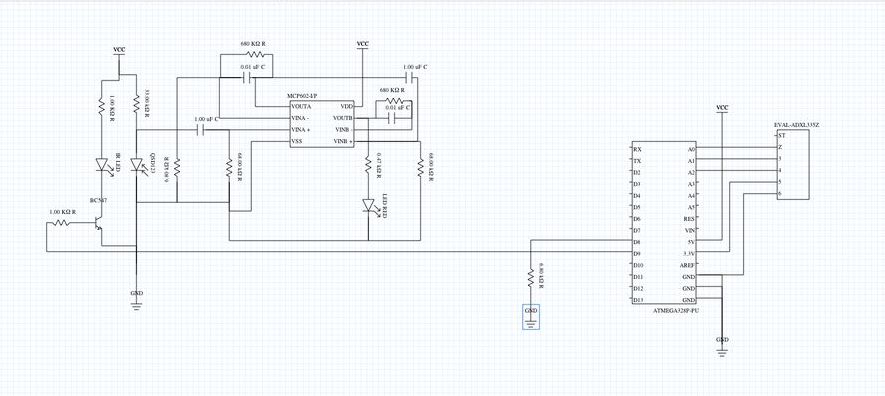
For this project I used the Arduino Uno and an Ethernet shield on top of this. You need to make sure that pins 12 and 13 (point to pins in picture) are open because these will be used for communications between the Arduino and the Ethernet shield. Which sucks because pins 12 and 13 are my favourite to use. I don’t know what it is about them just like the numbers, but that took me 30 minutes to find out. So I used pin 9 to control whether or not the Infrared LED and red LED are active and I used pin 8 to read whether or not there was a change in the IR photo transistor. Pins A0, A1 and A2 were used to take care of the accelerometer. For power, I connected the 5v pin to the heart rate circuit and connected the 3.3v pin to the accelerometer circuit. That is basically how I hooked up the brains of the device. Still plenty of pins open for other things, maybe a moisture sensor to see if you’re sweating buckets in your sleep. Or a pressure sensor to see if you’re crushing a limb for hours and hours every night.
Heart Rate Sensor
The heart rate sensor is comprised of an op amp connected to an IR LED and an IR photo transistor. In short, the design works by shinning an IR LED onto your finger and receiving some amount of light through the photo transistor. When your heart pumps blood, the volume of blood in your finger will change, and so will the amount of light picked up by the photo transistor. This value change will be pretty small so we’ll need to kick the change up a couple of notches with an op amp. The one I’ve set up should roughly multiply the signal by about 10 000 times. Now what we can do with this amplified signal is pump it into the Arduino and read the changes as ones and zeroes. I’ve also hooked up a LED between the Arduino and the op amp so you can directly view the signal going into the Arduino. What I’ve done is measured the time in between heart rates and after 5 beats, I take the average to compose a beats per minute. I also have filters in place in the program to rule out any unreasonable frequencies. For example, if the heart rate comes out to be 100ms between beats, I know this reading is false because the human heart cannot beat 600 times per minute. I made the valid range 30BPM to 250BPM. I found the IR sensor works on multiple parts of the body, but best on the finger.

Accelerometer
I used an accelerometer pre-assembled from Sparkfun called the ADXL335, but you can build your own which isn’t that hard.(The schematic is here ) The accelerometer is directly hooked up to the analog pins of the Arduino. Constant readings are given about it’s orientation and I basically I detect the changes in the orientation and log them as movements. I had to do a couple of things in the program to combat irregularities such as twitches. I take a time frame in which the number of movements read is compared to the number of non-movements read. Then, I also change the sensitivity. So if you move by 5 it will detect a positive movement. Basically, more movement equals a higher change in number.
Put it all together and you have a way of reading someones heart rates and movements. Lets move on to what you actually have to get to build this bad boy.
Major Components in ProjectArduino
For more detail: Sleep n’ Tweet using an Arduino
