
Summary of Tilt Sensor Tutorial using arduino
A tilt sensor detects orientation or inclination using a conductive mass (mercury or ball) inside a cavity that shorts two poles when tilted. Popular for toys and gadgets, they are low-power, inexpensive, and durable. Unlike accelerometers, they act as simple switches without needing extra circuitry, though mercury types are now rare due to toxicity.
Parts used in the Tilt Sensor Project:
- Tilt sensor (Cylindrical 4mm diameter)
- Multimeter
- Soldering equipment
- Breadboard
- Alligator clips
What is a tilt sensor?
Tilt sensors allow you to detect orientation or inclination. They are small, inexpensive, low-power and easy-to-use. If used properly, they will not wear out. Their simplicity makes them popular for toys, gadgets and appliances. Sometimes they are referred to as “mercury switches”, “tilt switches” or “rolling ball sensors” for obvious reasons.
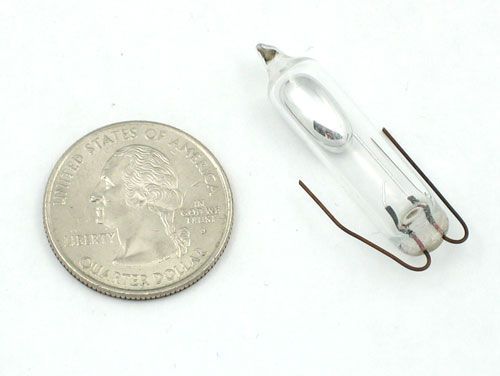
They are usually made by a cavity of some sort (cylindrical is popular, although not always) and a conductive free mass inside, such as a blob of mercury or rolling ball. One end of the cavity has two conductive elements (poles). When the sensor is oriented so that that end is downwards, the mass rolls onto the poles and shorts them, acting as a switch throw.
Tilt switches used to be made exclusively of mercury, but are rarer now since they are recognized as being extremely toxic. The benefits of mercury is that the blob is dense enough that it doesn’t bounce and so the switch isn’t susceptible to vibrations. On the other hand, ball-type sensors are easy to make, wont shatter, and pose no risk of pollution.
While not as precise or flexible as a full accelerometer, tilt switches can detect motion or orientation simply. Another benefit to them is that the big ones can switch power on their own. Accelerometers, on the other hand, output digital or analog voltage that must then be analyzed with extra circuitry.
Basic Stats
These stats are for the tilt sensor in the Adafruit shop which is very much like the 107-2006-EV. Nearly all will have slightly different sizes & specifications, although they all pretty much work the same. If there’s a datasheet, you’ll want to refer to it
- Size: Cylindrical, 4mm (0.16″) diameter & 12mm (0.45″) long.
- Price: $2.00 at the Adafruit shop
- Sensitivity range: > +-15 degrees
- Lifetime: 50,000+ cycles (switches)
- Power supply: Up to 24V, switching less than 5mA
- Datasheet
Step 1: Testing your tilt
Testing your sensor is simple. Put your multimeter into continuity-test mode and touch the probes to the two leads. Then tilt to determine the angle at which the switch opens and closes.
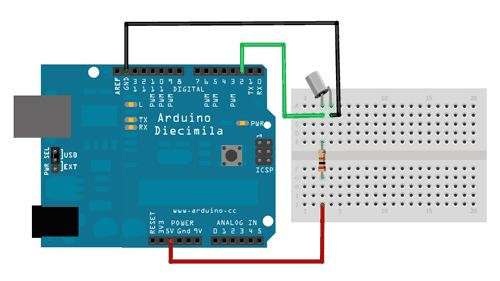
Step 2: Connecting to your sensor
Tilt switches are pretty hardy, you can easily solder to them, clip the leads, plug them into breadboards, use alligator clips, etc. The only care you should take is to avoid bending the leads too much as they may break off.
For more detail: Tilt Sensor Tutorial
- What is a tilt sensor?
A device that detects orientation or inclination by shorting two poles with a conductive mass. - Why are mercury tilt switches rarer now?
They are recognized as being extremely toxic compared to ball-type sensors. - How do you test a tilt sensor?
Use a multimeter in continuity-test mode and touch probes to the leads while tilting. - Can tilt switches switch power on their own?
Yes, larger tilt switches can switch power directly unlike accelerometers which need analysis. - What is the sensitivity range of the Adafruit tilt sensor?
The sensitivity range is greater than plus or minus 15 degrees. - Does a tilt sensor wear out easily?
No, if used properly they will not wear out and have a lifetime of over 50,000 cycles. - What are the alternatives to mercury in tilt sensors?
Rolling ball sensors are used as they are easy to make and pose no pollution risk. - How should you handle the leads of a tilt sensor?
Avoid bending the leads too much as they may break off during installation.