Summary of Sonic Switch: Use a Sonic Screwdriver to turn on your computer!
This project is an Arduino-based light-sensitive switch that turns on a desktop computer using a Sonic Screwdriver replica. It employs a photocell in a voltage divider circuit to detect light levels, triggering a transistor via a Boarduino (Arduino) to complete the motherboard's power switch circuit. The system relies on USB power from the computer itself and uses simple code to monitor analog input thresholds for activation.
Parts used in the Sonic Screwdriver Computer Switch:
- Arduino Boarduino
- Photocell
- Transistor
- Resistors (implied by voltage divider)
- USB cable
- Sonic Screwdriver replica
What it is: An Arduino-based light-sensitive switch for turning on a desktop computer.
Why its cool: Use a Sonic Screwdriver to turn on your computer!
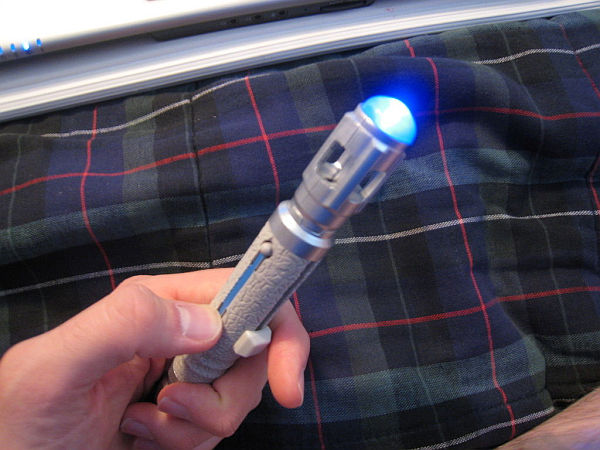
Story: This project started, as I’m sure a lot of them do, as a result of boredom and the thought “Wouldn’t it be cool if…”. I am a fan of Dr. Who. Enough of a fan, I suppose, to spend money on a plastic replica of the good Doctor’s Sonic Screwdriver (http://www.thinkgeek.com/geektoys/cubegoodies/8cff/). It was cheap, and it lights up and makes noise _ As a fan of the show (and a CPE/EE), I simply had to have it.
While pondering what to do with my time off, having recently graduated, and while playing with the Sonic Screwdriver, I had one of those “…Duuuuude, Awesome!” moments. And an hour or so and a transistor or two later, I have a device that allows me to do what you see in the video below:
Step 1: The Nitty Gritty

Now we’ll get into the technical stuff.
In a nutshell: The photocell is connected in a voltage divider circuit, resulting in a voltage between 0-5V applied to the analog input pin of the Boarduino depending on the amount of light detected. The on-board ADC gives a numerical value based on this voltage. If that value crosses a certain threshold, the digital pin connected to the Base of the transistor is set high, the motherboard power switch circuit is completed, and the computer turns on (or off).
Yes, the circuit can be triggered by any bright enough light source. Like a normal flashlight or, oh I don’t know, a camera flash. But its just so much cooler to whip out a Sonic Screwdriver and be all like the Doctor and stuff…Right? Thought so _
A Note: The USB ports on my computer are powered as long as the power supply is on (even if the computer is not running). This provided the power needed for the Boarduino and allowed the circuit to function. I was able to run the USB cable out the back of the case and into a free USB port. Not the best way to power the circuit, I’ll admit. I hope to have an updated version of this circuit that provides the same functionality in a more discrete manner. More on that later.
Step 2: The In-Line Transistor Circuit
A relatively simple circuit. Simple enough, even, to unceremoniously slap together and wrap up with a bit of electrical tape. I took off the tape for this picture. You’ve seen in the previous slide how it looked when finished. The inside of my computer is a rat’s nest of wire already. Why not add some more? hehe.
I’ve said it was a simple circuit. But notice how I totally got the collector and emitter backwards. Yeah. Funny story about me a transistors. For part of my senior design project, we built a giant PVC pipe binary clock. It had 19 LED light clusters, each one needing to be toggled at the appropriate time by a micro-controller. We chose to use a similar transistor circuit that would turn on the light when the pin on the micro-controller was set high. Easy enough. Worked great in prototyping. Worked great all the time, actually. Even as a final product. But one day, our adviser comes in to have a look at the circuit. He asks me to take a look at the “orientation of the transistors.”……*facepalm*. Every single one was backwards. But because the current draw of the lights was so low, the circuit functioned fine with the transistors reversed, which is why it never occurred to me during construction. As an electrical engineer, it was a very humbling experience. I told myself I would never make the same mistake again. mmmBahaha. We see how well that went…
(P.S. I hope to have another Instructable up eventually detailing the construction of that clock. Stay Tuned!)
Step 3: The (Bo)arduino program
So short, It’ll fit here. Based on one of the sample programs in the arduino library. Note that the ‘< 20’ bit can be changed to make the circuit more or less sensitive. Having taken the thing apart for this Instructable, I can’t, for the life of me, remember which direction results in higher sensitivity (i.e. whether a higher or lower number makes it more sensitive). My apologies. When I throw the circuit back together, I’ll update accordingly.
//Sonic Switch Code
int analogPin = 0; //pin a0 on the board
int ledPin = 10; //pin 10 on the board
int analogValue = 0; //value from the ADC
void setup()
{
pinMode(ledPin, OUTPUT);
}
void loop()
{
// read analog input, divide by 4 to make the range 0-255:
analogValue = analogRead(analogPin);
analogValue = analogValue / 4;
if (analogValue < 20){
digitalWrite(ledPin, HIGH);
}
else {
digitalWrite(ledPin, LOW);
}
delay(10);
}
For more detail: Sonic Switch: Use a Sonic Screwdriver to turn on your computer!
- How does the circuit turn on the computer?
The photocell detects light in a voltage divider circuit, and if the value crosses a threshold, it sets a digital pin high to trigger a transistor that completes the motherboard power switch. - Can other light sources activate the device besides the Sonic Screwdriver?
Yes, any bright enough light source like a normal flashlight or a camera flash can trigger the circuit. - What provides the power for the Boarduino in this setup?
The USB ports provide power as long as the power supply is on, even if the computer is not running. - How is the sensitivity of the circuit adjusted?
Sensitivity is adjusted by changing the numerical value in the code, specifically the bit set to less than 20. - Why did the author mention a mistake with transistors in a previous project?
The author accidentally installed all transistors backwards in a PVC pipe binary clock, but they functioned because the current draw was low. - What is the purpose of dividing the analog value by 4 in the code?
Dividing the analog read value by 4 scales the range to 0-255 for processing. - Does the computer need to be fully powered on for the circuit to work?
No, the USB ports are powered as long as the power supply is on, which allows the circuit to function without the computer being fully running.