
Once after Russian EFT community podcast where one of the guests said that expensive items, such as LEDX, should occupy a larger number of the slots in secure containers… It didn’t happen in 0.12,6 patch, but it did happened in my workshop.
Supplies
Things required:
- Arduino microcontroller (in different steps I used Arduino Uno and Mega)
- DFPlayer mini module
- MicroSD card (I had 8 Gb card, but DFPlayer supports cards up to 32 Gb)
- 24 RGB diodes
- 24 wending machine capsule caps
- 1 pushbutton
- 8 Ohm speaker
- 5V source (I had 4 18650 Li-on batteries, but ended up using 5V old powerbank)
- On-off switch
- Speaker mesh
- Breadboard (170 dots)
- Cardboard
- PVA glue
- Gauze bandage
- Plastiс spray gun bottle that you don’t need
- Spray paint (Black, white and red)
- Foundation for acrylic paint
- Polyurethane foam
Tools required:
- Soldering iron + solder, soldering paste ect.
- Glue gun
- Sanding paper
- Stationery knife
Software
- Arduino IDE
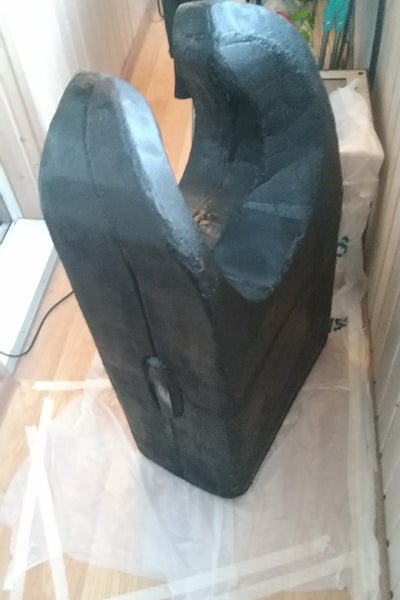
Step 1: Housing Frame
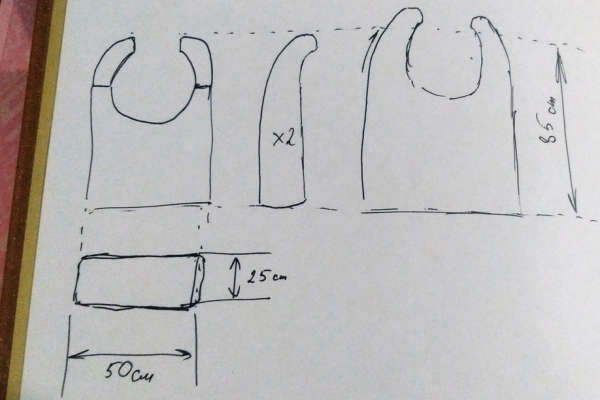
For this step we need a lot of cardboard. Unfortunately, I don’t have much of photos on the whole case on this step. The case can have some imperfections and holes, but with reinforcement I will get better. Inside I placed 5 liters of polyurethane foam to make case more stable. The neck of a plastic spray gun is LEDX’s change jack now.
Step 2: Frame Reinforcement
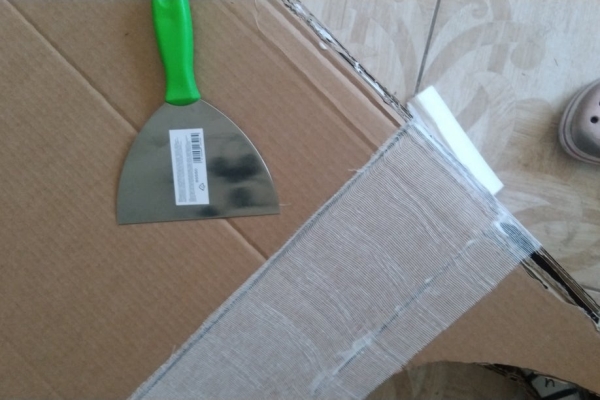
To make it more smooth and strong I used bandage and glue. After it is dry, it’s easy to cut, sand and paint it. The same way I did the buttons on sides. I repeated a few times reinforcement and applied foundation for acrylic paint on the frame in the place where LEDs are should be. Also I closed back part and saved the place for the circuit.
Step 3: Circuit Design
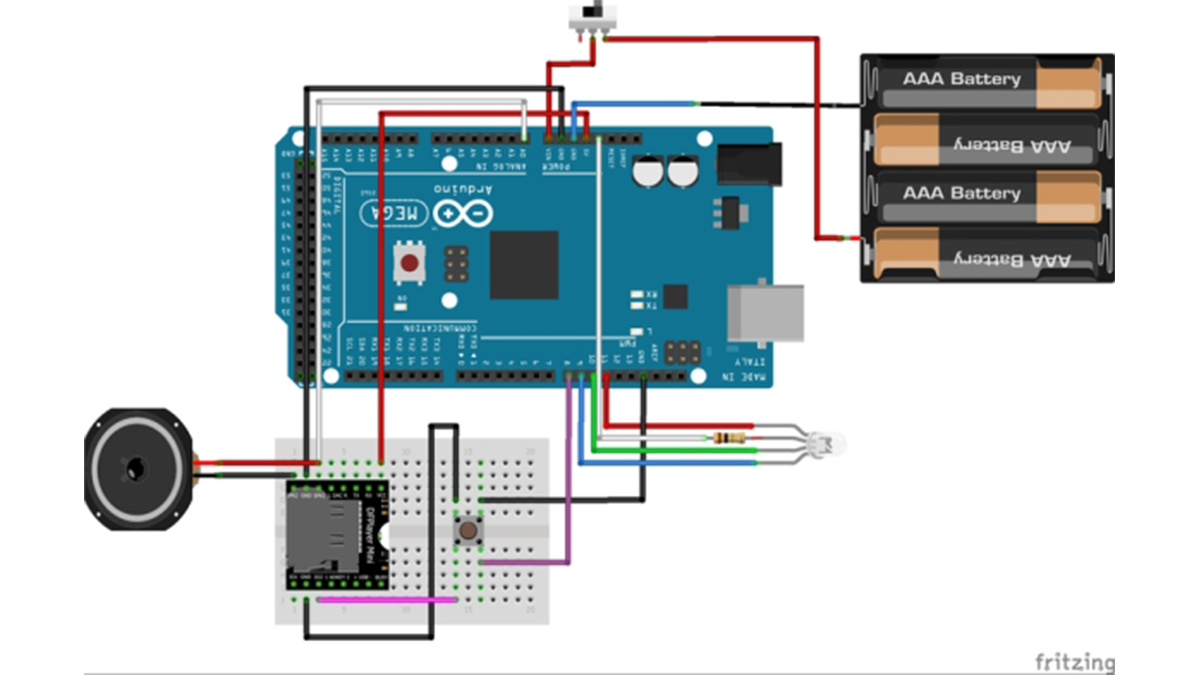
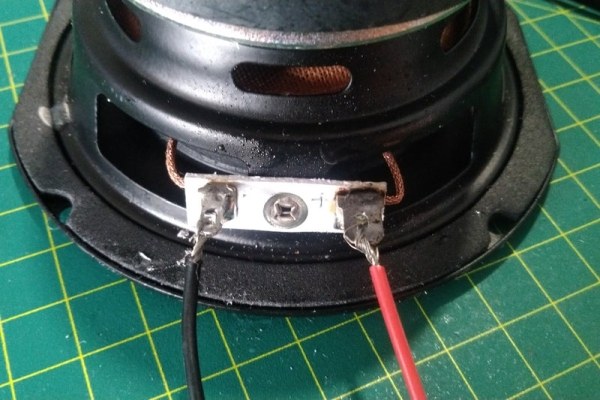
I came up with idea to make few modes for LEDX. First mode is classic red lighting as it is on original LEDX. And the second to make it sound like 00’s toy with RGB light music. I tried to do it programmatic, but for me it appeared to be difficult, so I came up with circuit that use button twice: to increase counter in microcontroller to switch lightning mode and, since the DFPlayer has its own way to switch tracks, switch the track in DFPlayer mini. Voltage from one of the speakers goes to arduino pin to create logic for RGB diodes.
Step 4: Bulbs Connection
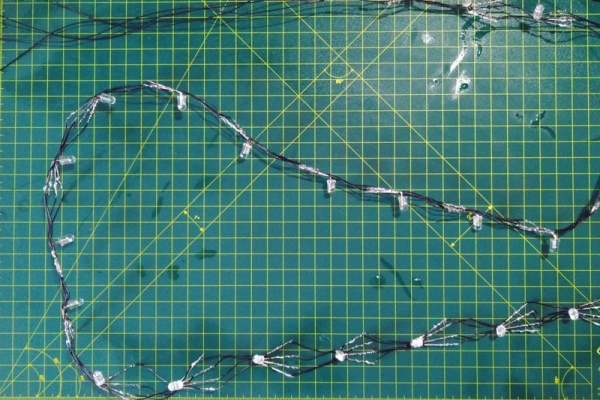
I didn’t want to make any kind of address LED strip, so I made parallel connection of 24 diodes and 1 Ohm resistor. To make it look like big LEDs I used wending machine toy capsules. After that I painted in black lightning place on frame and started to glue LEDs on it with gluegun, after that I used glue gun on LEDs’ caps. The last two photos is the check for correct working with battery.
Step 5: Applying Foundation on LEDX
I applied acrylic foundation on the case, sanded it and painted in black, so I was time to to start assemble circuit and to write the code for it.
Step 6: Circuit Assembling and Coding
For lightning and music modes I wanted to have two modes (and also save a place for future increasing number of modes), so for the first one it was easy: I need to pick the colour in RGB system, so I picked: R=255, G=8 and B=0, so I got something like scarlett colour. And i need the player stay silent on first mode, so I prepared two mp3 files: first one the short one with total silence and the second with 00’s toys music (I’m your little butterfly by Smile.dk).
You can see the screenshot of the code (let me know if you want the .ino file).
Step 7: Decorating

LEDX has case paintings, I made patterns in LibreOffice, printed them out, placed them on double sided tape and cut with stationery knife. After that I transferred them on the case and painted with a sponge.
Step 8: Assembling
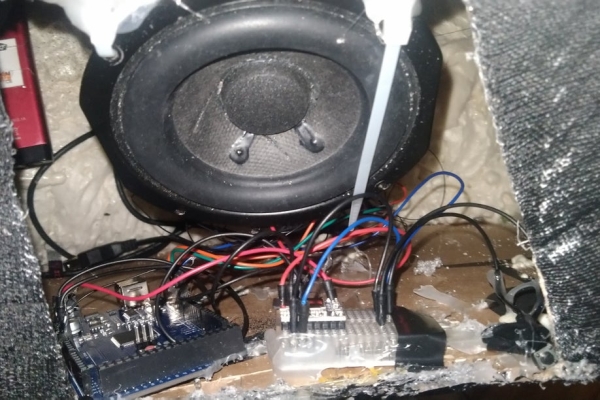
After all decorations done I started to assemble LEDX. To do that I used glue gun, basically, I’ve just glue the circuit inside. Long wires from LEDS went inside the frame through small the hole and connected to 3.7V power supply on anode and the three channels to 9,10 and 11 Arduino pins. It works. I made circuit hatch out of old metal speaker mesh.
Source: 12×12 LEDX From Escape From Tarkov