Summary of “12 Thumbs” R/C LEGO Dragster
The author built "12 Thumbs," a custom LEGO® Technic dragster inspired by 1983 and 1999 models. Weighing 129 components, it features a 3D-printed servo mount, a 3D-printed motor housing, and a wireless XBee control system powered by an Arduino and DRV8833 controller. The car uses a 9V DC motor and LiPo battery, achieving high speeds that initially proved difficult to steer.
Parts used in the 12 Thumbs:
- LEGO Technic Bricks (various sizes)
- LEGO Technic Plates
- LEGO Angle Elements
- LEGO Connector Pegs and Axles
- Technic Wedge Belt Wheels and Tires
- Technic Wheel 20 x 30 with Black Tires
- 3D Printed Servo Mount
- Tower Pro SG90 Micro Servo
- 3D Printed Motor Housing
- Round DC Motor (9V, 24mm)
- Arduino and Motor Driver PCB
- DRV8833 Motor Controller IC
- XBee Module and Breakout Board
- Battery Compartment for 9V or LiPo
Impressed by these two LEGO® Dragster sets, a 250 pieces LEGO®TECHNIC Dragster 8847 (released in 1983) and a 391 pieces Top Fuel Racing 5533 (released in 1999). These two Dragsters inspired me to build my own LEGO® dragster, the “12 Thumbs”.
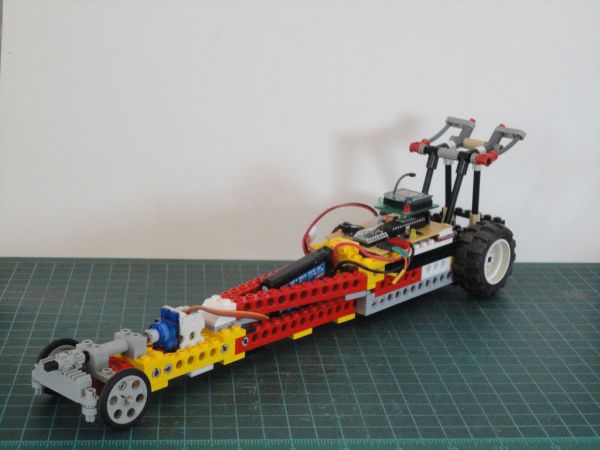 The name “12 Thumbs” came after I finished the design. While I was playing with my finished dragster on the cutting board (that I usually use as the background of my instructable photos). I spot that the the distance between the front and rear wheelbases is more or less 12″ long (See photo 4, 5)
I thought about the name “12 incher” but I don’t like the name. So I googgled around and came across the measurement term used in the old days, thumb, which is equivalent to an inch. (Source:http://en.wikipedia.org/wiki/English_units)
I like the word! So that’s it! My dragster got it name, “12 Thumbs”
My “12 Thumbs” is the easiest of all my custom LEGO® car to build. It only used 129 LEGO® components (not included Arduino and motor controller PCB). It used the same kind of wheels and tires as LEGO® 8847 model, a lot smaller than the LEGO® 5533 “Red Fury” that used the wheel and tires of 81.6 x 34.
The “12 Thumbs” equipped with a small servo to steer the car, same type of servo (9g) that I used with my other cars, R/C LEGO® Car (& Redux), R/C Race Car, or “The Bull” Buggy, etc.
But this time, instead of using the DIY servo supporter that made out of 2×2 plates. I design LEGO compatible, 9g servo mount that is (See next Step.)
For the motor housing, “12 Thumbs” is also using my 3D Printed Motor Housing. (See details in my R/C LEGO “The Bull” Buggy, Step 1)
In the mid section of the car is a battery compartment that is big enough to fit the 9V battery (or small 7.5V rechargeable LiPo battery) into. At the rear section, is where the Arduino and motor controller PCB is located next to the motor housing.
With 7.5V LiPo battery for motor power supply, and 9V, 24mm dia. round DC motor, Arduino, and DRV8833 motor controller IC (Details in Step 8), my “12 Thumbs” just flew out from the start line just like the real Top Fuel Dragster. On the first run “12 Thumbs” I set it speed to 3, it run so fast that I could not steer it straight, so I crashed it to the wall (See the Video in Step 10). Luckily there was no damage, the front wheels just flew off both sides.
“12 Thumbs” Dragster can be controlled wirelessly via XBee, or any other wireless radio, like bluetooth, or WIFI. In this instructable I chose to use XBee module since I have more than two XBee modules with me.
For the XBee Radio Control see R/C LEGO® Car, or Processing Controls R/C Car with XBee modules as examples.
Disclaimer:
LEGO®, TECHNIC, are property of The LEGO Group of Companies (http://www.lego.com), which does not sponsor, own, authorize or endorse this creation.
Video is available in Step 10.
Step 1: 3D Printed Servo Mount

3D Printed Servo Mount idea came after the 3D Printed Motor Housing. And with the same reason, since I was not very happy and was tired of hacked or modified LEGO plates to use as the 9g servo mount. Even though, I could used the servo mount from my previously build cars. But that what I do not want to do, I always keep my custom design LEGO car!
So I am prototyping a LEGO compatible Servo Mount. This 3D Printed Servo Mount is the fifth version. The design and 3D modeling processes were done in123D Design.
The opening in the 3D Printed on the top of servo mount is for the wiring from the servo. The Servo Mount has LEGO compatible mounting plate at the bottom.
This 3D Printed Servo Mount fits any 9g servo with the dimension of 23 x 12.2 x 27mm. The servo that I used for this 3D Printed Servo Mount is Tower Pro’s micro servo model SG92R (available from Adafruit’s ID#169 or Tower Pro website).
Attached is the STL file, you download below. You can view this 3D Model atmy 123D project page. The Servo Mount is still in prototyping stage, any comments and suggestion will be really appreciated.
It is a good value for the long run. My Servo Mount for Lego car design can be used in my other custom LEGO car design too.
Gallery of photos below show the 3D model in 123D app. and the actual 3D Printed ordered from a third party fabricator.
Step 2: Parts & Tools
Following is the list of Lego Technic parts that I used for building this “The Bull” Buggy.
If you want to do this project you could use the differenct color for the car.
Note: The number in the bracket is the Lego’s Design ID.
Lego Parts
4 nos. – 1×16 Technic Brick (#3703)
2 nos. – 1×12 Technic Brick (#3895)
2 nos. – 1×10 Technic Bricks (#2730)
2 nos. – 1×8 Technic Brick (#3702)
8 nos. – 1×6 Technic Brick (#3894)
2 nos. – 1×4 Technic Brick (#3701)
5 nos. – Technic Brick 1X2, Ø4.9 (#3700)
1 no. – Roof Tile 2X2/45° (#3039)
2 nos. – Angle Element [1], 0 Degrees (#32013)
2 nos. – Angle Element [4], 135 Degrees (#32192)
2 nos. – Angle Element [5], 112.5 Degrees (#32015)
4 nos. – 1×4 Plate (#3710)
4 nos. – 1×6 Plate (#3666)
6 nos. – 2×4 Technic Plate (#3709)
4 nos. – 2×6 Technic Plate (#32001)
4 nos. – 2×2 Plates (#3022)
2 nos. – 1x2x2 Corner Plate (#2420)
4 nos. – Technic Bush 1/2 Toothed Type II (#4265b)
1 no. – Pin Connector Round (Pin Joiner Round) (#75535)
19 nos. – Connector Peg with Friction (#2780)
4 nos. – Connector Peg with Cross Axle (#6562)
2 nos. – Perpendicular Axle Connector (#32039)
2 no. – Axle Joiner (#6538b)
2 nos. – Cross Axle 2M with Groove (#32062)
1 no. – Cross Axle 3M with Knob (#6587)
2 nos. – Cross Axle 3M (#4519)
2 nos. – Cross Axle 4M (#3705)
2 nos. – Cross Axle 5M (#32073)
4 nos. – Cross Axle 6M (#3706)
1 no. – Cross Axle 10M (#3737)
2 nos. – Bush for Axle (#6590)
4 nos. – Hinge Plate 1 x 4 Swivel Top/Base (#73983)
3 no. – 1×6 Plate with Toothed End (#4262)
1 no. – 1×4 Gear Rack (#3743)
2 nos. – Hose Rigid 3mm D. 5L / 4.0cm (#75c05)
2 nos. – Technic Level 3M (#6632)
Steering Kit
2 nos. – Steering Arm (#4261)
2 nos. – 8-Tooth Gear (#3647)
Gear Kit
1 no. – 24-Tooth Crown Gear Type III (#3650)
Wheels and Rims
Front
2 nos. – Technic Wedge Belt Wheel (Pulley) (#4185)
2 nos. – Wedge Belt Wheel Tire (#70162)
Rear
2 nos. – Technic Wheel 20 x 30
2 nos. – Black Tire 20 x 30 Solid Balloon (4266 / 2857)
Others
Servo Mount or modify LEGO plates to use as servo mount. (Download the stl file below)
9g Micro Servo (T Pro SG90) or similar.
2mm Shaft Adapter for Lego Wheels (Pololu part #1001)
(or Modified Connector Peg/Cross Axle (#6562) to fit the shaft of DC toy motor.)
LEGO compatible Motor Housing for Round 24mm dia. 9V motor. (STL file can be download from my “The Bull” Buggy project.)
or if you do not have 3D Printer (I wish I have one too!) You could order one from Shapeways, here.)
Round DC Motor: 9V, 24mm in diameter.
Two M2.3, 4 mm long round head screws (if not come with the 9V, 24mm. dia. round motor.)
DIY Arduino and Motor Driver PCB (See detail in Step 9)
XBee Module
XBee breakout board (I used XB-Buddy Basic Kit, Jameco Part no. 2163680)
Hook up Wire
Tools
Super Glue
X-ACTO Knife
Sand paper
Files
Hand Drill & bits
For more detail: “12 Thumbs” R/C LEGO Dragster
- What inspired the name 12 Thumbs?
The distance between the front and rear wheelbases measured approximately 12 inches, and the author discovered that a thumb is historically equivalent to an inch. - How many LEGO components does the project use?
The build utilizes 129 LEGO components, excluding the Arduino and motor controller PCB. - Can I use different colors for the car?
Yes, the article notes that you could use different colors for the car while following the same design. - What type of servo fits the 3D printed mount?
The mount fits any 9g micro servo with dimensions of 23 x 12.2 x 27mm, such as the Tower Pro SG92R. - How is the car controlled wirelessly?
The car is controlled via an XBee module, though other radio types like Bluetooth or WIFI are also possible. - What power supply options are available for the motor?
The battery compartment fits a 9V battery or a small 7.5V rechargeable LiPo battery. - What happened during the first run of the car?
The car ran so fast at speed setting 3 that the author lost steering control and crashed into a wall, causing the front wheels to fly off. - Where can I find the STL file for the servo mount?
The STL file is attached in Step 1 and can also be viewed on the author's 123D project page.