Summary of Garage Genie – Parking & Remote Control using Arduino
The Garage Genie Parking & Remote Control project uses an Arduino-based system combined with OpenHAB to automate garage parking and door control. It includes ultrasonic sensors to detect vehicle presence and distance, LED “traffic lights” to guide parking, remote garage door operation via smartphone apps using a modified garage door remote with a relay, and an optional webcam stream. The system provides real-time status via smartphone and enables home automation features like email alerts and voice announcements. The project emphasizes a wired Ethernet setup for reliability and security with user authentication and encrypted communication.
Parts used in the Garage Genie Parking & Remote Control:
- Ultrasonic distance sensor
- Arduino Uno clone
- Arduino prototype shield
- Arduino Ethernet shield
- Relay module
- Color LEDs
- Dupont cables
- 5V AC adapter (USB charger)
- Soldered spare garage door remote
- Webcam (optional)
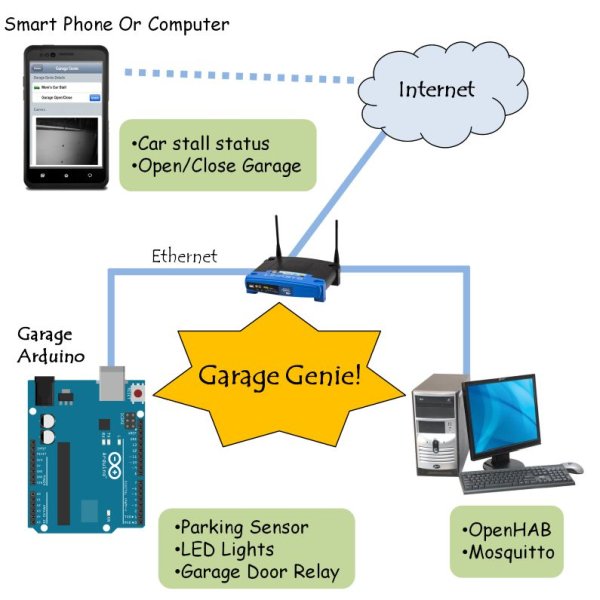
The Garage Genie Parking & Remote Control is a car automation Arduino gadget. Click on the two images above to see the animated explanation. It aims to do a few things:
1. The “traffic lights” tells you when you’ve inched your car up close enough when parking. The lights are control by an Arduino using an ultrasonic distance sensor.
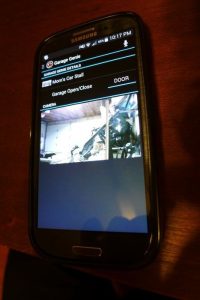
2. The ultrasonic distance sensor tells the system whether a car is parked in the stall or not. Using iPhone or Android app, you can check whether or not someone’s car is in the garage.
3. Non-invasive remote open/close operation of the garage door via smart phone app. I’m using a spare garage door remote so that you don’t need to cut into existing wiring.
4. Webcam view of garage if you have a webcam in the garage.
The Garage Genie is part of my series of Instructables for Arduino devices based on an awesome, open source home automation platform called OpenHAB.
Here is how the pieces of the Garage Genie fit together. Continue on for a step-by-step of how it’s built.

Don’t know if it’ll amount to anything. But I’m in the Instructables Contest, if you want to vote. Thanks!
Step 1: Parts List and Initial Hardware Prep
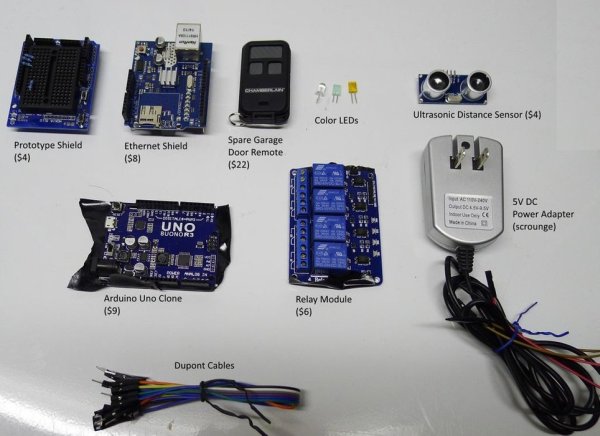
Here’s the parts list.
- Ultrasonic distance sensor (less than $4)
- Arduino Uno clone ($9)
- Arduino prototype shield ($4)
- Arduino ethernet shield ($8)
- Relay module ($6)
- Color LEDs
- Dupont cables
- 5V AC adapter (like from a smart phone / USB charger)
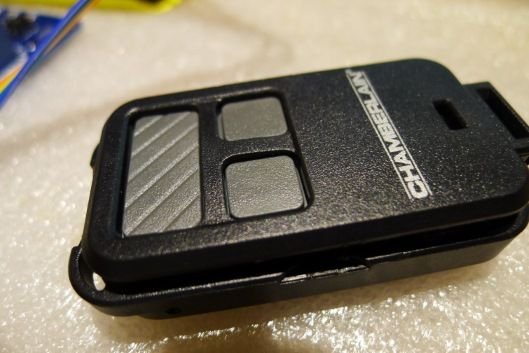
The initial hardware preparation involves putting the Arduino together and getting the garage door remote ready for wiring. I’ve combined these tasks into this step.
Once you have the parts, assemble the Arduino components (Arduino, ethernet shield, prototype shield) into a stack like this. Pretty simple.

Next, we’ll be using the relay module to actuate the button on the spare garage door remote. To do this, we need to prepare the remote. First, remove the circuit board and solder wires to one of the buttons. This following series of pictures should give you a good idea of what to do.
Here’s the circuit board removed from the remote housing.
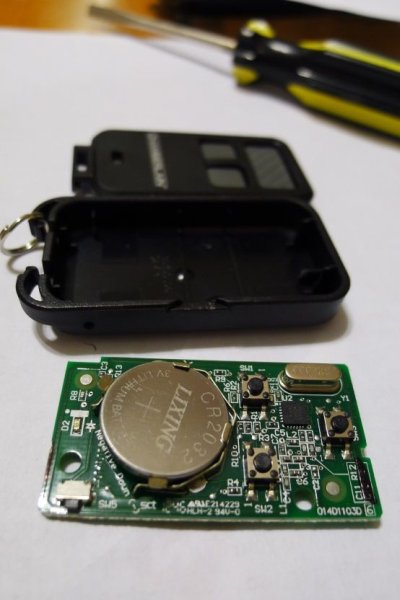
Next, decide which button corresponds to the garage door open button. Use a multimeter to determine which two pads/legs on the button are shorted when the button is pressed. Solder a few inches of wire to these two legs. You should take the batteries out of the remote so you don’t accidentally operate the garage door.

If you measure the continuity across the two wires, it should be an open circuit. Once the wires are installed, try to open garage by touching the two wires together. It won’t work because the batteries aren’t installed. Put in the battery and try again.
Ok, next!
Step 2: Software Setup
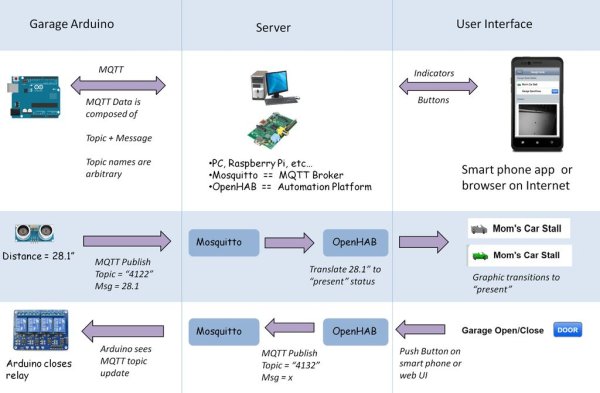
The data flow diagram above explains how the three pieces of software (Arduino, Mosquitto, and OpenHAB) work together to get the functionality we’re after. This one diagram pretty much explains how all the communications work. Hopefully it makes sense.
Let’s take care of the PC side by installing the two programs Mosquitto and OpenHAB.
Mosquitto
Install the MQTT broker called Mosquitto. Once installed, Mosquitto can simply be ran by double clicking on the executable after installation. Make sure Mosquitto is running by navigating to the program folder and running this following command in the command prompt window (“dos prompt”).
cd C:\”Program Files (x86)”\mosquitto
mosquitto_sub -h localhost -t #
This subscribes to all topics on the MQTT broker. When numbers come in from the Arduino’s ultrasonic distance sensor in later steps, you’ll see them appear here. And when you push the garage door open button, you’ll also see that activity here. Use ctrl_c to cancel out of this.
OpenHAB
OpenHAB is the main server. It can be installed on a PC, Mac, or Raspberry Pi (and other similar single board computer). The Raspberry Pi is ideal for this since it’s very energy efficient, but for first time users, a Windows or Mac installation will be easiest.
Install OpenHAB according to the instructions on the OpenHAB wiki. Get familiar with some of the OpenHAB files like the sitemap, item, and rules file. The wiki does a good job explaining this, so I’ll forgo the OpenHAB explanation myself.
Once installed, use the attached text file and add the appropriate sections to the configuration of the item, sitemap, and rules files. Here’s the the graphics used for the “car present” indicator, but you’re free to use your own if you’re artistically incline. The images go in \webapps\images of the OpenHAB folder.
https://www.instructables.com/files/deriv/F0E/GPI7/…
https://www.instructables.com/files/deriv/FOD/7LGJ/…
https://www.instructables.com/files/deriv/F3X/4R03/…
That should be it for OpenHAB. If you’re using Windows, double click the “start.bat” file in the OpenHAB folder to start running it. Open a browser and go to “http://localhost:8080/openhab.app?sitemap=demo” to view the interface.
For the mobile app, download it from the app store and enter the IP address of the PC hosting OpenHAB. You’ll have to “port forward” and create a “dynamic DNS” in order to use the app outside of your home wifi network. I won’t go over this detail, but google it and you shall find.
Step 3: Parking Lights Circuit
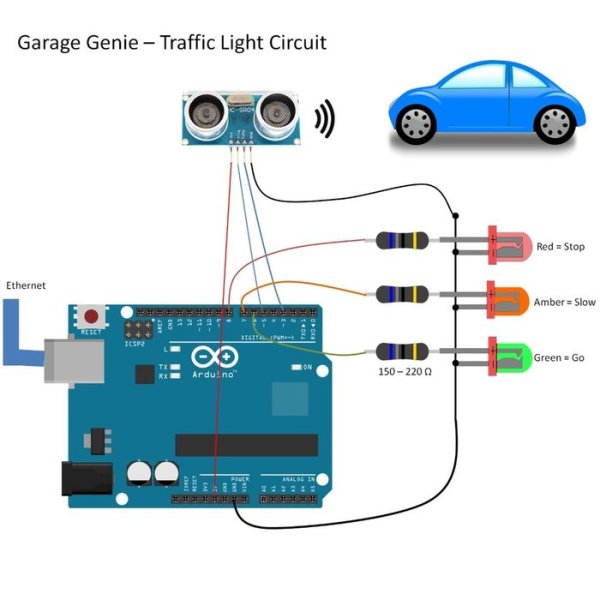
Next, assemble the circuit for the LED lights. The resistor values can be anything from 150 ohms to 220 ohms, depending on how hard you want to drive the LED’s.
Step 4: Non-Invasive Remote Garage Door Control


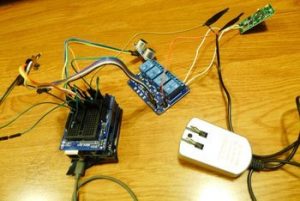
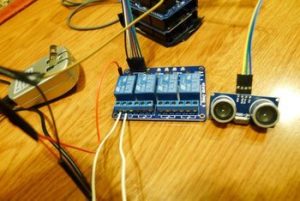
Next, wire up the relay circuit as shown above. You should already have the circuit board for the remote garage door opener ready. The two wires from the remote control just needs to be wired into the first relay’s normally open terminal.
I don’t recommend powering the relay coils using the Arduino. You should use a separate power supply, like a 5V USB charger. I used a spare one I had laying around. They’re so common you likely have one you’re not using. Cut off the ends, solder dupont cables to them so you can simply connect them to the male JD-Vcc pin on the relay. Connect the common wire from the AC adapter to the GND on the Arduino, as shown in the wiring diagram.
Step 5: Upload the Arduino Code
At this point, you may want to take the battery out of the remote again so that you can test communications without needlessly operating the garage door.
Upload the following Arduino code. Check out the header comments to determine what edits are required. You’ll need to change the IP address of the server. You may also want to edit the color ranges for the LED’s. You can use the serial monitor to see whether or not the Arduino is connecting to the MQTT server, and what the distance sensor is seeing. There are lots of println statements in the code for troubleshooting.
Step 6: Webcam View
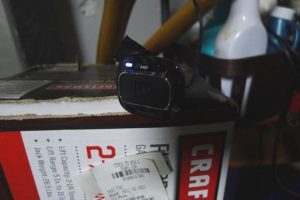
You can use any webcam that has a mjpeg stream and that you can access on LAN without password. Edit the OpenHAB sitemap file and change the IP to the IP address of your webcam.
Frame label=”Camera” {
Video url=”http://192.168.1.71:88″ encoding=”mjpeg”
//Video url=”http://204.248.124.202/mjpg/video.mjpg?camera=1″ encoding=”mjpeg”
}//end frame “camera”
I happen to be using a USB webcam connected to a small Linux computer, running a program called Motion. I won’t prescribe what webcam to use, since there’s so much variety. If you’re running the server on a Pi, you can put this Pi in the garage and run Motion and a USB webcam off of it.
Step 7: Automation
Now, you might be asking – “what’s the use of the car presence indicator if there is already a webcam view?”
Good question! First, I like making tutorials that can be used by people in different circumstances. And some people don’t have a webcam in the garage. So they would be using the presence indicator.
But, the more interesting thing for having a digital bit represent “car present” status is that now you can do automation! A simple example is to set up OpenHAB to email you when someone’s car arrives in the garage, and announce that person’s arrival.
rule “send email when arrive”
when
Item itm_garage_dist changed from CLOSED to OPEN
then
say(“Mom is home”)
sendMail(“[email protected]”, “mom is home” , “just now”)
end
The speaker on the computer will perform a text-to-voice action and announce “mom is home”. Then it sends an email. If you have fancy Sonos speakers (which I don’t), OpenHAB can control those speakers to start playing music when you come home.
If you want an idea of how the text-to-speech sounds like, take a look at this video for my laundry room automation.
Step 8: Remote Access, Security, and Tips
Since this is opening a garage door, you’ll want to make sure you authenticate and encrypt the communication between the mobile app and your server. This is pretty easy to do with OpenHAB. First, create a user and password on the server. Under ~/OpenHAB/configurations/users.cfg, add a user and password like this:
user1=password1
user2=password2
Once that’s done, you need to be able to access OpenHAB via the encrypted port 8443. Test this out first by going through your web browser and going to
https://192.168.x.x:8443/openhab.app?sitemap=demo
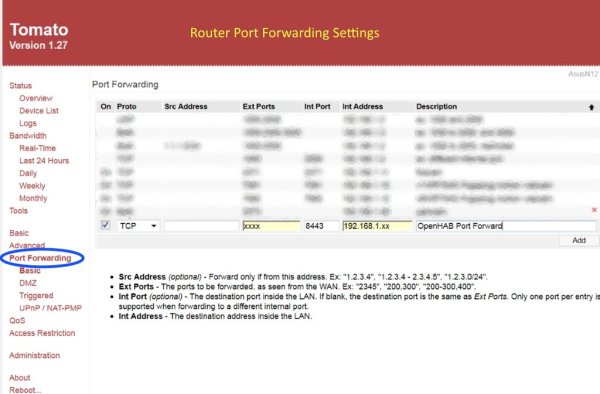
If that works, you’ll have to setup a port forward in your router to access the server at port 8443. To make it easier, setup up dynamic DNS so you don’t have to remember your home IP address, which might change.
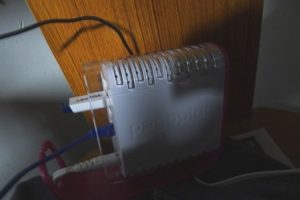
This project is purposely made to work with a hard ethernet connection so no wireless gateways are needed. If you don’t have ethernet to your garage, it’s pretty easy to make a wireless bridge using a cheap $20 “tomato” or “dd-wrt” compatible router.
Step 9: Conclusion & Video Demo
This video demo goes over all aspects of the Garage Genie.
OpenHAB has been around for a couple of years now, but it’s mostly been used by people who are automating commercial products like Sonos speakers or Phillips Hue lights. There hasn’t been a lot of information on how to use Arduino with OpenHAB. It’s odd considering there’s so much potential for Arduino users to integrate their custom Arduino gadgets to OpenHAB.This Garage Genie project originally started out as a request from commenters on my other Uber Home Automation Instructable. The Uber project focused on wireless Arduino sensors, but a lot of people wanted a more simple wired setup. This project is a good complement because it shows how to use OpenHAB with a wired Arduino for inputs and outputs. The code is easily adaptable for whatever sensor and output you might need. For example, you can add a PIR sensor to the garage Arduino and have it act as a security device; turn on a light, play a loud audio file, and send an email notification if an intruder is detected.Once you have the infrastructure in place, the possibilities are endless!
Source : Garage Genie – Parking & Remote Control using Arduino