Aim:
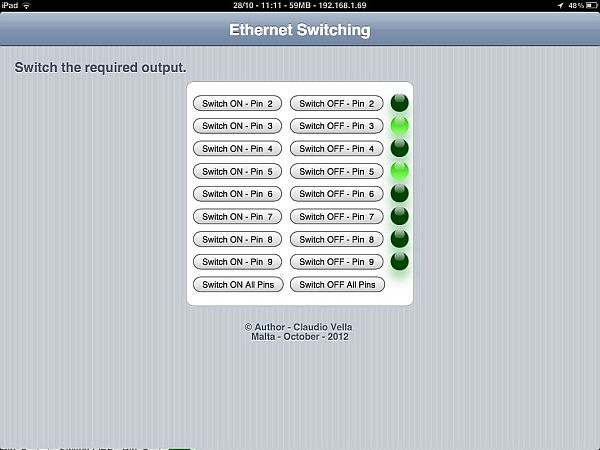
Switch relays from the ethernet or the internet, using your mobile, tablet or computer with a nice graphical user interface.
Update V4.06
Please read the below steps to Step 2 if you are viewing this article for the first time.
Please go to step 3 for the latest revision which is V4.06
Material:
* Arduino MEGA 2560
* Arduino Ethernet Shield
* Relay board
* RJ45 cable
Tools:
* Arduino Software version 1.0.1 (downloadable from Arduino Website )
* A / B USB cable
Infrastructure:
* Internet access with fixed IP for Arduino
* Access to your router to share the port for internet access
* Testing devices – your pc, mobile etc
Disclaimer:
* This project was tested with iPhone 3GS, iPad 2 and MacBook Pro running Safari and PC running Safari, Firefox, Opera and IE.
* This project was created on October 2012 with the mentioned material.
* Binary sketch size: 22,322 bytes (of a 258,048 byte maximum).
* This sketch does not offer any sort of authentification, therefore if required to be used from outside the network or from the internet, I suggest to configure your network to connect trough VPN. Nowadays many routers and smartphones support VPN.
Step 1: Ethernet Switching – with Arduino – Description
Description:
* With this project, I had not included any images, or links to images from the internet. It only make use of CSS3 and HTML5.
* The simulated LEDs are created from CSS3 code.
* Some browsers does not make full use of CSS3 and HTML5. Thus I suggest using Safari.
Step 2: Ethernet Switching – with Arduino – Program
//Ethernet Switch
//
//Intro:
//This will swich on and off outputs trough your mobile device.
//No images or links to images. CSS3 and HTML5 use.
//Though it work with other web browser, we suggest Safari for best experiance.
//
//Version: Web Server Ethernet Switching Version 3.05
//Author: Claudio Vella – Malta
//Initial code from: http://bildr.org/2011/06/arduino-ethernet-pin-control/
//Made lot of comments for beginners.
//ARDUINO 1.0+ ONLY
#include <Ethernet.h>
#include <SPI.h>
////////////////////////////////////////////////////////////////////////
//CONFIGURE
////////////////////////////////////////////////////////////////////////
//IP manual settings
byte ip[] = { 192, 168, 1, 177 }; //Manual setup only
byte gateway[] = { 192, 168, 1, 254 }; //Manual setup only
byte subnet[] = { 255, 255, 255, 0 }; //Manual setup only
// if need to change the MAC address (Very Rare)
byte mac[] = { 0xDE, 0xAD, 0xBE, 0xEF, 0xFE, 0xED };
//Ethernet Port
EthernetServer server = EthernetServer(80); //default html port 80
//The number of outputs going to be switched.
int outputQuantity = 8; //when added to outputLowest result should not exceed 10
//The lowest output pin we are starting from
int outputLowest = 2; //Should be between 2 to 9
////////////////////////////////////////////////////////////////////////
// Variable declaration
int outp = 0;
boolean printLastCommandOnce = false;
boolean printButtonMenuOnce = false;
boolean initialPrint = true;
String allOn = “”;
String allOff = “”;
boolean reading = false;
boolean readInput[10]; //Create a boolean array for the maximum ammount.
//Beginning of the program
void setup(){
Serial.begin(9600);
//Pins 10,11,12 & 13 are used by the ethernet shield
//Set pins as Outputs
for (int var = outputLowest; var < outputLowest + outputQuantity; var++) {
pinMode(var, OUTPUT);
}
//Setting up the IP address. Comment out the one you dont need.
//Ethernet.begin(mac); //for DHCP address. (Address will be printed to serial.)
Ethernet.begin(mac, ip, gateway, subnet); //for manual setup. (Address is the one configured above.)
server.begin();
Serial.println(Ethernet.localIP());
}
void loop(){
// listen for incoming clients, and process requests.
checkForClient();
}
void checkForClient(){
EthernetClient client = server.available();
if (client) {
// an http request ends with a blank line
boolean currentLineIsBlank = true;
boolean sentHeader = false;
while (client.connected()) {
if (client.available()) {
if(!sentHeader){
// send a standard http response header
client.println(“HTTP/1.1 200 OK”);
client.println(“Content-Type: text/html”);
client.println(“Connnection: close”);
client.println();
client.println(“<!DOCTYPE HTML>”);
client.println(“<head>”);
// add page title
client.println(“<title>Ethernet Switching</title>”);
client.println(“<meta name=\”description\” content=\”Ethernet Switching\”/>”);
// add a meta refresh tag, so the browser pulls again every 5 seconds:
client.println(“<meta http-equiv=\”refresh\” content=\”10; url=/\”>”);
// add other browser configuration
client.println(“<meta name=\”apple-mobile-web-app-capable\” content=\”yes\”>”);
client.println(“<meta name=\”apple-mobile-web-app-status-bar-style\” content=\”default\”>”);
client.println(“<meta name=\”viewport\” content=\”width=device-width, user-scalable=no\”/>”);
//inserting the styles data, usually found in CSS files.
client.println(“<style type=\”text/css\”>”);
client.println(“”);
//This will set how the page will look graphically
client.println(“html { height:100%; }”);
client.println(” body {“);
client.println(” height: 100%;”);
client.println(” margin: 0;”);
client.println(” font-family: helvetica, sans-serif;”);
client.println(” -webkit-text-size-adjust: none;”);
client.println(” }”);
client.println(“”);
client.println(“body {“);
client.println(” -webkit-background-size: 100% 21px;”);
client.println(” background-color: #c5ccd3;”);
client.println(” background-image:”);
client.println(” -webkit-gradient(linear, left top, right top,”);
client.println(” color-stop(.75, transparent),”);
client.println(” color-stop(.75, rgba(255,255,255,.1)) );”);
client.println(” -webkit-background-size: 7px;”);
client.println(” }”);
client.println(“”);
client.println(“.view {“);
client.println(” min-height: 100%;”);
client.println(” overflow: auto;”);
client.println(” }”);
client.println(“”);
client.println(“.header-wrapper {“);
client.println(” height: 44px;”);
client.println(” font-weight: bold;”);
client.println(” text-shadow: rgba(0,0,0,0.7) 0 -1px 0;”);
client.println(” border-top: solid 1px rgba(255,255,255,0.6);”);
client.println(” border-bottom: solid 1px rgba(0,0,0,0.6);”);
client.println(” color: #fff;”);
client.println(” background-color: #8195af;”);
client.println(” background-image:”);
client.println(” -webkit-gradient(linear, left top, left bottom,”);
client.println(” from(rgba(255,255,255,.4)),”);
client.println(” to(rgba(255,255,255,.05)) ),”);
client.println(” -webkit-gradient(linear, left top, left bottom,”);
client.println(” from(transparent),”);
client.println(” to(rgba(0,0,64,.1)) );”);
client.println(” background-repeat: no-repeat;”);
client.println(” background-position: top left, bottom left;”);
client.println(” -webkit-background-size: 100% 21px, 100% 22px;”);
client.println(” -webkit-box-sizing: border-box;”);
client.println(” }”);
client.println(“”);
client.println(“.header-wrapper h1 {“);
client.println(” text-align: center;”);
client.println(” font-size: 20px;”);
client.println(” line-height: 44px;”);
client.println(” margin: 0;”);
client.println(” }”);
client.println(“”);
client.println(“.group-wrapper {“);
client.println(” margin: 9px;”);
client.println(” }”);
client.println(“”);
client.println(“.group-wrapper h2 {“);
client.println(” color: #4c566c;”);
client.println(” font-size: 17px;”);
client.println(” line-height: 0.8;”);
client.println(” font-weight: bold;”);
client.println(” text-shadow: #fff 0 1px 0;”);
client.println(” margin: 20px 10px 12px;”);
client.println(” }”);
client.println(“”);
client.println(“.group-wrapper h3 {“);
client.println(” color: #4c566c;”);
client.println(” font-size: 12px;”);
client.println(” line-height: 1;”);
client.println(” font-weight: bold;”);
client.println(” text-shadow: #fff 0 1px 0;”);
client.println(” margin: 20px 10px 12px;”);
client.println(” }”);
client.println(“”);
client.println(“.group-wrapper table {“);
client.println(” background-color: #fff;”);
client.println(” -webkit-border-radius: 10px;”);
client.println(” -moz-border-radius: 10px;”);
client.println(” -khtml-border-radius: 10px;”);
client.println(” border-radius: 10px;”);
client.println(” font-size: 17px;”);
client.println(” line-height: 20px;”);
client.println(” margin: 9px 0 20px;”);
client.println(” border: solid 1px #a9abae;”);
client.println(” padding: 11px 3px 12px 3px;”);
client.println(” margin-left:auto;”);
client.println(” margin-right:auto;”);
client.println(” -moz-transform :scale(1);”); //Code for Mozilla Firefox
client.println(” -moz-transform-origin: 0 0;”);
client.println(” }”);
client.println(“”);
//how the green (ON) LED will look
client.println(“.green-circle {“);
client.println(” display: block;”);
client.println(” height: 23px;”);
client.println(” width: 23px;”);
client.println(” background-color: #0f0;”);
//client.println(” background-color: rgba(60, 132, 198, 0.8);”);
client.println(” -moz-border-radius: 11px;”);
client.println(” -webkit-border-radius: 11px;”);
client.println(” -khtml-border-radius: 11px;”);
client.println(” border-radius: 11px;”);
client.println(” margin-left: 1px;”);
client.println(” background-image: -webkit-gradient(linear, 0% 0%, 0% 90%, from(rgba(46, 184, 0, 0.8)), to(rgba(148, 255, 112, .9)));@”);
client.println(” border: 2px solid #ccc;”);
client.println(” -webkit-box-shadow: rgba(11, 140, 27, 0.5) 0px 10px 16px;”);
client.println(” -moz-box-shadow: rgba(11, 140, 27, 0.5) 0px 10px 16px; /* FF 3.5+ */”);
client.println(” box-shadow: rgba(11, 140, 27, 0.5) 0px 10px 16px; /* FF 3.5+ */”);
client.println(” }”);
client.println(“”);
//how the black (off)LED will look
client.println(“.black-circle {“);
client.println(” display: block;”);
client.println(” height: 23px;”);
client.println(” width: 23px;”);
client.println(” background-color: #040;”);
client.println(” -moz-border-radius: 11px;”);
client.println(” -webkit-border-radius: 11px;”);
client.println(” -khtml-border-radius: 11px;”);
client.println(” border-radius: 11px;”);
client.println(” margin-left: 1px;”);
client.println(” -webkit-box-shadow: rgba(11, 140, 27, 0.5) 0px 10px 16px;”);
client.println(” -moz-box-shadow: rgba(11, 140, 27, 0.5) 0px 10px 16px; /* FF 3.5+ */”);
client.println(” box-shadow: rgba(11, 140, 27, 0.5) 0px 10px 16px; /* FF 3.5+ */”);
client.println(” }”);
client.println(“”);
//this will add the glare to both of the LEDs
client.println(” .glare {“);
client.println(” position: relative;”);
client.println(” top: 1;”);
client.println(” left: 5px;”);
client.println(” -webkit-border-radius: 10px;”);
client.println(” -moz-border-radius: 10px;”);
client.println(” -khtml-border-radius: 10px;”);
client.println(” border-radius: 10px;”);
client.println(” height: 1px;”);
client.println(” width: 13px;”);
client.println(” padding: 5px 0;”);
client.println(” background-color: rgba(200, 200, 200, 0.25);”);
client.println(” background-image: -webkit-gradient(linear, 0% 0%, 0% 95%, from(rgba(255, 255, 255, 0.7)), to(rgba(255, 255, 255, 0)));”);
client.println(” }”);
client.println(“”);
//and finally this is the end of the style data and header
client.println(“</style>”);
client.println(“</head>”);
//now printing the page itself
client.println(“<body>”);
client.println(“<div class=\”view\”>”);
client.println(” <div class=\”header-wrapper\”>”);
client.println(” <h1>Ethernet Switching</h1>”);
client.println(” </div>”);
client.println(“<div class=\”group-wrapper\”>”);
client.println(” <h2>Switch the required output.</h2>”);
client.println();
//This is for the arduino to construct the page on the fly.
sentHeader = true;
}
char c = client.read();
if(reading && c == ‘ ‘){
reading = false;
}
// Serial.print(c);
if(c == ‘?’) {
reading = true; //found the ?, begin reading the info
}
if(reading){
if(c == ‘H’) {outp = 1;}
if(c == ‘L’) {outp = 0;}
Serial.print(c); //print the value of c to serial communication
//Serial.print(outp);
//Serial.print(‘\n’);
switch (c) {
case ‘2’:
//add code here to trigger on 2
triggerPin(2, client, outp);
break;
case ‘3’:
//add code here to trigger on 3
triggerPin(3, client, outp);
break;
case ‘4’:
//add code here to trigger on 4
triggerPin(4, client, outp);
break;
case ‘5’:
//add code here to trigger on 5
triggerPin(5, client, outp);
//printHtml(client);
break;
case ‘6’:
//add code here to trigger on 6
triggerPin(6, client, outp);
break;
case ‘7’:
//add code here to trigger on 7
triggerPin(7, client, outp);
break;
case ‘8’:
//add code here to trigger on 8
triggerPin(8, client, outp);
break;
case ‘9’:
//add code here to trigger on 9
triggerPin(9, client, outp);
break;
}
}
if (c == ‘\n’ && currentLineIsBlank){
printLastCommandOnce = true;
printButtonMenuOnce = true;
triggerPin(777, client, outp); //Call to read input and print menu. 777 is used not to update any outputs
break;
}
}
}
//Set Variables Before Exiting
printLastCommandOnce = false;
printButtonMenuOnce = false;
allOn = “”;
allOff = “”;
client.println(“\n<h3 align=\”center\”>© Author – Claudio Vella <br> Malta – October – 2012</h3>”);
client.println(“</div>\n</div>\n</body>\n</html>”);
delay(1); // give the web browser time to receive the data
client.stop(); // close the connection:
}
}
void triggerPin(int pin, EthernetClient client, int outp){
//Switching on or off outputs, reads the outputs and prints the buttons
//Setting Outputs
if (pin != 777){
if(outp == 1) {
digitalWrite(pin, HIGH);
}
if(outp == 0){
digitalWrite(pin, LOW);
}
}
//Refresh the reading of outputs
readOutputStatuses();
//Prints the buttons
if (printButtonMenuOnce == true){
printHtmlButtons(client);
printButtonMenuOnce = false;
}
}
//print the html buttons to switch on/off channels
void printHtmlButtons(EthernetClient client){
//Start to create the html table
client.println(“”);
//client.println(“<p>”);
client.println(“<FORM>”);
client.println(“<table border=\”0\” align=\”center\”>”);
//Start printing button by button
for (int var = outputLowest; var < outputLowest + outputQuantity; var++) {
//set command for all on/off
allOn += “H”;
allOn += var;
allOff += “L”;
allOff += var;
//Print begining of row
client.print(“<tr>\n”);
//Prints the ON Buttons
client.print(” <td><INPUT TYPE=\”button\” VALUE=\”Switch ON – Pin “);
client.print(var);
client.print(“\” onClick=\”parent.location=’/?H”);
client.print(var);
client.print(“‘\”></td>\n”);
//Prints the OFF Buttons
client.print(” <td><INPUT TYPE=\”button\” VALUE=\”Switch OFF – Pin “);
client.print(var);
client.print(“\” onClick=\”parent.location=’/?L”);
client.print(var);
client.print(“‘\”></td>\n”);
//Print first part of the Circles or the LEDs
if (readInput[var] == true){
client.print(” <td><div class=’green-circle’><div class=’glare’></div></div></td>\n”);
}else
{
client.print(” <td><div class=’black-circle’><div class=’glare’></div></div></td>\n”);
}
//Print end of row
client.print(“</tr>\n”);
}
//Prints the ON All Pins Button
client.print(“<tr>\n<td><INPUT TYPE=\”button\” VALUE=\”Switch ON All Pins”);
client.print(“\” onClick=\”parent.location=’/?”);
client.print(allOn);
client.print(“‘\”></td>\n”);
//Prints the OFF All Pins Button
client.print(“<td><INPUT TYPE=\”button\” VALUE=\”Switch OFF All Pins”);
client.print(“\” onClick=\”parent.location=’/?”);
client.print(allOff);
client.print(“‘\”></td>\n<td></td>\n</tr>\n”);
//Closing the table and form
client.println(“</table>”);
client.println(“</FORM>”);
//client.println(“</p>”);
}
//Reading the Output Statuses
void readOutputStatuses(){
for (int var = outputLowest; var < outputLowest + outputQuantity; var++) {
readInput[var] = digitalRead(var);
//Serial.print(readInput[var]);
}
}
For more detail: Ethernet Switching – with Arduino