Summary of Arduino measures heart beat rate from fingertip
This article demonstrates how to build a heart rate meter using an Arduino Uno, an Easy Pulse Plugin sensor, and a 4-digit MAX7219-based seven segment LED display. The device measures heart rate by processing pulse signals from the fingertip sensor and displays beats per minute on the LED module, updating approximately every 3 seconds. The Easy Pulse Plugin uses photoplethysmography and interfaces with Arduino's analog inputs, while the display uses only three I/O pins for serial communication. The project is straightforward, requiring simple connections and coding via the Arduino IDE.
Parts used in the Arduino Heart Rate Meter:
- Arduino Uno (or compatible board like Crowduino Uno SD)
- Easy Pulse Plugin sensor
- Fingertip pulse sensor with 3.5mm stereo jack
- 4-digit MAX7219-based serial seven segment LED display
- Male-to-female jumper cables
The PIC16F628A based heart rate meter is one of the most popular projects published on Embedded Lab. In this article, I am going to show how to replicate the same project using a simpler platform like Arduino. The Arduino heart rate meter will use Arduino Uno, Easy Pulse Plugin, and 4-digit SPI seven segment LED display module. It computes the heart beat rate by processing the analog pulse signal output from the Easy Pulse Plugin sensor and displays it on the seven segment display module. The heart beat rate is refreshed every ~3 sec.
What will you need?
The following things are required to build this project.
1. Arduino Uno or any other compatible board. I am using Crowduino Uno SD board for this project.
2. Easy Pulse Plugin : A pulse sensor based on Photoplethysmography principle. It directly plugs on to the left-side headers of Arduino Uno.
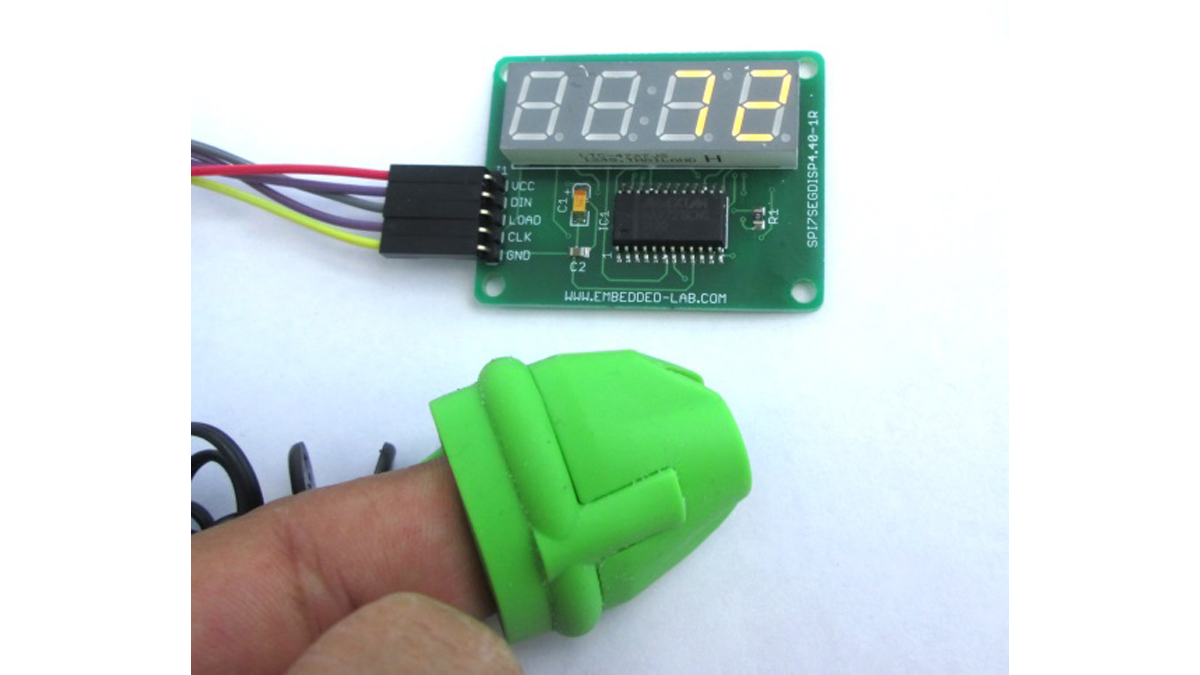
3. 4-digit serial seven segment display: It is a MAX7219 based serial segment LED display that is easy to interface with Arduino using only 3 I/O pins.
4. Few male-to-female jumper cables.
Connecting things
The hardware setup of this project is pretty simple and straightforward. Here are the instructions to be followed for setting up the connections between Arduino, Easy Pulse Plugin, and the display.
- On Easy Pulse Plugin module, place the 2-pin shunt jumpers JP1 and JP2 to 5V and A0 positions, respectively. This configuration will allow the module to use the 5V power supply from the Arduino Uno board and connect the pulse output signal to the Arduino’s A0 ADC channel, when it is plugged in to the Arduino Uno board.
- Insert the fingertip pulse sensor jack to the 3.5mm stereo socket on the Easy Pulse Plugin board. Make sure it is inserted well as shown in the picture below. Then plugin the sensor module on to the left headers of the Arduino Uno board such that the A0 and A1 pins of the sensor module go into the A0 and A1 analog pins of the Arduino.
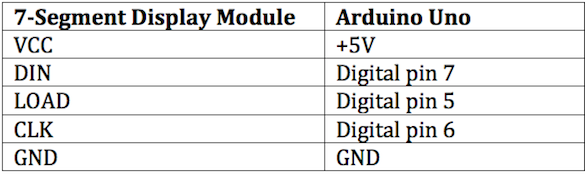
- Connect the 4-digit seven segment LED display to Arduino Uno as follows:
- The following picture shows the complete setup of this project.
- Load the project sketch to the Arduino board using Arduino IDE. You can download the Arduino sketch for this project from the link below.
- Wear the sensor on your index fingertip as shown in the picture below. Sit on a chair with your hand resting on some support. The heart rate meter will display the heart beat rate in beats per minute (bpm) on the seven segment LED module. If Arduino didn’t receive any pulse signal from the sensor, it will display ‘EEEE’ on the seven segment as an error message. Otherwise, the heart beat rate is refreshed every 3 seconds.
Read More: Arduino measures heart beat rate from fingertip