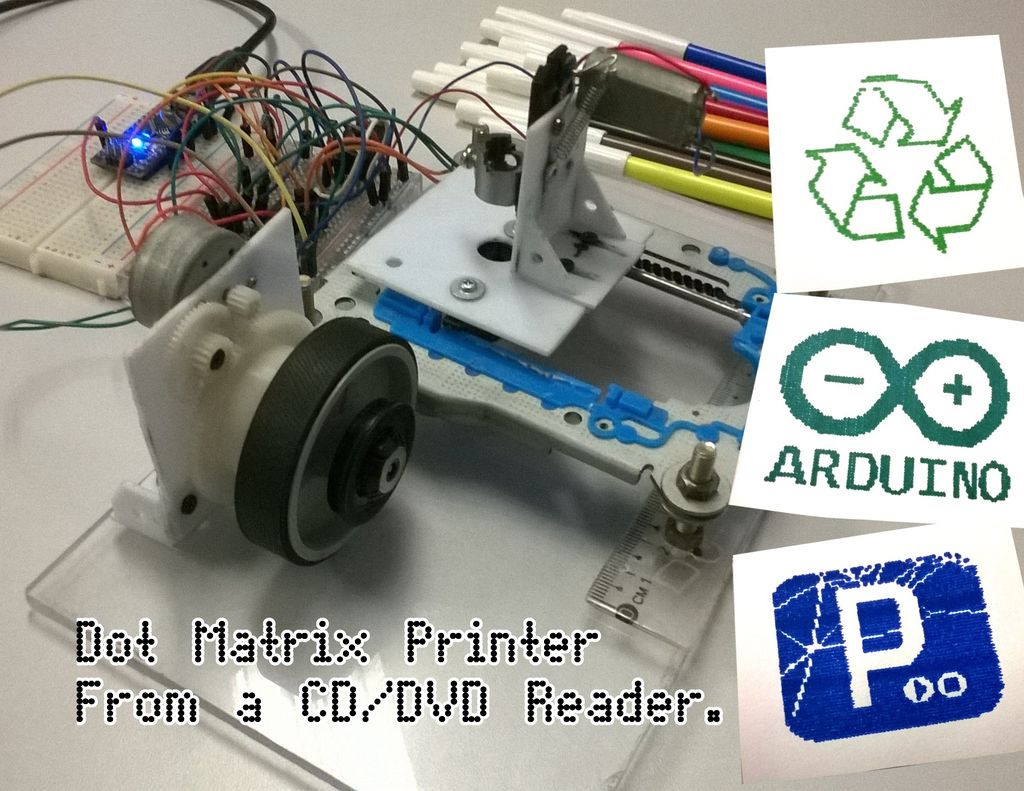
Summary of Dot Matrix Printer from a CD/DVD Reader with Arduino
This project guides building a dot matrix printer using recycled parts from a CD/DVD reader combined with an Arduino. To simplify construction, a DC motor replaces a stepper for paper feeding, and Arduino is used instead of a PIC microcontroller for ease of programming. The printer mechanism uses the sled from a CD/DVD drive for precise pen movement, and various recycled parts like gears and a wheel from an old printer facilitate assembling the moving components. The project emphasizes cost-effective DIY fabrication with basic tools like a dremel and common electronics components.
Parts used in the Dot Matrix Printer from a CD/DVD Reader with Arduino Project:
- CD/DVD Reader sled with stepper motor and laser module structure
- Gears from CD/DVD drive tray mechanism
- Acrylic sheet (or wood) for base
- Wheel from an old inkjet printer (for paper feed)
- Arduino Board (Uno, Nano, Mega, etc.)
- 2 x Diodes 1N4001 (or similar)
- 2 x TIP120 Transistors (or TIP122)
- 2 x 2.2k ohm resistors
- L293D Dual H-bridge IC (for stepper motor control)
- Breadboard(s)
- Jumper cables
- 7V power supply (adjusted from 12V source)
- Dremel tool (for cutting and drilling plastic)
- Spring mechanism (for pen lift)
Hey!
Some time ago while going through the pages here in Instructables, something catch my attention, a printer made of a CD reader, and i was amazed.
I thought: “This is incredible, I have to make one!”
I know that these kind of projects don’t always receive a “I made it”, because of its degree of difficulty, so I tried to make mine easier.
This project was started more than a year ago, because of the lack of time i could only work in it while on college recess, but this is great because I finish it during the remix contest, that’s fit perfectly in this case. If you think that I deserve your votes in the contests don’t be shy and hit the button, I really like your support.;)
I also wanted to make this a motivation, I don’t even dream of putting my hands in a laser cutter or 3D printer for making my projects, so I made this printer only using my dremel to cut the plastic pieces and gluing them together with super glue.
What can I say? It worked.
Step 1: The motivation and my ideas
Lets give a look in the Brunoip’s version and compare with mine:
-It uses a Stepper motor to pull the paper, it makes the circuit and programming more complex, but the precision it’s very reliable, I used instead a DC motor, making the circuit and programming easier, but losing a bit of the precision offered by the stepper.
-The pen makes a circular(that’s the word?!) movement, like a pointer in a clock, I opted for a vertical movement, and instead of using a H bridge chip to moving the motor in both directions, I used only a transistor to lower the pen, making a mechanism with a spring to lift it.
-Brunoip used a pic microcontroller as a brain for its printer, I opted for Arduino because it is easy to code, to program , to buy and is very popular here.
Brunoip, thank you for posting this creative instructable, without it I would never think of making mine 😉
Step 2: Enough talk, lets get the recicled parts!
You will need a CD or a DVD Reader/Writer, you can ask for one in the computer repairs workshop next to your house. You need the ‘sled’ from the DVD/CD reader with the stepper motor and laser module, it will be used to movement the pen mechanism.
The gears for opening the tray I used to make the pen mechanism. Here in my house I have boxes with parts that I toke from these drives for the years, so I not used pieces from only one drive. You can find many precious things in old electronics, think twice before putting them in the trash.
I used a piece of acrylic to make the base, but you can use wood or something like that, it only needs to be flat, that piece was from a friend that kindly gave me(acrylic is costly where I live). You can find a nice acrylic sheet in some LCD monitors, be careful opening them, you may hurt you fingers in some sharp parts.
The wheel used to pull the paper is from a old inkjet printer, You will see that I really like to reuse junk in my projects ;).
Step 3: Parts List (Arduino and electronics).
Ok, let’s see what we will need to control the printer.
To receive the data from computer and control the motors:
1 x Arduino Board (Uno, Nano, Mega…. whatever).
To controlling the DC motors:
2 x Diodes 1N4001 or similar.
2 x TIP120 Transistors (Can be the TIP122 too).
2 x 2.2k ohm Resistors (Red,Red,Red) ;
To control the stepper motor:
1 x L293D Dual bridge IC.
You will need too:
A breadboard, I used two halfs (yeah, i know, is what i had in hands).
Jumper cables.
A 7V power source( you can’t power the motors through USB). You can see my converter in the images, I’m using a adjustable module to get 7V from my 12V source.
Step 4: Starting the hard work.
*You can put your protection glasses now, i’m serious your eyes are too precious, be careful.*
You will need the laser sled from a CD or DVD reader, if you don’t know how to disassemble one don’t worry, I have a instructable teaching how to disassemble these drives, you can get some tips there.
Disassembling a CD/DVD reader and reusing its parts.
Hey! don’t disassemble the entire driver, check the first picture in this step, this piece we will use to carrying the pen.
First, loose the screws that fix the brushless motor (the one that makes the CD spin), after that, with care, retire the laser module from the structure.

Step 5: A long and careful journey, disassembling the laser.
We will need to retire many parts from the laser module, leaving only its structure. It will be use to attach the pen mechanism.
My advice is that you get a these made of plastic, like mine, because you will need to make a whole in it, there are the modules with a metal structure, like the one I disassembled in my other instructable, I think they are hard to drill but not impossible, remember to use protection glasses.
You will have to take all the electronics and glass, be careful here, you can cut yourself or hurt your eyes, see the pictures to know how to proceed, after having only the plastic structure make a hole like in the pictures, where the pen will pass.
For more detail: Dot Matrix Printer from a CD/DVD Reader with Arduino