Here’s a six word tragedy:
My arduino needs four AA batteries.
Really? Isn’t this 2012? Where’s my jetpack?!!
Here’s a way to the future — a way to make a solar panel, from scratch, that can power any arduino off of sunlight or even light in your house. Sort of a peel-and-stick power source for your projects.
Time to complete: 15 minutes
No soldering required
Difficulty level: Easy as pie (key lime)
Loss of skin during assembly: moderate
This is one of the first entries in the Solar Pocket series of projects that Alex (this guy) and I are posting over the coming weeks. For more about Solar Pocket Factories and DIY solar check out our just launched Kickstarter campaign (Aug 15 – Sept 14):
http://www.kickstarter.com/projects/alex9000/the-solar-pocket-factory-an-invention-adventure/posts/303802
Step 1: What you need
++ A playing card.
++ Copper tape (single-sided adhesive): This is easy to find at most hardware or electronics shops.
++ 8 to 11 solettes: these are small pieces of monocrystalline or polycrystalline PV silicon that are typically hidden under an epoxy blob in off-the-shelf panels. You need the raw stuff for this instructable — this will give you the flexibility to power any arduino with varying current demands for different projects. You can get this key material here for now: http://goo.gl/C25he But there will be a kit on Kickstarter that makes these readily available soon.
++ Superglue aka cyano: the thin stuff, like crazy glue. The gels don’t seem to work well.
++ 5-minute epoxy: this is the encapsulant that will cover the entire panel. Epoxy is only good for 2 years in the sun, but it’s the easiest stuff the find off the shelf for a quick project. Fear not, better encapsulant is on the way (soon, soon…)
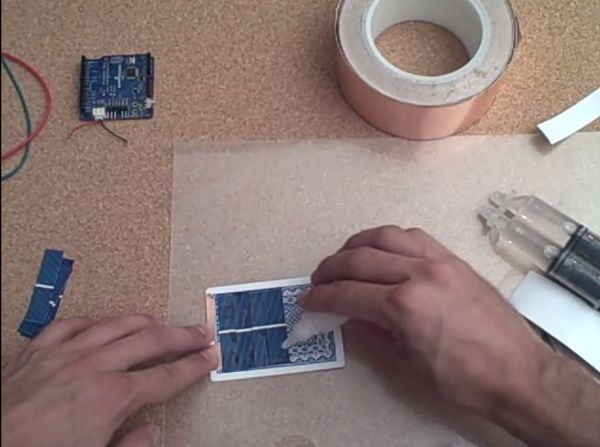
Step 2: Lay down the copper tape + bend the card
You’ll need two pieces of copper tape, to pickup the two poles of the solar panel you are assembling. Cut, peel, and stick. Rub it down with the back of your fingernail for that retro gloss finish.
If you feel so inclined, you could also add extra copper tape traces, for indicator LEDs and whatnot — but this is not essential for a functioning arduino charge card.
>>Note that the copper tape conducts best along the surface without the adhesive. It doesn’t conduct reliably through the tape thickness.
>>You could solder to this copper tape surface if you wanted, for certain projects — the copper tape is a joy to solder to – but it’s not necessary to power an arduino. A few more steps and we are there…
Step 3: Superglue + stack the solettes
This is the only tricky part.
Theory:
This step is the key to getting the whole ladder of monkeys to work properly — combine solettes in series with a superglued shingling technique. Each solette, or any chunk of mono or polycrystalline PV silicon for that matter, outputs around 0.5 – 0.6VDC, which is not enough voltage to do very many useful things. So, we need to combine enough of these solettes together in series so that their voltage outputs add up.
In order to power an arduino (3.3V – 5V, depending on the arduino model), we will need a minimum of 7 solettes in series (or, 3.5Vopen). The solettes we are using output Im (or, the max current at the maximum power point of the cells – about max power point here: http://en.wikipedia.org/wiki/Maximum_power_point_tracking) of around 100 mA per solette. So, since we are combining the solettes in series, the voltages add up, but the current does not. Or, to put it another way, 7 of our solettes in series will output 3.5VDC-ish and 100mA with a perfect load outside in the glorious noonday sun.
If however your solar panel is jammed into a lightbulb, like a 14W compact fluorescent, you can deliver about 10mA (if demanded).
Back to the solettes: The (+) output is the grey underbelly of the first solette in your shingled fan-stack. The (-) output of the series connected fan can be accessed either at the bus bar or white silver ink runners on the blue top surface of the final solette in your stack, or by using a “false” solette that doesn’t produce electricity but just serves to bring do the top surface connections to a solette underbelly. Watch the video here for more explanation: http://www.youtube.com/watch?v=nsX6r-_Nn6Y
What to do:
A few dabs of superglue (again, the very thin clear liquid stuff — also known as cyanoacrylate), a few seconds of pressure, and you’ve got yourself a solar series connection! Repeat 7 times for an Arduino Pro (or, 8 times if you are using a false solette to pulldown the power to your copper tape), or 10-11 times for most other Arduinos. This also works with the new Leonardo boards.
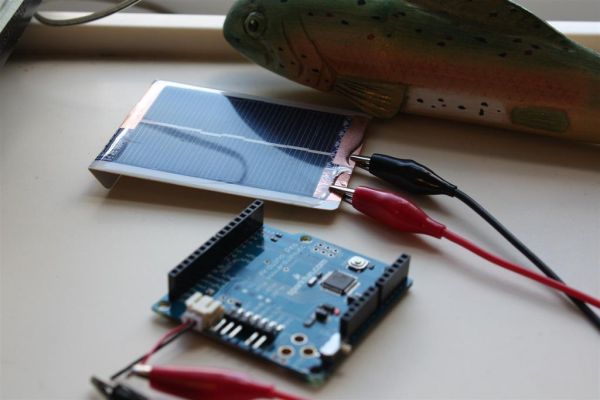
Step 4: Check the output before creating an epoxy tomb
Check the output of your freshly minted panel at your two copper tape outputs — in noonday sun on a sunny day in, say, Hong Kong, you should read an open voltage of around 3.5VDC – 5VDC (depending on how many solettes you connected in series) and a closed current of, well, whatever the closed current of a single solette is. For solettes of the area I am using in this project, the closed current is around 175mA. This is wayyy more than you’ll need to power an arduino, even for some heavy duty tasks.
We programmed an arduino powered off of a CFL without any problem — and this would be cake in real sunlight. So, you can do loads with this amount of juice.
Add a supercap or rechargeable batteries if nighttime operation of your project is necessary.
++ Copper tape (single-sided adhesive): This is easy to find at most hardware or electronics shops.
++ 8 to 11 solettes: these are small pieces of monocrystalline or polycrystalline PV silicon that are typically hidden under an epoxy blob in off-the-shelf panels. You need the raw stuff for this instructable — this will give you the flexibility to power any arduino with varying current demands for different projects. You can get this key material here for now: http://goo.gl/C25he But there will be a kit on Kickstarter that makes these readily available soon.
++ Superglue aka cyano: the thin stuff, like crazy glue. The gels don’t seem to work well.
++ 5-minute epoxy: this is the encapsulant that will cover the entire panel. Epoxy is only good for 2 years in the sun, but it’s the easiest stuff the find off the shelf for a quick project. Fear not, better encapsulant is on the way (soon, soon…)
For more detail: Solar powered arduino on the back of a playing card