Today is High Speed Photography day !
The concept is to take a ‘long’ exposure photograph, 4 seconds say, in a (very) dark room (a bathroom in our case). You end up with a completely black picture, right ? If you burst a flash (about a millisecond for a standard flash) then you get a picture made of 4 seconds of ‘dark’ and one millisecond of ‘light’. Are you still with me ?
The trick is to burst the flash at the right moment so that the millisecond of light you get illuminates an interesting scene. A popping balloon for example…
This project uses the sound an exploding balloon makes to trigger a flash.
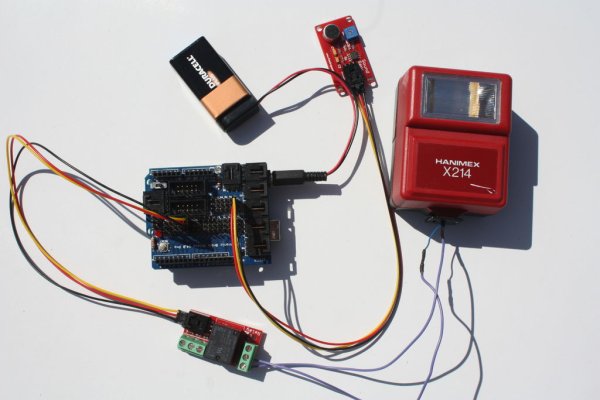
I used:
– a DSLR camera (Canon 450D) + tripod.
– an arduino duelaminove + 9v battery.
– a sound sensor (from www.flamingoeda.com). Or better yet (if you don’t read japanese): http://stores.ebay.com/FunRobo/_i.html?_nkw=Arduino+Sound+Sensor+Module&submit=Search
– a relay module (on ebay search for ‘relay module arduino’, sort by price, pay about 5$ for it).
– a cheap flash (paid 10$ for this one).
optional:
– a (convenient) sensor shield + cables.
Enjoy !
Step 1: Put it together.
It is a very simple setup, yet pretty effective…
The sound sensor returns a 0-1024 value, the relay can be controlled by a digital pin.
I cracked open the flash, removed the shoe and soldered a couple of wires instead.
Some will probably argue that a relay is too slow. Well it turns out it isn’t…
To be fair I, too, thought it would be too slow so I have tried and used an opto- isolator. It burned (as well as my atmega328, 🙁 ) during my first try. The voltage in the shoe of this *very* cheap flash is probably too high for my opto-isolators.
As I have no idea what kind of voltage I am dealing with here (I just know it hurts if I put my fingers !), I took the easy route and used a relay. It works, so… problem solved !
Step 2: Arduino code
When the sound sensor gets above a certain threshold, send a ‘high’ signal on the relay pin.
A small trick is to then ignore the sound sensor entirely so that the flash will not be triggered again.
Press the ‘reset’ button to re-enable the system.
Step 3: Set you camera
You need to install a tripod in a dark room. The point is to be able to take a 4 second picture that comes back completely black.
Set your camera to ‘manual focus’, ‘stabilizer off’, ‘priority to Time’.
You are all set. Press reset on the arduino board, switch off the light, take a picture and pop a balloon within the next 4 seconds….
For more detail: High Speed Photo Arduino : HighSpeeduino