I have a “through the Looking Glasses” idea of making another version of Palm Arduino.
Since this design derived from Palm Arduino, I will called it Palm Arduino II.
This Palm Arduino, the Second, will be the combination of Palm Arduino and Portable 5V Voltage Regulator.
So that everything is staying together closely in the same package!
Palm Arduino II will be a little smaller, 1-3/8″ wide x 2-3/8″ x 1/2″ thick (Palm Arduino the First are 1-1/2″ wide x 2-1/2″ long x 1/2″ thick), so it will be fit on the back of the 9V battery holder.
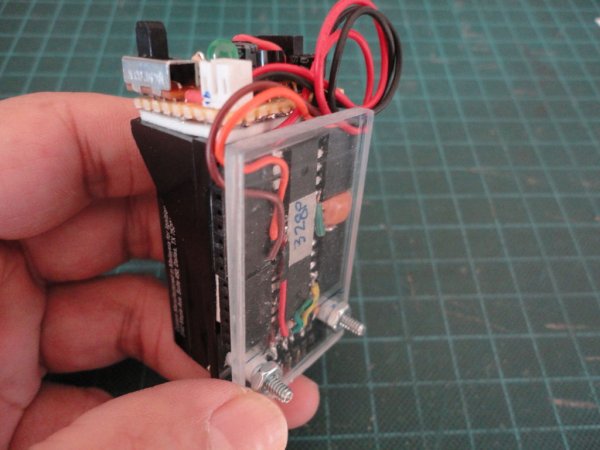
Palm Arduino II will be powered by separate PCB installed on top of 9V battery holder that has both 5V and 3.3V regulator.
PARTS
Palm Arduino II
Parts for Palm Arduino II are exactly the same as Palm Arduino, less 3mm Green LED and 1K Resistor.
I changed the nuts and screws size to 4-40 instead of 2-56.
1 no. ATMega328P with Arduino Bootloader
1 no. 3mm Green LED
1 no. 1K Resistor
1 no. 10K Resistor
1 no. 16Khz Resonator
2 nos. 0.1uF Capacitor
1 no. 1×6 Male Header
1 no. 1×14 Female Receptacle
1 no. 1×4 Female Receptacle
1 no. 1×6 Female Receptacle
1 no. 1.375″ wide x 2.375″ long, 1/8″ thick clear Acrylic sheet
Plastic Standoffs
Some hookup wires
2 nos. 4-40 Flat-Head Machine Screws
4 nos. 4-40 Steel Machine Hex Nuts
Voltage Regulators PCB
1 no. Slide switch
1 no. 1N4001 Diode
2 nos. 100uF Electrolytic capacitor
1 no. 10uF Electrolytic capacitor
1 no. 0.1uF Capacitor
1 no. 78L05 Voltage Regulator, TO-92 package
1 no. 78L33 Voltage Regulator, TO-92 package
1 no. PCB about 7/8″ wide x 1″ long
2-pin Female socket with hookup wire
Step 1: Build Palm Arduino II
Since the Palm Arduino, the Second is the decedent of Palm Arduino Kit.
There is no different in how to built steps between the First and this one, except Palm Arduino, the Second does not have pin D13 LED and resistor.
So instead of repeating the steps, I would referred to these Steps from Palm Arduino Kit:
Step 2: Straighten the pins
Step 3: Added Power and Ground
Step 4: Bring out the pins
Step 2: 5V and 3.3V Regulator PCB
Use the same Schematic of the Portable 5V Regulator, with addition of 3.3V Regulator (See Schematic for details). Which perfectly fit on the top of 9V battery holder (7/8″ wide x 1-1/8″ long.)
5V Portable Regulator
I placed the circuit right on the 9V Battery holder with double sided foam tape.
The circuit was one side circuit.
I placed the components on the solder side of PCB board, because I wanted to use the component side of the PCB to stick to the foam tape and place it right on the top of the 9V battery holder.
The 5V Portable Voltage regulator consists of
Slide switch
1N4001 Diode
100uF Electrolytic capacitor
10uF Electrolytic capacitor
78L05 Voltage Regulator with TO-92 package
and 2-pin Female socket with hookup wire
PCB about 5/8″ wide x 1″ long.
The schematic of this 5V Voltage regulator is from my notebook when I started to learn embedded electronics. As when I first learned why the diode was added. Because it blocks current from flowing in the opposite direction. And it will block current from flowing backward and damaging the system if you accidentally hook up the power supply the wrong direction.
To built this Portable 5V Regulator is quite easy.
Just solder the components according to the schematics.
And be careful about the polarity of the the diode, and capacitors.
For the 78L05 IC also need to be careful on the pins connectivity.
I used 2-pin female socket as the power connector.
For more detail: Palm Arduino II