Project by CU Boulder Thinks That Think students:
Michelle Bourgeois, Charles Dietrich, and Ben Link
Imagine having a safe in which the combo is any small object of your choosing. Perhaps it’s your favorite coffee mug, or a bat man figurine. This project is based on this idea, using the weight and placement of your “key” object(s) to determine the combination for a safe.
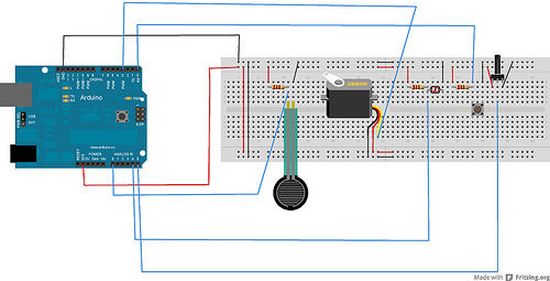
This safe uses an array of force sensors to determine the unique weight distribution of your key object(s). The Arduino is set up to lock and unlock the safe door when objects are placed on the platform, and an LED indicates whether the door is locked (red) or unlocked (green). For this prototype, we used stacks of Alphabet Blocks as our key to open the safe. This project utilizes a laser cutter, some soldering, and a cabinet in which we constructed ourselves, but you could modify any box you wish to use.

Note: There is a variation of this project which uses homemade sensors. You will see additional materials and steps for this variation. These sensors were taken from the “DIY Force Sensitive Resistor” Instructable.
Materials:
1 box with a door
1 Arduino Uno
1 12×12″ 1/4″ thick, color acrylic sheet
1 12×12″ 1/8″ thick, color acrylic sheet (detail work)
2? 12×12″ 1/8″ thick, clear acrylic sheets
1 servo
4 small pressure sensors (www.sparkfun.com/products/9673 )
4 1″ long, 1/4″ diameter dowels (cut from shelving pegs)
1 push button
1 tri-colored LED
1 potentiometer
4 1 kOhm ? resistors
9V battery and casing
solid wire
scraps of wood and wood glue (or latch)
double-sided tape
hot glue and glue gun
Additional Materials (for homemade sensors):
1 3×4″ one-sided copper plated PCB (http://www.jpmsupply.com/servlet/the-196/Copper-Clad-Circuit-Board/Detail )
1/4″ thick, conductive foam
Aleene’s Original Tacky Glue (http://www.amazon.com/Aleenes-Original-Tacky-Glue-4-oz/dp/B00195OGKA )
composite wire
Step 1: Build the Safe
1. Obtain or build a box with a door . We built our own box out of spare shelving and 2.5″ screws. Two hinges where attached to the door and the left interior of the box. Each side was then sanded to be smooth and each facing was covered with piping and white caps over the screws. It measures one cubic foot.
2. Attach the locking servo with duct tape or other means.
3. Build a latch that fits the servo lock. We made ours out of small scraps of wood and used wood glue to bond it to the interior of the door.
4. Drill a hole in the top of the box to allow wiring to the servo and light sensor.
Step 2: Build the Sensor Block
Our sensor block was made using a laser cutter to cut pieces of clear acrylic.
Holes allowed the wiring from the Arduino to reach the hole in the safe for the servo.
The pieces were bonded together using an acrylic bond.
The sensor block was bonded to a 12×12″ piece of clear acrylic with a square cut out to use as its base.
1 Arduino Uno
1 12×12″ 1/4″ thick, color acrylic sheet
For more detail: Combo Blocks using an Arduino