In a previous article we showed you how to control digital pins over over serial, and showed how such a simple thing can be so powerful. One major downfall with that is you need to be nearby to send commands… So today we are going to look at doing the same thing, but this time we will be doing it over the internet using the Arduino Ethernet Shield.
As per our usual style, I am going to make this as simple as possible so it is easier to extend. So if you you are looking for something with an HTML interface, this article will not be covering that.
The Arduino Ethernet Shield is capable of being both a client (like a web browser), and a server, and with the onboard SD card-slot can be quite powerful by hosting up full websites, but for this article we are just looking at using the Arduino as a server and you will control it simply by going to a specific URL.
Note that the Ethernet Shield uses digital pins, 10, 11, 12, and 13 for itself, so it is best to leave these alone and not try to use them for anything else.
Getting It On The Net
Getting the ethernet shield on the internet is going to differ depending on your network, but no matter what, you need to plug it into an ethernet port connected to the internet – So make sure you do that.
Without an extra library, the ethernet code does not support DHCP and therefore requires that we hardcode the IP Address,gateway address, and subnet mask for your network. This isn’t really that hard, it is more of a pain when especially if you want to plug it into a different network as the same settings may not work.
As of Arduino 1.0, the library does support DHCP So you should be able to just plug it into your network and have it work. It will report the ipAddress to the serial monitor
We also left the code in there to do a manual setup if you prefer doing it that way. (I know I do) If you are familiar with your network and how to do this, awesome, just make sure you change the setting at the top of the code to fit your network, and un comment out the parts related to it. If you are not familiar with it, we can help you in the forum, and have posted some general help in there as well.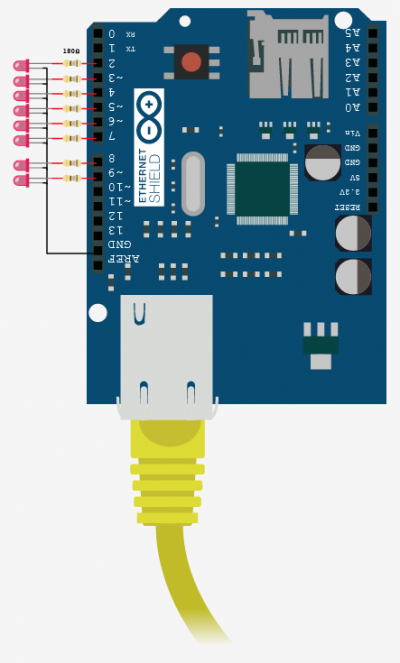
Hooking It Up
Aside from plugging the Ethernet Shield into you Arduino, there isn’t really anything you HAVE to have. I have LEDs on pins 2-9 on this example so we can see it being controlled. If you do not intend to blink LEDs or test the code with LEDs, you can by all means leave these off.
For more detail: Pin Control Over the Internet – Arduino + Ethernet