This is the first time I have used the Lilypad Arduino or any kind of soft circuit technology, so my coding is borrowed from several others (more on my code in Step 2).
All in all, it was quite the learning experience creating this hat and I’m excited to share it with you!
Step 1: Gather Materials
-Lilypad Arduino Development Board
https://www.sparkfun.com/products/11262
-Lilypad Simple Board, 1 White LED, RGB tricolor LED, Light Sensor, Buzzer, FTDI, Conductive Thread, Needles, LiPo Battery
-USB cable
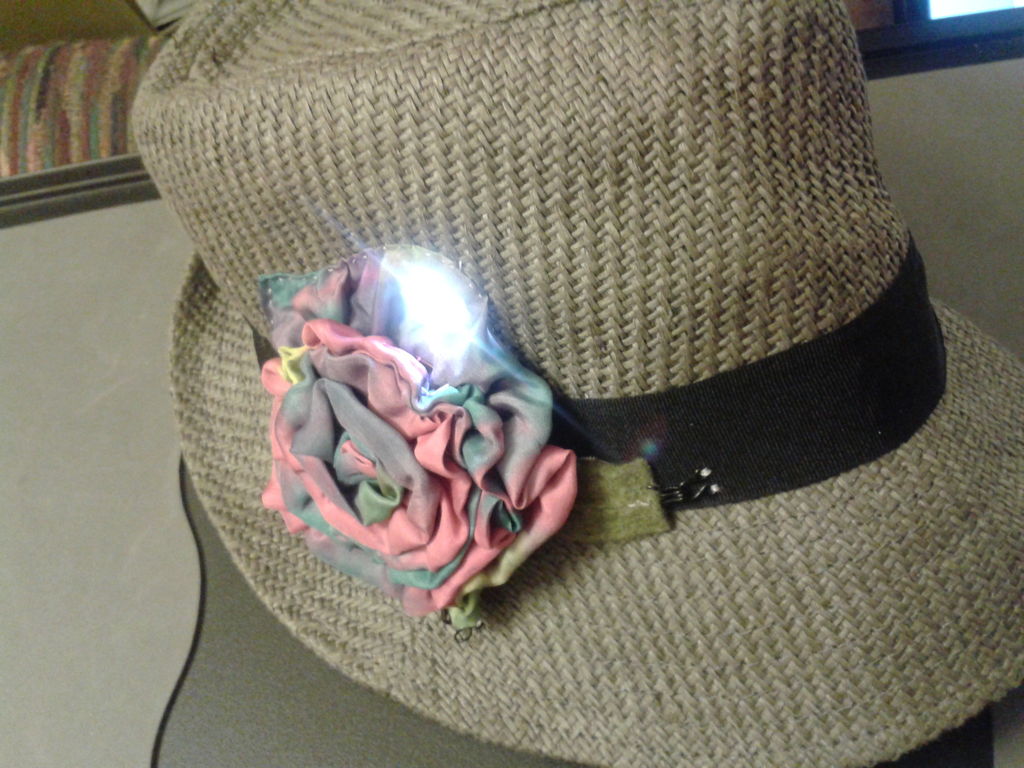
-Fedora
-Silk flower rosette
-Small rectangle of green felt (~2x.5in)
-Large rectangle of lining fabric (~5x4in)
-2 Sets of hook-and-eyes, plus one extra hook
-All purpose thread
-Clear nail polish
-Needlenose pliers
Step 2: Create a Plan
Plug your FTDI and battery into the main board and coonect it to your computer with your USB cable. Upload your code.
/*
Nursery Rhyme Hat
Liz Huessy
March 2014
*/
int ledPin =
int ledPin = A3; // The white LED pin is connected to pin A3
int redPin = 10; // The red LED pin is connected to pin 10
int bluePin = 9; // The blue LED pin is connected to pin 9
int greenPin = 6;// The green LED pin is connected to pin 6
int ground = 11; // Pin 11 is the ground pin
int speakerPin = A2; // The speaker is connected to digital pin A2
int sensorPin = A4; // The light sensor is connected to pin A4
int sensorValue; // Variable to store the value coming from the sensor
void setup()
{
pinMode(speakerPin, OUTPUT); // Sets this pin to be an output
pinMode(A3, OUTPUT); // Sets this pin to be an output
pinMode(10, OUTPUT); // Sets this pin to be an output
pinMode(9, OUTPUT); // Sets this pin to be an output
pinMode(6, OUTPUT); // Sets this pin to be an output
pinMode(sensorPin, INPUT); //
pinMode(ground, OUTPUT);
digitalWrite(ground, LOW); // Turns off power to pin 11 (ground)
}
void loop() // Runs on a loop
{
sensorValue = analogRead(sensorPin); // Read the value from the sensor
delay(100); // Delay for 1/10 of a second
if (sensorValue < 20)// If it is dark, turn all LEDs off
{
digitalWrite(6, LOW);
delay(750);
digitalWrite(9, LOW);
delay(500);
digitalWrite(10, LOW);
delay(500);
digitalWrite(A3, LOW);
delay(500);
}
else { //If it is not dark, turn green and blue LEDs on and play the tune, then turn on red and white LEDs
digitalWrite(6, HIGH);
delay(500);
digitalWrite(9, HIGH);
delay(500);
scale(); // Call the scale() function
delay(1000); // Delay for 1 second
digitalWrite(10, HIGH);
delay(500);
digitalWrite(A3, HIGH);
delay(500);
}
}
void beep (unsigned char speakerPin, int frequencyInHertz, long timeInMilliseconds) // the sound producing function
{
int x;
long delayAmount = (long)(1000000/frequencyInHertz);
long loopTime = (long)((timeInMilliseconds*1000)/(delayAmount*2));
for (x=0;x<loopTime;x++)
{
digitalWrite(speakerPin,HIGH);
delayMicroseconds(delayAmount);
digitalWrite(speakerPin,LOW);
delayMicroseconds(delayAmount);
}
}
void scale ()//Play Mary Had a Little Lamb
{
beep(speakerPin,2637,500); //E
beep(speakerPin,2349,500); //D
beep(speakerPin,4186,500); //C
beep(speakerPin,2349,500); //D
beep(speakerPin,2637,500); //E
beep(speakerPin,2637,500); //E
beep(speakerPin,2637,1000); //E
beep(speakerPin,2349,500); //D
beep(speakerPin,2349,500); //D
beep(speakerPin,2349,500); //D
beep(speakerPin,2637,500); //E
beep(speakerPin,2637,500); //E
beep(speakerPin,2637,1000); //E
beep(speakerPin,2637,500); //E
beep(speakerPin,2349,500); //D
beep(speakerPin,4186,500); //C
beep(speakerPin,2349,500); //D
beep(speakerPin,2637,500); //E
beep(speakerPin,2637,500); //E
beep(speakerPin,2637,1000); //E
beep(speakerPin,2637,500); //E
beep(speakerPin,2349,500); //D
beep(speakerPin,2349,500); //D
beep(speakerPin,2637,500); //E
beep(speakerPin,2349,500); //D
beep(speakerPin,4186,1000); //C
beep(speakerPin,4186,1000); //C
}
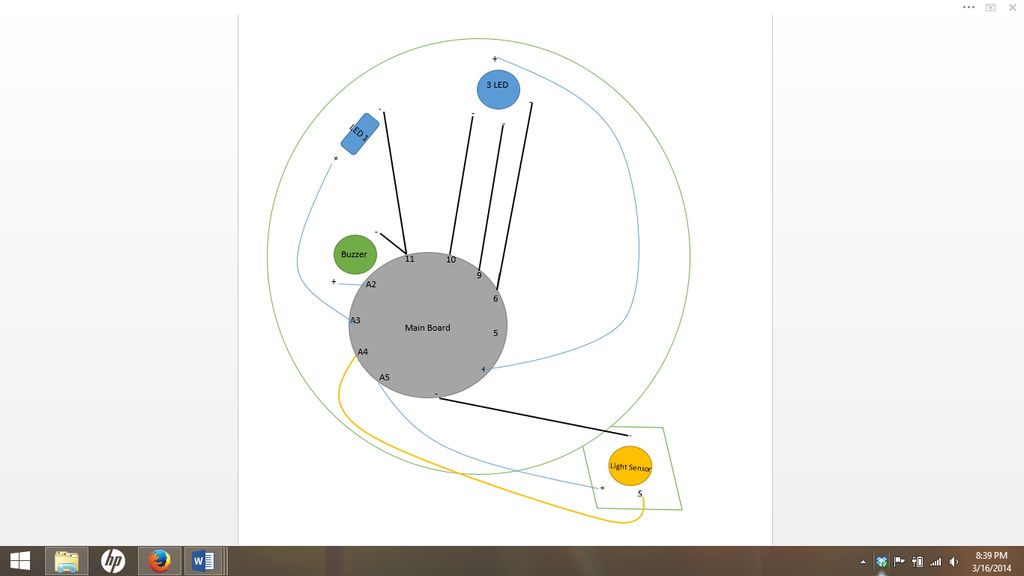
Once I had written my code, the next thing I did was to create a diagram of my e-textile, showing the exact connections and layout of my circuit, making sure that no negative and positive lines crosssed and that each LED, Buzzer and Sensor was properly connected.
It is very important to complete this step before taking apart the Lilypad pieces!
Step 3: Sew Electronics
With the conductive thread, you now begin to sew on the LEDs, Buzzer, Light Sensor and Main Lilypad Board, using the diagram from the previous step.
Each sewn connection should begin and end with sewing the conductive thread through the pin multiple times to ensure a good connection.