
Summary of Yun Bridge Client Example using Arduino Uno with Proteus Simulation
This article describes a Proteus simulation of an IoT project using an Arduino Uno to send HTTP requests via a Yun Bridge Client. It demonstrates firmware flow, network communication with `www.arduino.org`, and console output without physical hardware.
Parts used in theYun Bridge Client Example:
- Arduino Uno
- ESP8266-12E / Proteus Playkit Bridge interface
- 10kΩ resistor (R3)
- 100nF capacitor (C1)
- Wi-Fi reset push button
- LED
- 5V supply
- TXD and RXD UART connections
- SCK, MOSI, and MISO SPI pins
Introduction
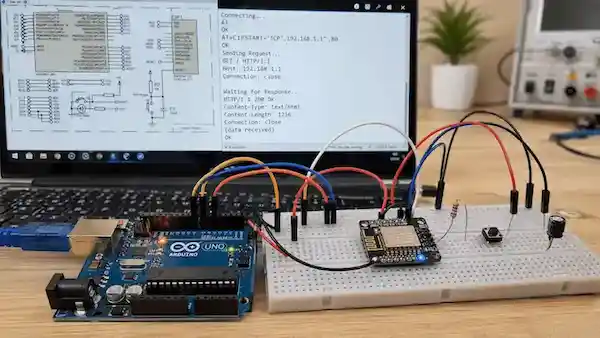
This Yun Bridge Client Example is an Internet of Things based microcontroller project built around the Arduino Uno in Proteus simulation.
The project demonstrates how an Arduino can use a bridge client to make a simple HTTP request to a web server.
It is useful for learning how embedded boards communicate with online services in embedded systems and DIY electronics projects.
Instead of controlling a sensor or display, this project focuses on network communication through the Proteus Playkit Bridge concept.
It is a practical electronics example for understanding basic firmware flow, HTTP requests, and simulated IoT connectivity.
How the Project Works
The project uses an Arduino Uno with the Bridge and BridgeClient libraries.
When the simulation starts, the firmware initializes the bridge communication at 115200 baud and opens the console.
After initialization, the Arduino creates a bridge client and connects to:
www.arduino.orgon port:
80The firmware then sends a simple HTTP GET request:
GET / HTTP/1.1After sending the request, the Arduino waits for the response. Any available response data is read line by line and printed to the console. Once the response is complete, the client connection is stopped.
Workflow Explanation
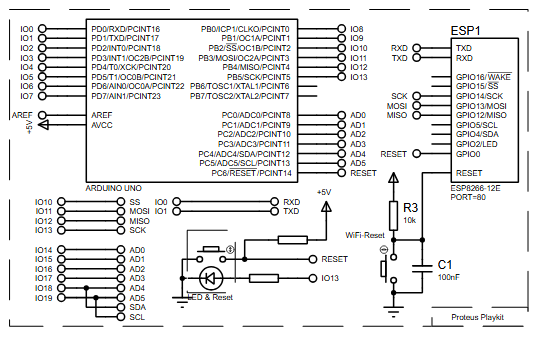
The schematic shows an Arduino Uno connected with an ESP8266-12E / Proteus Playkit Bridge style interface.
Workflow
Start Simulation
      ↓
Initialize Bridge at 115200 baud
      ↓
Start Console
      ↓
Create BridgeClient object
      ↓
Connect to www.arduino.org on port 80
      ↓
Send HTTP GET request
      ↓
Wait for server response
      ↓
Print response to console
      ↓
Stop client
      ↓
Done
The Arduino Uno acts as the main controller, while the bridge client handles the simulated internet communication. The ESP8266 section in the schematic represents the Wi-Fi / bridge side of the design, including reset-related components.
Key Features
- Arduino Uno based Internet of Things project
- Uses Proteus Playkit Bridge Client
- Demonstrates a simple HTTP request from firmware
- Connects to a web address using port 80
- Sends an HTTP
GETrequest - Prints server response to the console
- Includes ESP8266-12E style Wi-Fi bridge section in the schematic
- Uses a reset circuit with resistor, capacitor, and push button
- Good learning project for embedded systems, networking, and Proteus simulation
Components Used
Based on the schematic and source code, the project uses:
- Arduino Uno
- ESP8266-12E / Proteus Playkit Bridge interface
- 10kΩ resistor labeled
R3 - 100nF capacitor labeled
C1 - Wi-Fi reset push button
- LED and reset section shown in the Arduino side of the schematic
- 5V supply
- UART-related connections:
TXDRXD
- SPI-related pins shown on the ESP8266 side:
SCKMOSIMISO
No LCD, ADC sensor, timer module, or temperature sensor circuit is included in the provided schematic or code.
Applications
This type of project is useful for:
- Learning basic IoT communication in Proteus
- Testing HTTP request logic before real hardware implementation
- Understanding Arduino bridge-style firmware
- Building a foundation for cloud-connected embedded projects
- Simulating web request behavior in a microcontroller project
- Developing future sensor-to-web projects, such as sending temperature sensor readings to a web server
- Practicing firmware development for internet-enabled DIY electronics
Explanation of Code
The source code is simple and focused on HTTP communication.
Bridge Initialization
The code starts the bridge interface using:
Bridge.begin(115200)This sets up communication for the Proteus Playkit Bridge environment.
Console Output
The console is started using:
Console.begin()The firmware uses the console to print messages such as connection status, request status, response data, and completion messages.
Bridge Client
A BridgeClient object is created to handle the web connection. The client connects to:
www.arduino.orgusing port:
80HTTP Request
The firmware sends a basic HTTP request with:
GET / HTTP/1.1
Host: www.arduino.org
User-agent: Proteus
Response Reading
The code checks whether the client is connected and whether data is available. When response data is available, it reads the response line by line and prints it to the console.
Loop Function
The loop() function is empty because this project performs the request once during setup().
Source Code
void setup () {

   Bridge.begin(115200);
   Console.begin();
   BridgeClient client;
   Console.println("Connecting...");
   client.connect(URL, 80);
Console.println("Sending Request...");Proteus Simulation
In the Proteus simulation, the Arduino Uno runs the firmware and communicates through the Proteus Playkit Bridge client. The schematic includes the Arduino Uno and an ESP8266-12E style bridge section with reset circuitry.
When the simulation starts, the console displays the connection process:
Connecting...
Sending Request...
Waiting for Response...
If the bridge client connection works correctly, the HTTP response from the server is printed in the console. After the response is read, the firmware stops the client and prints:
DoneThis makes the simulation useful for testing the working principle of a basic IoT HTTP client without needing real hardware.
Conclusion
The Yun Bridge Client Example using Arduino Uno with Proteus Simulation is a clean and useful starting point for learning IoT communication in embedded systems. It shows how firmware can connect to a web server, send an HTTP request, and display the response in the console.
For students and electronics learners, this project is a practical introduction to Arduino-based networking, Proteus simulation, and modern DIY electronics development.
Complete File
Yun Bridge Client Example using Arduino Uno with Proteus Simulation
- How does the project initialize bridge communication?
The firmware initializes the bridge at 115200 baud using the Bridge.begin function. - What web server does the Arduino connect to?
The client connects to www.arduino.org on port 80. - Does the code use a loop for repeated requests?
No, the loop function is empty because the request happens once during setup. - What type of HTTP request is sent?
The firmware sends a simple HTTP GET request to the root path. - Where is the server response displayed?
The response data is read line by line and printed to the console. - Can this project be used without real hardware?
Yes, it is designed as a Proteus simulation for testing logic before implementation. - What components make up the Wi-Fi reset circuit?
The circuit includes a resistor, capacitor, and a push button. - Does the schematic include temperature sensors?
No, no temperature sensor or ADC sensor circuit is included in the design.
