Through technological means individuals with disabilities gain empowerment and the Ultrasonic Sensory Device for the Visually Impaired stands as an excellent representation of this phenomenon. Its affordable design enables this simple device to detect ultrasonic signals for reliable assistance to people with vision impairment while they move around.

What does the Ultrasonic Sensory Device accomplish?
The Ultrasonic Sensory Device is a handy Arduino tool that picks up on objects with ultrasonic sensors then warns users by vibrating or sounding an alarm.
Key Features:
- The device spots items around it in its fixed distance area.
- The device shows feedback instantly by producing vibrations or audio tones.
- The device comes with small size packed features simple operations.
How This Arduino Project Benefit Children with Sensory Issue
- Enhances spatial awareness for children with visual impairments.
- Translates spatial data into auditory feedback for easier navigation.
- Promotes independent movement and safety through real-time environmental awareness.
- Improves sensory processing by allowing children to interpret the world using sound.
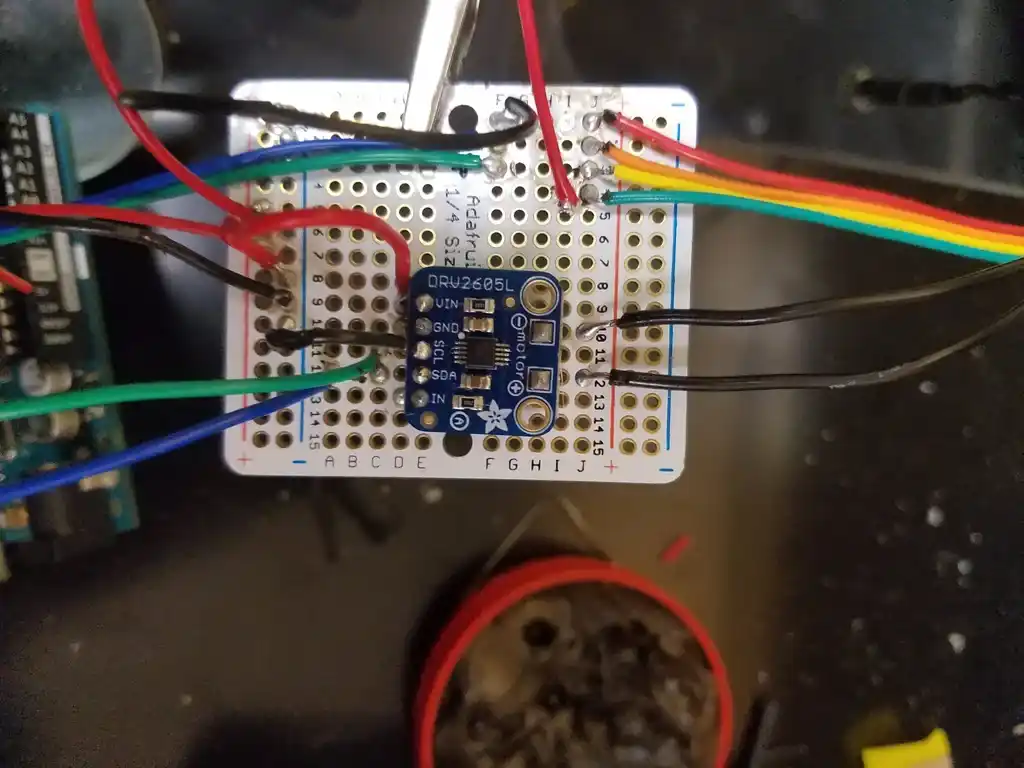
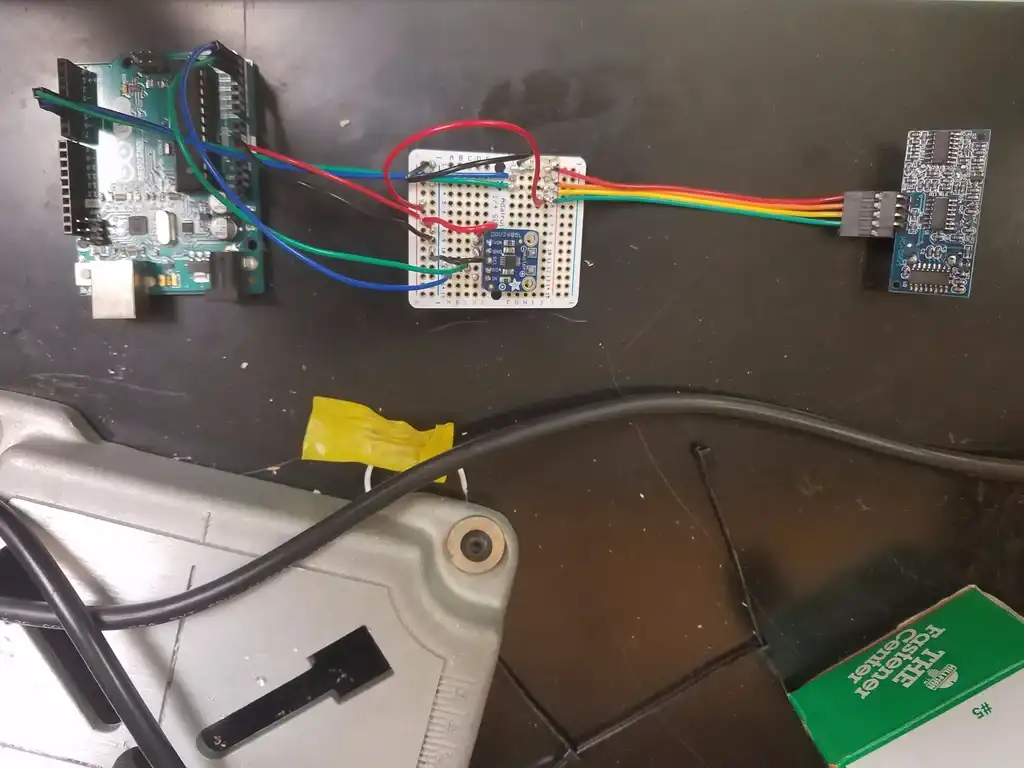
Hardware and Wiring for the Ultrasonic Sensory Device
- Arduino Microcontroller
Use an Arduino Uno or Nano to process data from the ultrasonic sensor and control the feedback system (vibration motor or buzzer). - Ultrasonic Sensor (HC-SR04)
- VCC to 5V pin on Arduino
- GND to GND pin on Arduino
- Trig to pin 4 on Arduino
- Echo to pin 5 on Arduino
- Haptic Motor
- VCC to 5V pin on Arduino
- GND to GND pin on Arduino
- Control Pin to motor driver (e.g., DRV2605L)
- DRV2605L Haptic Driver
- SCL to A5, SDA to A4 on Arduino
- VCC to 5V, GND to GND on Arduino
- Power Supply
Use a USB cable for powering via a laptop or battery pack (9V or Li-ion) for portability. - Mounting
Secure components in a compact enclosure (e.g., acrylic) and mount using a glove or elastic strap for easy wear.
How Does It Work?
- The ultrasonic sensor releases sensors waves to measure how long they take to return after hitting an item.
- The Arduino device activates either the vibration motor or buzzer system following distance detection from the sensor.
- Object avoidance becomes better when the sensor detects objects closer to the device.
The project offers basic help functionality while remaining easy to manufacture for assistive technology creators.
Software Implementation Overview:
- Libraries:
- Use Adafruit_DRV2605 for the vibration motor and Ultrasonic for the sensor.
- Setup:
- Initialize the sensor and haptic motor, set trigger and echo pins.
- Distance Measurement:
- Use
pulseIn()to calculate the time taken by the ultrasonic pulse to return, converting it into distance.
- Use
- Distance Grouping:
- Categorize distances into ranges (e.g., 0-30 cm, 31-70 cm) to determine vibration intensity.
- Vibration Feedback:
- Based on the distance group, select a vibration pattern using
drv.setWaveform().
- Based on the distance group, select a vibration pattern using
- Main Loop:
- Continuously measure distance, assign a group, and trigger the corresponding vibration.
- Troubleshooting:
- Verify connections, check sensor power, and test different vibration effects.
Code:
Troubleshooting and Challenges
While working on the project, a few challenges arose that were important to address:
- Sensor Range Issue: The sensor only worked up to 50 cm instead of 4 meters. Solution: Swap the sensor or check its wiring.
- Sensor Failures: The sensor occasionally stopped sending readings. Solution: Reset the Arduino or re-upload the code.
- Vibration Intensity: Adjusting vibration for clarity was tricky. Solution: Use Adafruit’s vibration chart to fine-tune intensity.
- Power Supply: USB limited portability. Solution: Add a portable battery pack.
Step-by-Step Instructions for Building the Device
1: Gather Materials
- Arduino Uno (or similar)
- HC-SR04 ultrasonic sensor
- Vibration motor or Piezo buzzer
- Wires, resistor (optional)
- Power source (battery or USB)
- Prototyping board
2: Assemble Hardware
- Connect ultrasonic sensor:
- Trig Pin to pin 4, Echo Pin to pin 5.
- VCC to 5V, GND to GND.
- Attach vibration motor/buzzer:
- Connect to pin 6 and GND.
- Power the device via USB or battery pack.
3: Upload Code
- Upload the code to Arduino via the IDE.
4: Test & Calibrate
- Test the sensor’s distance detection and adjust the feedback in the code if needed.
5: Mount the Device
- Mount the sensor on a wearable base (glove, belt) and place the motor in a noticeable spot.
6: Troubleshooting
- Sensor not working? Reset the Arduino and check connections.
- Range issues? Check sensor connection and adjust the code.
Note on Bugs & Issues:
The sensor initially worked up to 4 meters but suddenly only detected objects up to 50cm. This issue was traced to the sensor itself, and the solution was either replacing the sensor or adjusting the code to limit the range for testing purposes.
Occasionally, the sensor would stop working and fail to send data to the Arduino. In such cases, pressing the reset button or re-uploading the code would resolve the issue and restore functionality.
Why Try This Project?
Building the Ultrasonic Sensory Device offers a rewarding experience for people interested in disability-friendly technology creation. Both newcomers and experts in making can use this project to help visually impaired people move more easily through their surroundings.