Summary of The SMD beak
Concise summary (under 100 words): The article describes a quick DIY SMD beak tool for precise hand-soldering of tiny components when reflow stencils or paste dispensers are unavailable. Using three metal rods (a conical arm, a base with a drilled recess, and a drilled weight/tip), the builder forms a bent arm fitted into the base and adds the weight for stability and firm component grip. The tool was made from junk metal in about 30 minutes and holds even the smallest passives steady for soldering.
Parts used in the SMD beak:
- Metal rod (about 5 mm) for the arm
- Larger metal rod (about 1 inch diameter and length) for the base
- Third metal rod (about 0.5 inch diameter and length) for the tip weight
- Drill and drill bit matching the arm diameter
- File (to shape the arm tip into a conical point)
- Bending tool or pliers (to bend the arm about 90 degrees)
I ordered this awesome N|Watch kit the other day, which requires some serious SMD hand-soldering skills. There’s always the easy alternative to use a reflow oven, but guess what, there is no stencil included (and no, I don’t have a paste dispenser). In a desperate need of a third hand (!) in order do a neat job, I saw some similar DIY solutions (thumbs up for Google images) and managed to build my own version in less than 30 minutes, just using junk metal parts : the SMD beak !
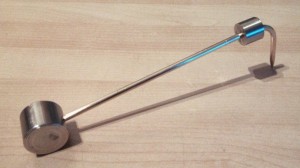

Step 1 : The arm : find a metal rod (mine was 5 mm), file its tip to a conical shape (like a pencil) and bend it at about 90 degrees. Adjust its length to your preference.
Step 2 : The base : find a larger metal rod, about one inch in diameter and length. Drill a hole (for about 1 cm deep) using the same drill size as the arm diameter.
Step 3 : The weight : find a third rod, about half an inch in diameter and length. Drill a hole in the center, using the same drill size as before, this time all the way through. This is going to be the extra tip weight, for a firmer component grip.
A few tests : the tip weight is substantial, nothing can move at all, even the smallest passive components. Now ready for soldering !
For More Details: The SMD beak
For More Details: The SMD beak
- What is the SMD beak used for?
It is used to hold tiny SMD components firmly for hand-soldering when no stencil or paste dispenser is available. - How long does it take to build the SMD beak?
The article states it can be built in less than 30 minutes. - Can any metal rods be used for the SMD beak?
Yes, the article suggests using junk metal rods of the specified sizes for arm, base, and tip weight. - How is the arm tip shaped?
The arm tip is filed to a conical shape like a pencil. - How is the arm attached to the base?
The base has a drilled recess sized to the arm diameter so the arm fits into the base. - What is the purpose of the tip weight?
The tip weight provides extra firmness and prevents components from moving, even the smallest passive components. - How deep should the base hole be?
The base hole is drilled about 1 cm deep using the same drill size as the arm diameter. - Does the tip weight hole go all the way through?
Yes, the tip weight is drilled all the way through with the same drill size as the arm diameter.