Summary of Stunning RGB light effects using Arduino Nano
This project creates stunning RGB LED strip effects using an Arduino Nano and a custom control board that switches 10 LED strips via transistors and Dupont wires. The guide covers cutting strips, wiring, designing a PCB-compatible control board in EasyEDA, and adding switches to change effects handled by the Arduino.
Parts used in the RGB light effects using Arduino Nano:
- LED strip (12V)
- Arduino Nano
- Dupont wire connectors
- Custom control board (PCB)
- Transistors Q1 to Q10 (as switches)
- Switches S1 to S4
- Power supply (12V for LED strips)
None of us could deny the fact that we would love with to play with LED’s and lighting stuffs. I love to play with LED’s and create attractive lighting effects. This project was a result of such attempt where i created a stunning RGB light effects using the popular development platform Arduino Nano. Let’s see the circuit, code and instruction on building this project.
MATERIALS REQUIRED FOR RGB LIGHT EFFECTS:
- LED strip
- Arduino Nano
- Dupont wire connectors
- Custom control board.
Let’s get started on this
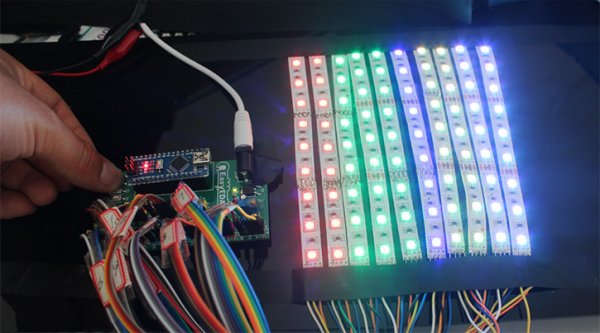
STEP 1 – PREPARING LED STRIPS:
Cut down the LED strips into 10 single pieces. Make sure you cut them into equal halves and care must be taken that you should cut only on the copper conduction plate in the strip. Making a wrong cut disrupts the electrical conductivity between the LED’s. After cutting down into separate strips connect it using a Dupont wire connector.
STEP 2 – DESIGNING CONTROL BOARD:
I have made a custom control board compatible used with Arduino Nano to produce the desired effect. The control board basically used to boost the incoming signal from Arduino and lights up the corresponding LED strips.
STEP 2.1 – CIRCUIT DIAGRAM OF CONTROL BOARD:
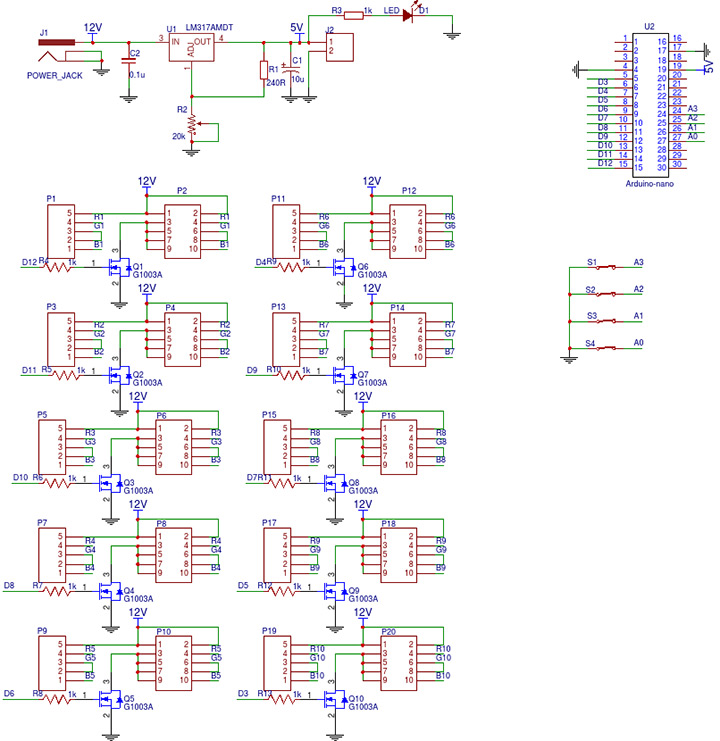
This is the schematic of control board i have designed. Here i have added 10 connection points for 10 LED strips. Separate pins from Arduino Nano was used to control the connection points thereby handles each RGB LED strip separately. Transistor Q1,Q2,Q3….Q10 acts as a switch for these LED strips for controlling 12V strips through 5V signal. And switch S1,S2..S4 was added to alternate the effect produced in the strip. The input of these switches goes into Arduino and it produces the programmed effect for corresponding switch press.
I have used Online circuit and PCB designing platform called as Easyeda to develop my control board. It was pretty easy to use with large number of part libraries. Even you can order PCB board through it once you are done with your design.
- How many LED strips are used?
Ten single LED strip pieces are used. - Can I cut the LED strip to make multiple pieces?
Yes, cut into 10 equal pieces but only at the copper conduction pads to avoid breaking conductivity. - What microcontroller is used to control the LED strips?
An Arduino Nano is used to control the strips. - How are the LED strips connected to the Arduino?
Each strip is connected via Dupont wire connectors to separate Arduino pins through the custom control board. - What does the custom control board do?
It boosts the Arduino signal and uses transistors to switch 12V LED strips from 5V control signals. - Which components act as switches for the LED strips?
Transistors labeled Q1 to Q10 act as switches for the strips. - How are different effects selected?
Switches S1 to S4 feed inputs to the Arduino, which produces the programmed effects for each switch press. - What tool was used to design the PCB for the control board?
EasyEDA was used to design the circuit and PCB.