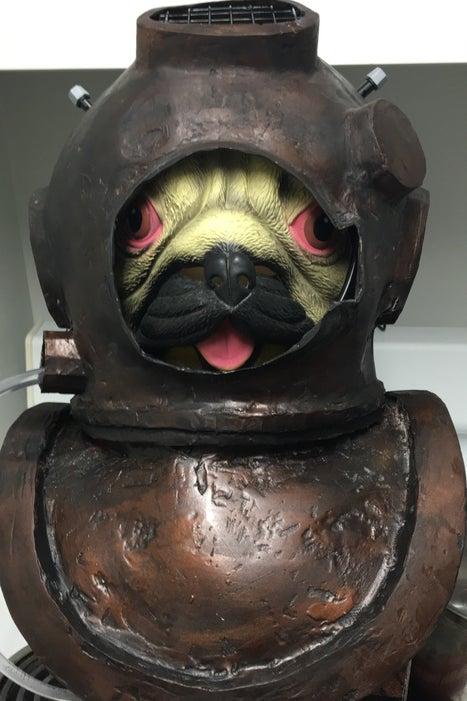
In this project we will create a timer based water pump scuba helmet that will mist or spray every ten seconds. The original intention of this project is for the helmet to be used as a wearable garden, however, depending on the nozzels you use it can be used to keep people at a comfortable distance.
For this Project you will need:
SAFETY EQUIPMENT
-Safety Glasses
-Lots of disposable gloves
– A Particle Respirator
-A Respirator rated for fumes
ELECTRONICS
– An arduino Uno (or knock off)
– A small aquarium Pump : https://www.amazon.com/gp/product/B00JWJIC0K/ref=oh_aui_detailpage_o04_s00?ie=UTF8&psc=1
-Plastic tubes that fit around the pump: https://www.amazon.com/gp/product/B000E62TCC/ref=oh_aui_detailpage_o04_s00?ie=UTF8&psc=1
– A garden misting set (Gallons per hour) : https://www.amazon.com/gp/product/B01ET0SPSK/ref=oh_aui_detailpage_o03_s00?ie=UTF8&psc=1
– Electrical Wire
– A relay
-Solder
– Soldering iron
-Shrink tube
-9v battery
-A hot glue gun
-Electrical tape
PAPER FOLD MATERIALS
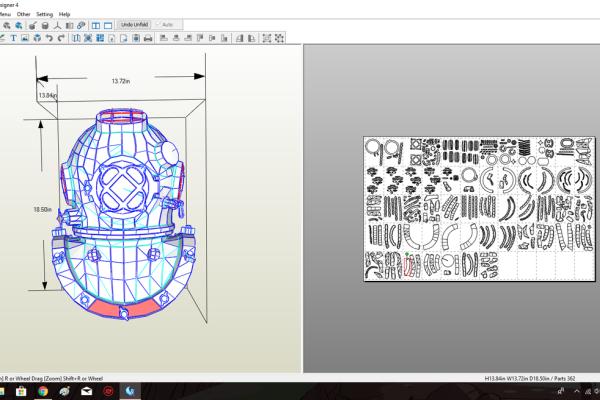
– A laptop with pepakura
– this paperfold file here http://www.tamasoft.co.jp/pepakura-en/gallery/gal… credit goes to creator D-mind on Pepakura
– A Printer, (or plotter if you can)
– heavy weight Paper
– A cutting mat
-A box cutter or eXacto Knife
-Scissors
– A bone folding knife
-A ruler (suggested)
– Tacky glue, (or whatever glue floats your boat)
SHELL MATERIALS
-Drop Cloth(s)
-Fiber Glass
-Resin
– Body filler
– Disposable brushes
-Plastic measuring cups
-Popsicle sticks
-Sandpaper
– Palm sander (suggested)
-Spray paint (Black and rust)
-Acrylic Paint
MUST NEED
-Masochistic personality or a task mas- I mean teacher who will keep you going.
Step 1: Printing and Creasing

For this project we will be using Pepakura, which is a software specifically for paper fold project.
If you have not purchased pepakura, don’t worry! If you open the program and file you can save it as a pdf. From there you can print immediately, or if you have a plotter, make combine the different pieces in adobe illustrator to print faster.
WARNING: If you are a bulky person or just have a large head, I suggest increasing the file 150%-200% in Illustrator. I am on the bulky side, so 200% works for me. If you are 6ft and under you will be fine with the current file size.
After printing your file out it is time to use the bone folding blade and your laptop.
Before cutting or assembly, I like to pre-crease, or as we say in Florida, pre-bone my paper with the bone folding knife. If you have never used a bone folding knife, first place your paper on the cutting mat, then take your bone folding knife and run it over all the folding edges of the paper which are designated by a dashed line. This will take you a while, and is a lot less monotonous if you have some friends to help. Pull up your favorite podcast and get to creasing.
Note: I did not make the smaller parts of the helmet, such as all the knobs and rivets, and I kept the bottom right hole on the neck open to run tubing through.
Step 2: Cutting and Glueing
A note before you begin, I suggest you begin construction at either the top or bottom of the mask, and overall to do it in halves. It doesn’t matter which end you start with, but it is easier to simply glue the two halves together than to build it as a solid piece. I prefer starting with the top half because then I can wear it through the rest of the folding to remind me why I’m doing this.
Here is a helpful video if you have never assembled a pepakura fold before:
Keep the model open on pepakura during this process. In the left window of pepakura, click on section of the model, and you will see that section highlighted in the left panel of pepakura. Select that paper section and cut it out. Fold at each section,(I suggest folding in both directions). Now, in the right panel on the section you have just folded, right click and select find adjoining face. This will show you which section you will glue to your first piece. Repeat the cutting and folding process, and glue. Make sure your tab is facing the inside of the helmet. Congratulations! Now repeat this process another two hundred times and you’ll be halfway there!
After each half is done, glue the two sections together at the neck with glue, and your helmet should be ready to fiberglass.
Step 3: Fiber Glass
Now for this step we’ll be needing to use our safety equipment. Put on your organic filter mask, safety glasses, and a pair of disposable gloves (keep the box on hand). You will also want to work outside or in an area with a good ventilation system.
for those who have never worked with resin and fiber glass, here is the company’s video on using it :
First, put down you drop cloth. Resin is a pain to get off of tables, and this way you can work more freely without the fear of getting resin on your furniture. Then, while wearing gloves, cut 3 inch squares of fiberglass. make sure to cut up a bunch. Next, stir 1oz of resin with 8-10 drops of hardener,(I use bondo resin and fiber glass, if you are not make sure to read your resin’s directions), and stir for 50 seconds with a popsicle stick. After this, take a sponge brush and dab a small amount of resin on an small area on the outside of the helmet. Next, gently place a square of fiberglass on the area. Now, dip you brush in more resin, and dab the fiberglass with it until it sits flat. It is VERY IMPORTANT to dab and not brush, as it may unravel the fiberglass. Now repeat the process, making sure each fiberglass strip overlaps the other, until you are out of resin. your resin will no longer be tacky after it is cured.
you can either wait for this section to cure and continue from there, or you can continue to fiberglass the helmet. I would suggest doing this in sections as well, patience results in less mistakes and therefore less work. Curing time may differ on the weather, during this process my resin cured within 30-45 minutes. You will know it is cured when it has no stickiness.
After your helmet is completely fiber glassed and cured, put on your particle filter and sand it. Be careful not to sand down to the paper, just sand it enough so any stray strands are gone and the surface is level.
notes: You can reuse your plastic measuring cup. Simply wait for the resin to cure, then give the cup a slight squeeze, and you can generally lift the resin out.
The smaller and more cramped the area, the smaller the strips of fiberglass you will want to use. Its easier to cut soft fiber glass than to sand it down once it is hardened.
Make sure your fiber glass sits as flat as possible, bubbles in the fiberglass will make your helmet look disfigured, and you’ll have to sand the bubble away and reapply resin and fiberglass.
For very difficult ares,(specifically the neck), I just put on multiple layers of resin and skip the fiberglass.
Step 4: Putting on Filler
Now that your helmet has a hard shell, you can begin to round out the shape by applying automotive body filler.
For this part you will need some sort of plastic mixing surface, a palette knife or other flat mixing tool, as well as gloves, and safety glasses. You may also want a smaller more maneuverable applicator for your helmet to reach into tight corners. I just use a popsicle stick.
First, take a golf ball sized amount of body filler and put it on the mixing surface. Then, after kneading your hardener, apply a line of hardener across the diameter of the grey filler. Using a palette knife, move the bondo in a slow x mixing pattern to avoid bubbles. Your bondo will be ready to apply after it has turned salmon pink. Make sure you stick with small amounts, as you will only have about 5 minutes to work with it.
Using your palette knife or other applicator, apply a thin coat of filler to your helmet. make sure the filler is pressed firmly into the surface to avoid bubbles. After your filler becomes crumbly, it can no longer be worked with.
Continue this process until the helmet is covered and looks rounded. It is better to build up thin layers than to gob on a blob of filler, as it is more likely you will get air bubbles, and it will also be a pain to sand it down.
now, take 60 grit sand paper and sand away the excess filler. next, smooth with 180 grit sand paper. You can use your palm sander for this process if you have one, or you can rough it out by hand. Use a dremel in any tight spaces or for detailing.
ALTERNATIVELY, you can apply the filler more haphazardly and leave more inconsistencies in it to give the helmet a more aged, welded effect. I did this on my helmet, and it helps in making the helmet appear more tarnished. But to each their own.
notes: If you end up with lots of pinholes in your filler and it bothers you, bondo makes a glaze product that will produce a smooth exterior. Personally the little stuff doesn’t bother me.
Step 5: Painting
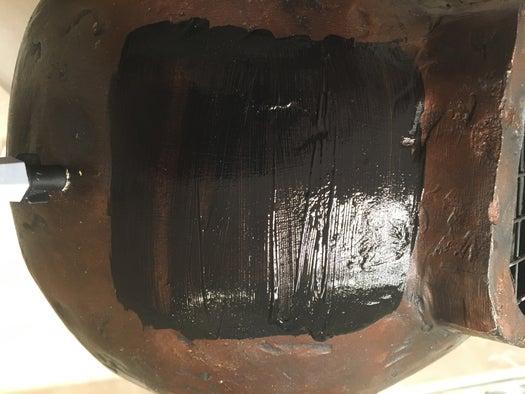
You will need a mask for fumes, disposable gloves, and spray paint of your choosing, optionally you can also buy black acrylic for the detailing.For this process I used rust colored metal paint and acrylic black, though to be more historically accurate you may want to use brass.
Put down a tarp in a ventilated area, or spray paint somewhere you don’t mind getting paint on. keep your spray paint a foot and a half away and spray the inside of the helmet first if using a different colored spray paint,(I used black), and allow to dry. Then, spray the outside and allow to dry.
After putting on a coat of spray paint, take a paint brush, towel, or paper towel, and apply black acrylic to a portion of your helmet. Wait one minute, and then take a moist paper towel or rage and wipe the surface. You will notice that the black acrylic stays in all the low points. This will give the helmet a tarnished appearance. Continue this until you have your desired effect.
Congrats! The sculptural portion of the Instructable is over. Now, on to the electronics!
Source: Squirting Scuba Helmet