For my children and technology class, we were challenged to make a product using a Lilypad Arduino.
I am currently obsessed with the movie Frozen, so I decided to create something using one of the most iconic characters of the movie, Olaf.
I used a blank, reusable grocery bag and created a picture of Olaf with led lights and music that plays the most popular line of “Do You Want to Build a Snowman.”
I have attached a video of the bag in action below as well!
Step 1: Materials
Crafting Materials:
- Bag (I used a reusable grocery bag I already owned but any bag will do)
- White felt
- Orange felt
- Brown felt
- Black felt
- Felt snowflakes
- Scissors
- X-Acto Knife
- Thread (any color)
- Hot glue gun
- Extra hot glue sticks
Electronics Materials:
- LilyPad Arduino Simple board
- 5 White LilyPad LEDs
- Li-Po Battery
- Conductive Thread
- LilyPad Button Board
- LilyPad Buzzer
- LilyPad FTDI Basic
- Mini-USB cable (I used the one that came with my GPS)
- FTDI driver and Arduino IDE should be installed on your computer
Step 2: Planning
Sketch Craft:
I planned to create Olaf surrounded by twinkling/flashing snowflakes. I also planned where all the electronic attachments for the LilyPad Arduino hardware. (First Picture)
Sketch Circuit:
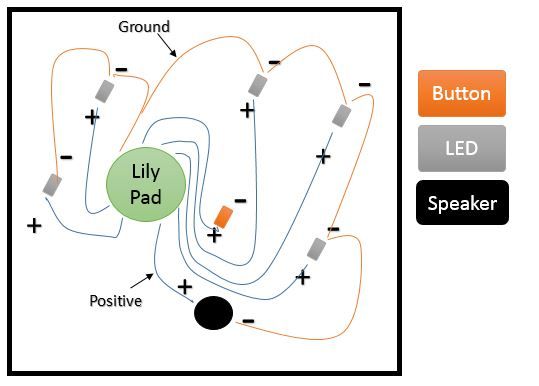
I sketched how I was going to sew the pieces of my LilyPad and attach them via conductive thread. The point of the sketch is to ensure no “wires” (stitches) are crossed, because then the final product won’t work. This is on a piece of fabric separate from the bag, so none of the electronics are exposed. (Second Picture)
Step 3: Create Olaf
1. Print the attached picture of Olaf (also available here).
2. Cut out the individual pieces necessary to create Olaf out.
3. Trace the pieces onto the appropriate colors of felt (white for body, brown for arms/hair, orange for nose and black for eyes/mouth/coal).
4. Hot glue them onto the bag to create Olaf.
Step 4: Sewing the circuit
1. Using the diagram from step two, lay out the LEDs, button, buzzer, and LilyPad board on the piece of fabric that will be the backing to your project.
(I used a single stitch of regular thread to hold each in place before I used the conductive thread to attach everything securely and ensure the circuit would work. You definitely don’t have to do this, but I wanted to make sure everything was laid out properly)
2. Begin sewing the conductive thread from the correct location on the LilyPad board to the corresponding pin. Wrap enough thread around the connection sites to ensure that it will conduct electricity.
3. After all of the positive connections are sewn, go back and sew the ground to each of the pins from the “-” on the LilyPad board.
For more detail: Singing Olaf Bag (Frozen) Using Arduino


