Summary of RFID Blocking – How Secure Are Our RFID Cards? How Can We Protect Them Further? – an Experiment
This article describes an experiment testing methods to block RFID credential skimming (focused on 13.56 MHz HF cards). It explains RFID basics, frequencies, and risks, then shows building an Arduino RC522 reader project and testing commercial and homemade blocking solutions (RFID-blocking wallet, aluminum-foil wallet, and metal-backed ID badge). It explains how conductive shielding reflects electromagnetic fields to prevent card-reader communication and gives step-by-step wiring, UID reading, programming, and DIY blocking instructions.
Parts used in the RFID Blocking Experiment:
- Arduino Uno
- Computer for programming
- RFID rc522 module (with tags)
- LCD1602 module (or i2c variant)
- Male-to-male jumper wires
- Breadboard
- 10K potentiometer
- Red LED
- Green LED
- Two 10K resistors
- Aluminum foil
- Duct tape
- RFID blocking wallet (Buffway)
- ID Stronghold RFID badge holder (or similar)
- Optional: Servo
- Optional: Collected hotel cards
- Optional: Regular non-RFID blocking wallet
NOTE: Vocab
- RFID Reader – The box-like object that can be activated by an RFID tag
- RFID Tag/RFID Card – The card or tag that activates the reader. I took apart one and is displayed in the pictures above.
- RFID System – The tag and the reader work together.
- Electromagnetic Waves – A wave that contains both electric and magnetic waves that are traveling on the same frequency and are perpendicular to each other.
- EMC – Electromagnetic current.
- EMC Shielding – blocks, reflects, and/or absorbs an electromagnetic current.
This is an RFID blocking experiment where you test out multiple ways to protect your RFID credentials. RFID is everywhere these days, it’s in credit cards and phones for the tap to pay like Apple Pay and Google Pay. However, it is most commonly used by hotels, businesses, and schools as access cards. All you do is wave your card in front of the reader and it lets you in.
Nowadays, there is a lot of fear about RFID hackers stealing your credit card information through RFID readers. In reality, no scammers even bother to steal your information with RFID scanners. In order to steal information this way, they would need a very high-powered reader (which is very expensive) and need to be in an area where a lot of people use RFID credit cards (there aren’t that many). Additionally, credit cards are encrypted, so the scammer would need to acquire the information through this difficult process and then decrypt it. There are a lot of cheaper and easier ways to get credit card information online. Instead, most RFID is stealing credentials rather than credit cards. If a high-security place like a government building, a bank, or a different building used RFID people become more interested in stealing cards. This project is going to focus more on protecting these credential cards rather than credit cards.
note: This introduction is going to be kind of an infodump so you can understand how the project works, so I recommend at least skimming through the sections below.
Background Information
Before we start this project it’s important to understand how RFID works. This is a really basic explanation of how RFID works, so if you want to go into more detail I suggest reading this article. I included a lot of the information you see here in
Basically, the reader sends out an electromagnetic field that the RFID card picks up, which triggers the card to send digital information back to the reader through radio waves. There are a couple of variations to this process that depends on the card, such as:
- Active RFID Tags – There is a battery in the card that gives it the power to send information to the reader. These do better in longer distances and are bulkier than passive tags.
- Passive RFID Tags – All of the energy the card needs is harvested from the reader through the electromagnetic field. Most hotel keys are passive, which is why they are smaller and need to be right next to the reader.
In addition to having different energy methods, RFID systems can run at different radio frequencies, such as:
- 125 kHz or Low Frequency (LF) – The oldest frequency, but also the cheapest. This frequency is one of the most documented, which makes information on how to break in widely available. It also has no government regulations.
- 13.56 MHz or High Frequency (HF) – Newer than LF and more secure. It can be more expensive, but not by much. It is also the most commonly used and found in most hotel cards.
- Ultra-High Frequency (UHF) 865–868 MHz (Europe) or 902–928 MHz (North America) – These tags are most often used by trucking and railroad companies to keep track of trucks and their inventory. These are used less because they have more regulations than other kinds. UHF tends to interfere with other systems as well.
There are some other kinds, but these are the most common. For this project we’re using HF or 13.56 MHz as that is the cheapest and most common.
Where Can We Find RFID in our Lives?
- Hotel keys tend to be the most common. Not every hotel uses RFID, but you can find a lot in a city.
- Apple Pay/Google Pay uses a special kind of RFID called NFC (near field communication) to communicate with the reader.
- EZ-Pay or other automatic toll booth payments use RFID to track who is coming through and bill their account.
- Pets are often injected with an RFID microchip to keep track of their medical records and help identify lost animals.
- Schools and businesses have also been picking up RFID recently, to keep track of who is coming in and out, and to keep people out who aren’t supposed to be there.
- If you think this project is cool, wait until you hear about RFID implants. These are implanted usually into a human hand and can be programmed to open doors, tap to pay, send a website link to someone’s phone, and a whole lot of other super cool stuff!
There is no limit to the awesome stuff that RFID can do, so let’s get started!
Supplies
- Arduino Uno
- Computer for programming
- RFID rc522 module (should come with 2 tags, but in my package one was broken so be prepared.)
- LCD1602 module (an i2c can work as well, but you might have to change my code a bit)
- lots of male-male wires.
- Breadboard
- Potentiometer 10K
- Red and green LED
- two 10K resistors
- Aluminum foil
- Duct tape
- An RFID blocking wallet (below are the two I used, but I recommend experimenting with your own!)
- Buffway
- ID Stronghold (highly recommended)
Optional
- A servo
- You can build a fake door out of cardboard and wood that can open as a demonstration.
- collected hotel cards (keep in mind that the rc522 is a high frequency operating reader, so it won’t respond to low-frequency tags)
- A regular non-RFID blocking wallet
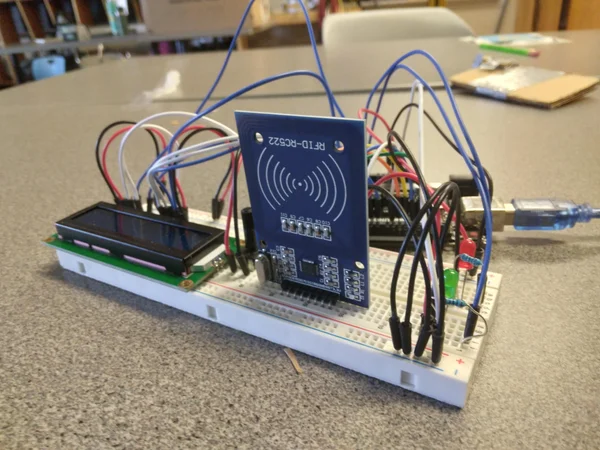
Step 1: Wire the Reader
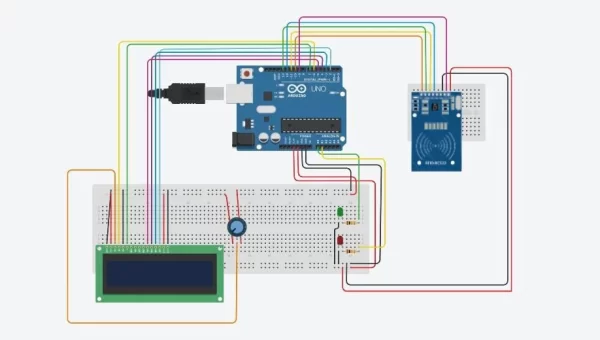
Follow the wiring diagram above.
If you want to include any special parts like a servo or a speaker add those in now.
Feel free to edit and change this diagram in any way you want!
Step 2: Find Your Cards UID
Before your card can be recognized by the reader, the reader has to know what to recognize. To do that we have to find the card UID. UID stands for unique identification, and it is 4 sets of 2 numbers and letters (example: xx xx xx xx), and you have to use the rc522 to find it. Below are the steps to finding your UID:
- install the rc522 Arduino library, called MFR522V2 (GitHub link)
- open examples and click on rfid_read_personal_data
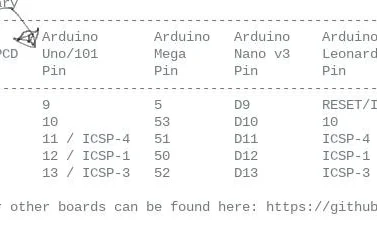
- Unplug the rc522 from your previous wiring and rewire it following the instructions at the beginning of the code. There are different instructions for different boards so pay attention.
- upload it to your board and open the serial monitor.
- Hold up your card to the reader. You can use the tag that comes in the package, or a stolen hotel card. However, if the hotel card is a low-frequency card, it won’t respond because the rc522 is a high-frequency reader.
- Then you should see a line that says “Card UID” It’s probably a good idea to write this down. Note that in the name section, it says “authentication failed” this isn’t super important, but if you want to have a custom name for your card you can change it with the rfid_write_personal_data example found in the same library.
WRITE DOWN THE UID. YOU NEED IT FOR THE NEXT STEP.
Step 3: Programming the Reader
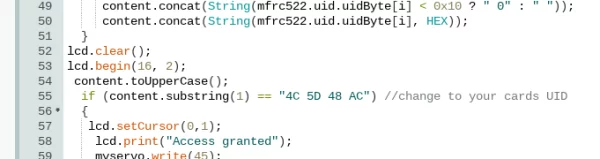
I have included the Arduino file for this project but you have to change the UID to your card UID for it to work. For reference, the number you have to change should be on line 55.
If you want to add more than one card, copy and paste both the if and else section and paste below with a different UID.
Additionally, I currently have some servo code in there as well. If you don’t want to use a servo, you can delete this or leave it as it won’t harm your project.
Remember to adjust the potentiometer to change the glare on the LCD.
Attachments

Step 4: Blocking Materials – RFID Blocking Wallet
This is where the experiment itself comes in. So we have a couple of questions we have to answer for each material:
- How do we protect credentials from RFID skimmers?
- How do these protection methods work?
- How can we recreate them?
How can we protect our credentials for RFID skimmers?
The first blocking material I want to test is the RFID blocking wallet. I chose the Buffway Slim Wallet, which is advertised as being able to block high-frequency readers, like ours. Putting the card in any pocket of the wallet, including the see-through driver’s license pocket, the reader is blocked and the card cannot be read. The wallet seems to work as advertised.
However not all RFID wallets work, a lot of the cheaper ones are just advertised as RFID blocking and don’t actually block anything. Be careful when buying an RFID wallet to look at the reviews and see if people have had success with this wallet.
So why does this work? The fabric within the wallet is lined with a special fabric that contains metal. I looked on the Buffway website and it doesn’t specifically say what it is made of, but most wallets are lined with nickel, copper, or aluminum, but some are lined with other metals.
So why does this work?
In order to block the electromagnetic signals coming from the reader, the material blocking it needs to have mobile charge carriers (example: electrons, ions), aka the material needs to be conductive. The electromagnetic signal and the mobile charge carriers interact along the surface of the conductive material and creates an opposing electromagnetic field. These two electromagnetic fields interfere with each other and make it impossible for the card to send information to the reader.
The description above is known as electromagnetic reflection and affects just the electric portion of the electromagnetic field. Note that without the electric component, it is no longer an electromagnetic field and is useless to the reader. There are ways to block the magnetic component known as electromagnetic absorption but those are much more difficult. If you want to learn more check out this article.
Finally, how can we recreate this?
So how can we recreate this outcome at home?
For this recreation, we are going to make a wallet out of aluminum to reflect the electromagnetic fields. This is a super simple super cheap replica of the commercial wallet.
*Note that aluminum is not the best metal for this job. Silver is the best at EMC shielding, however, this is incredibly expensive. Aluminum is about 40% worse than silver, but it does the job well enough for our experiment.
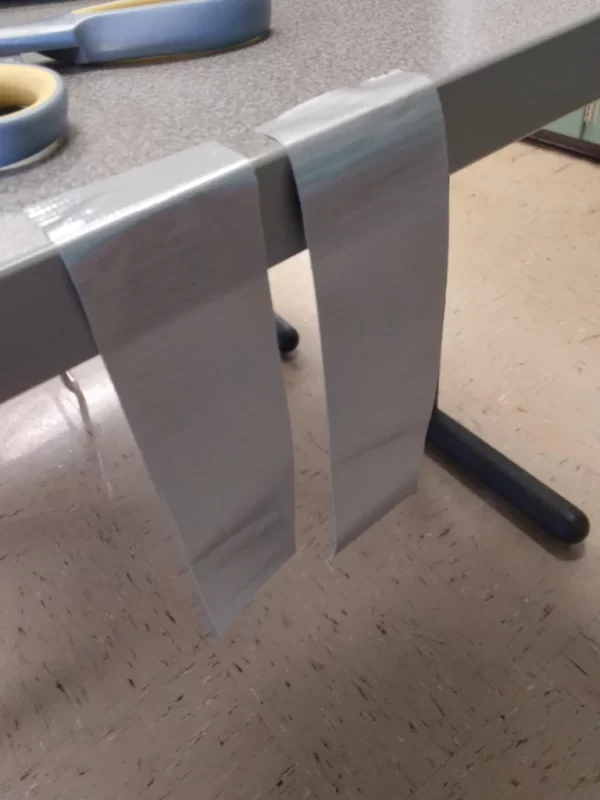
How to make an aluminum foil wallet:
- Cut off two equal-sized pieces of duct tape.
- Create circles with duct tape.
- put circles side by side so that they are touching on the edges
- and wrap the circles in aluminum foil. Leave a little bit of duct tape on the bottom.
- Cut off a small strip of duct tape and hotdog fold it over the bit of exposed duct tape to seal off that edge.
- Fold in any extra aluminum foil at the top into the wallet
- Insert your card and test it out!
*Note that the duct tape serves no purpose in blocking electromagnetic waves, it is only being used to hold the aluminum foil together and prevent it from ripping.
We achieve the same result with the homemade wallet that we did with the commercial wallet, so it does the job! This wallet is following the exact same principles as the Buffway wallet and is just a more simplified version, as it doesn’t have a leather cover and a bunch of do-dads on top.
*Note that if you wanted to use a homemade wallet like this to protect your credentials, this wallet would break super easy and wouldn’t last long. If you wanted to make something similar to this to be your everyday wallet, I would wrap the outside in duct tape as well to extend its lifespan.
Step 6: Blocking Materials – RFID Blocking ID Badge
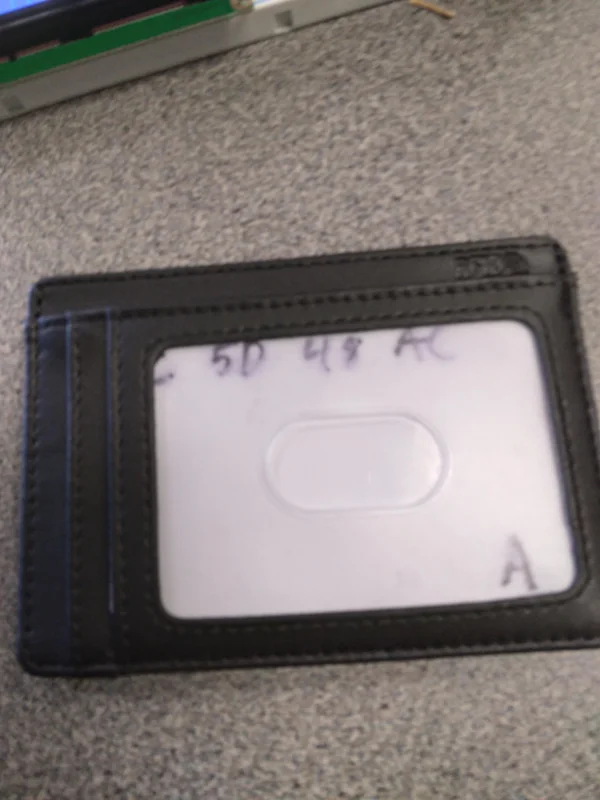
This is an alternative to the wallet that I wanted to highlight because it works on a slightly different principle. This is an RFID ID badge holder. What is really interesting about this is that it doesn’t have a metal cover, the front of the badge is empty, and there is no material covering.
Yet when you hold it up to the reader, it still can’t be read. In order to read this card, you need to open it with the alligator clip on the top, and then the reader can read it.
How does this work?
This ID badge clearly, doesn’t run on the same principle as the wallet, there is no way that it is being surrounded by metal, the case is made of plastic. So what is happening?
Notice that the sheet on the back has a metallic sheen. It’s hard to show in pictures but if you feel it it’s clearly a sheet of metal. But what would this do?
This thin sheet of metal is doing the exact same thing that the wallet was doing but in a slightly different way. The EMC coming from the reader is going through the card and hitting the metal backing. The backing is reflecting the EMC signal and that reflected signal interferes with the electric component, canceling out the original EMC and stopping communication with the reader.
However, this cancelation only works when the metal is touching the card, because the reflection needs to go through the card. Otherwise, the EMC would hit the metal and the card separately and have no effect, that’s why the ID badge doesn’t block the reader when the card and metal are separated with the alligator clip and does work when they are pressed together.
So How can we recreate this?
Source: RFID Blocking – How Secure Are Our RFID Cards? How Can We Protect Them Further? – an Experiment
- What frequency does this project use?
The project uses HF 13.56 MHz RFID. - Can an RFID blocking wallet stop the reader?
Yes, the tested commercial RFID blocking wallet (Buffway) prevented the RC522 reader from reading the card. - How does conductive shielding block RFID signals?
Conductive shielding provides mobile charge carriers that reflect the electromagnetic field, creating an opposing field that cancels the reader signal and stops card communication. - Can I make a DIY RFID blocking wallet?
Yes, a simple aluminum foil wallet assembled with duct tape replicated the commercial wallet and blocked the reader. - Why does the ID badge holder block the reader only when closed?
The badge has a thin metal backing that must touch the card so the reflected EMC passes through the card and cancels the reader signal; separating them prevents blocking. - Do all RFID-blocking wallets work?
No, some cheaper wallets advertised as RFID blocking do not actually block signals; reviews should be checked. - How do I find my card UID with the RC522?
Install the MFRC522 library, run the rfid_read_personal_data example, rewire per code instructions, open the serial monitor, and present the card to see Card UID. - Do I need to change the Arduino code to match my UID?
Yes, you must change the UID in the provided Arduino file (noted around line 55) for the reader to recognize your card.