Summary of Programmable Temperature Controller + Hot Plate
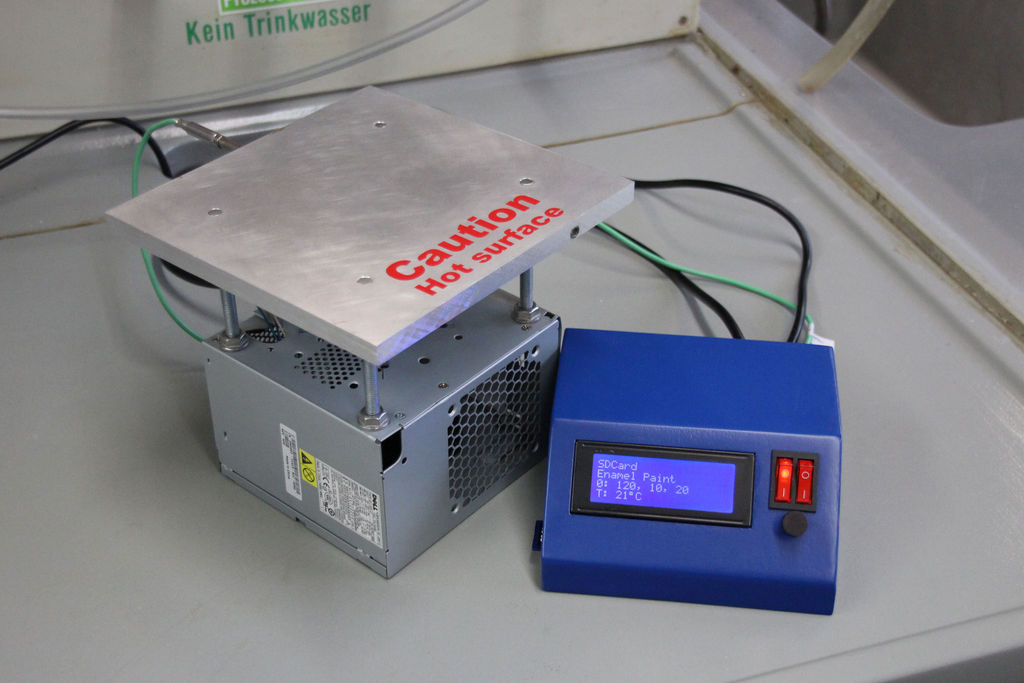
Heating and precise temperature programming are critical for lab work, so the author built an affordable, customizable programmable temperature controller that runs ramps and reads programs from an SD card, logs data, and can control many heating devices via a thermocouple. The project includes a laser-cut wooden case and an optional DIY hot plate with cartridge heaters; total cost about $45 for the controller and $55 for the hot plate. The build is intended as a weekend project and lists required electronics, casing materials, hot plate parts, and tools, plus assembly steps for the enclosure.
Parts used in the Programmable Temperature Controller + Hot Plate:
- Solid state relays (5V control voltage, 16 A load current)
- LCD
- SD card board
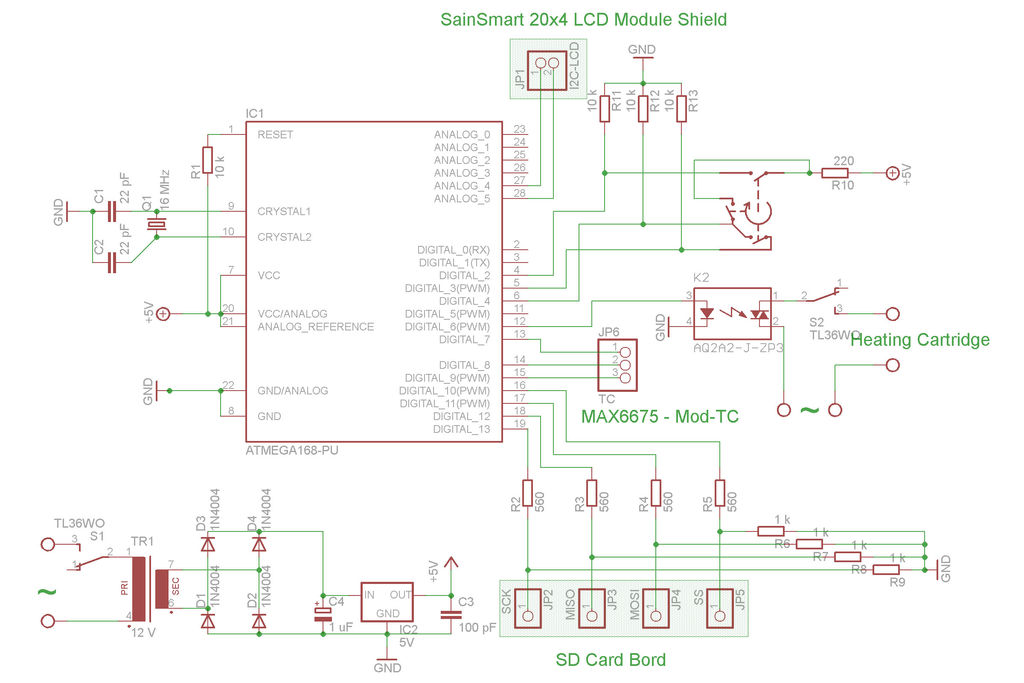
- MAX 6675 controller board
- Atmega 328 chip & socket
- 5 x 10 kΩ Resistors
- 4 x 1 kΩ Resistors
- 4 x 560 Ω Resistors
- 1 µF Capacitor
- 100 pF Capacitor
- 2 x 22 pF Capacitors
- 16 MHz quartz oscillator
- LM7805 5V linear voltage regulator
- Rotary encoder
- Mechanical 110 V switches
- 10 A fuse and fuse holder
- 4 mm plywood
- Wood glue
- Laser cutter
- Primer
- Paint
- Metal case for hot plate support (e.g., old computer power supply)
- Small plastic case
- Aluminum plate 20x20x1 cm
- 2 Cartridge heaters (1/4’’ or 6 mm)
- Type K thermocouple (1/4’’ or 6 mm)
- Steel thread rod (1/4’’ or 3/8’’) and nuts
- Locking screws
- Lead
- Copper paste
- Long (~30 cm) drill for heating cartridge and thermocouple
- Tap & die for locking screw and steel thread rod
- Drill press
Heating things up is one of the most performed tasks in a lab. Quite a lot of times it is not enough to simply hold something at a certain temperature, but the rate at which something is heated and for how long is just as important. Especially when you try to develop catalysts for chemical processes, the temperature program and exact temperature control is crucial and you probably do not want to stay in the lab for 16 hours to manually adapt your temperature program. Unfortunately, programmable temperature controllers that can automate processes are really expensive. So I decided to build a highly customizable controller that is able to run temperature ramps and read multiple different temperature programs from a SD card. It also provides a logging function on the SD card that allows you to evaluate the resulting temperature profile after running a program.
It is a great hack for your heating devices, since it can be easily connected to almost any heating apparatus you can think of, as long as it allows you to also connect a thermocouple. So If you have ever thought about building the perfect electric kiln (there are multiple really good explanations online) or hot plate (take a look at the steps 6 and 7), now is your time.
Overall the controller should cost you about $45 and the hot plate about $55. You should easily be able to build this as a weekend project.
Step 1: Things you need
Programmable temperature controller:
Electronics:
- Solid state relays (5V control voltage, 16 A load current)
- LCD (e.g. on amazon.com)
- SD card board
- MAX 6675 controller board (e.g. on olimex.com)
- Atmega 328 chip & socket
- 5 x 10 kΩ Resistors
- 4 x 1 kΩ Resistors
- 4 x 560 Ω Resistors
- 1 µF Capacitor
- 100 pF Capacitor
- 2 x 22pF Capacitor
- 16 MHz quartz oscillator
- LM7805 5V linear voltage regulator
- Rotary encoder
- Mechanical 110 V switches
- 10 A fuse and fuse holder
For the casing:
- 4 mm ply wood
- Wood glue
- Laser cutter
- Primer
- Paint
Hot plate:
- Metal case as support (e.g. an old computer power supply)
- Small plastic case
- Aluminum plate 20x20x1 cm
- 2 Cartridge Heaters (1/4’’ or 6 mm) (e.g. on amazon.com or from China on ebay.com)
- Type K thermocouple (1/4’’ or 6 mm)
- Steel thread rod (¼ ‘’ or 3/8’’) and nuts
- Locking screws
- Lead
- Copper paste
Tools
- Long (ca. 30 cm) drill for the heating cartridge and thermocouple
- Tap & die for Locking screw and steel thread rod
- Drill press
Step 2: Building the case part 1
You can of course use any casing you want, but I decided to laser cut a custom one. I uploaded the files to this step (the three different file types all include the same design. I just wanted to offer you options depending on which file type works best for you). You can see in the first image where every piece goes. Start by glueing the LCD distance holder to the back of the front-top panel. While the wood glue sets, attach the side panels to the back and the top panel. A corner clamp is certainly helpful to do so. Than add the front-bottom and front-top piece.
For more detail: Programmable Temperature Controller + Hot Plate
- What does the controller do?
It runs temperature ramps, reads multiple temperature programs from an SD card, and logs temperature data to the SD card. - Can the controller be connected to different heating devices?
Yes, it can be connected to almost any heating apparatus that allows connecting a thermocouple. - How much does the controller and hot plate cost approximately?
The controller costs about $45 and the hot plate about $55. - What temperature sensor is used in the project?
A Type K thermocouple is used, read by a MAX 6675 controller board. - What power switching component is recommended?
Solid state relays with 5V control voltage and 16 A load current are recommended. - What materials are suggested for the hot plate surface?
An aluminum plate 20x20x1 cm is suggested for the hot plate surface. - Is a laser cutter required for the casing?
No, any casing can be used, but the author used a laser-cut custom plywood case and provided files for that design. - What tools are needed to install the cartridge heaters and thermocouple?
A long (~30 cm) drill for the heating cartridge and thermocouple, a tap & die for locking screw and thread rod, and a drill press are listed. - Does the project include logging functionality?
Yes, the controller provides a logging function on the SD card to evaluate the temperature profile after running a program.