Tic Tac Toe is a two player game in which the players compete to get 3 pieces in a row. In this project we constructed a Tic Tac Toe game using a number pad and neo pixels as pieces. This results in a portable Tic Tac Toe game requiring only a wall outlet to play.
Supplies:
- Neo Pixel LEDs
- Membrane switch module
- Arduino Uno
- Power Supply (Arduino) (9V 2.5A)
- Wires Prototype board
- Breadboard (for testing)
- 3D printer3D print Filament
- M2.5 crews and nuts
The attached files contains pricing and links for the materials. The list was created early in 2021 so the prices may change. The neo pixels listed were used when we made this project, we suggest using neo pixel strips to avoid having to solder each of the individual neo pixels together.
Step 1: Concept
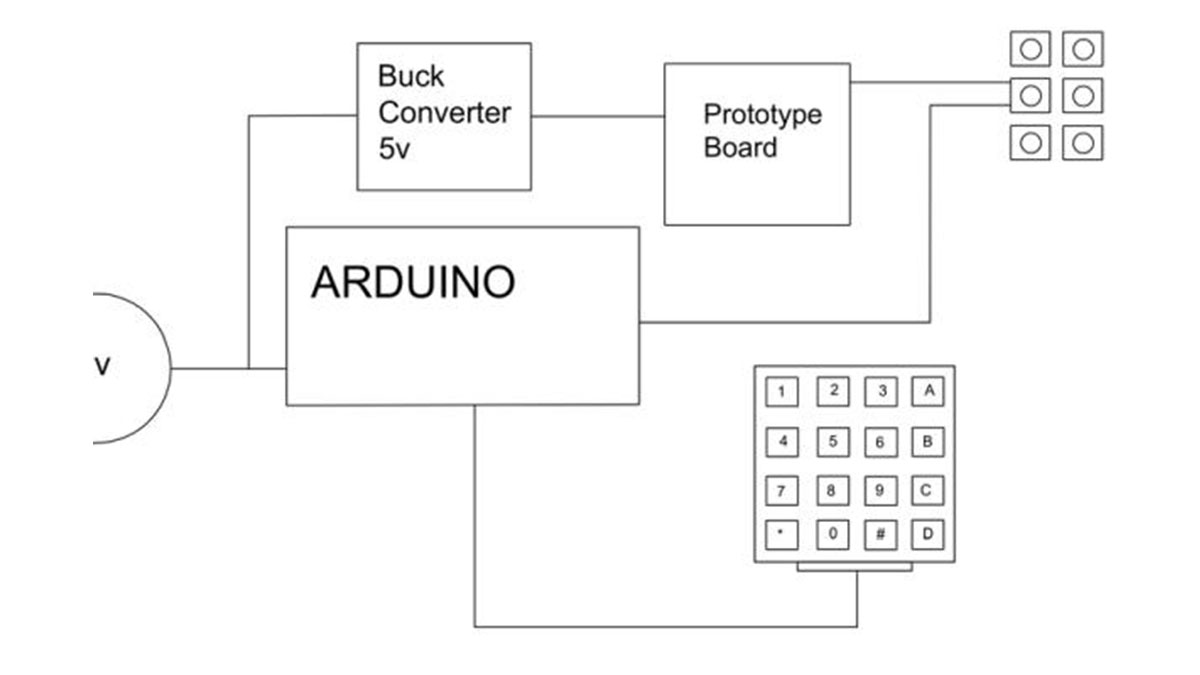
This project is a portable Tic Tac Toe game powered using a wall outlet. The game can be played and reset indefinitely. For a rough size comparison, it is around the size of a TI-89 calculator. Referring to the one-line diagram will show the major components of the project and how they interact with each other. The design of the main body is such that there is access to both the serial port of the Arduino Uno as well as the plug for the wall power. The project is designed to be powered using the 12v source, not the serial port of the Arduino. The graphic displays the functionality of the project and how a game is played.
Step 2: Circuit Diagram
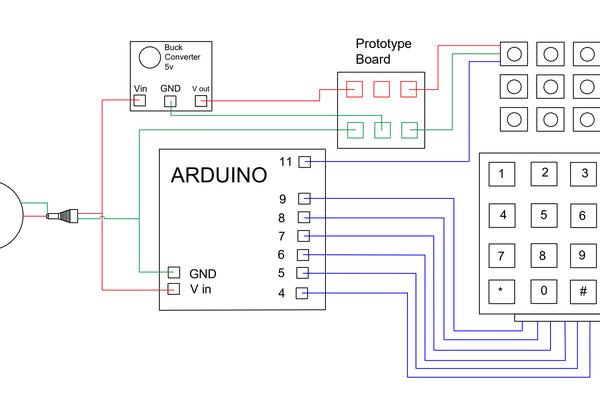
The circuit diagrams show each individual connection that need to be made to complete the project. As shown, the wall outlet provides power to the Arduino Uno and the buck converter. Once the voltage is stepped down from 12v to 5v by the buck converter, 5v is supplied to the neopixels. The Arduino Uno is supplied with 12v from the wall outlet, and receives the signals from the number pad and provides the output to the neopixels.
Step 3: Arduino Uno Code
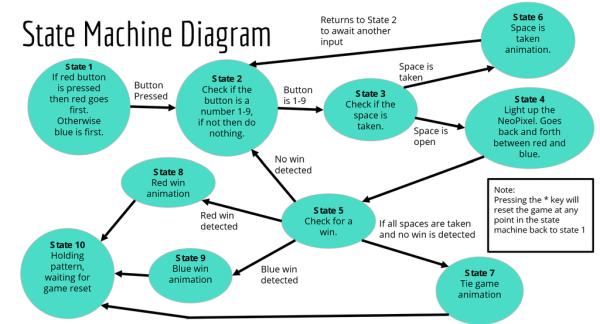
The code used to make Tic Tac Toe work is separated into 10 states.
In state 1 the player is deciding whether blue or red will play first. If a number 1-9 is pressed then blue will play first, if A, B, C, D, or # is pressed and then 1-9 is pressed then red will play first.
State two then functions as the launchpad for the rest of the game as state 1 is only used on initialization and resets. From state two when a number is pressed the code runs through state three to check if the space corresponding to that number is taken.
In state three, if the space is taken, the code sends you to state six which plays a space taken animation. This animation flashes the color that is has already taken the space. Once the animation plays through the code sends you back to state two awaiting another input. If a number is pressed and the corresponding space is not taken, the code send you to state four.
In state four the neo pixels are lit. State four is the state that the code will switch the inputs from blue to red. Any time a neo pixel is lit, the coordinates are translated into a 2D array. The concept for the array is this, when the game initializes or resets the array is filled with zeroes. Anytime a neo pixel is lit, a number is placed into the corresponding location in the array, a 1 for red and a 2 for blue. By placing the different values in the array we are able to check for win conditions based on color. From state four the code goes to state five and checks for a win condition.
In state five, if no win is detected and there are still spaces open (zero’s present in the array), then the code goes back to state two and the loop continues. If there is no win detected and there are no spaces open (the array is filled with 1’s and 2’s with no zeroes), then the code goes to state seven and plays a tie game animation. States eight and nine is a red and blue win respectively, these states will play the win animation for the given color.
From states seven, eight, and nine, the code goes to state ten. State ten is the holding pattern where the code will wait until the game is reset using the ” * ” key.
Of note, the ” * ” key can be used at any point in the code to reset the game.
The design of the housing is such that it grants access to the serial port on the Arduino Uno. This allows for the code to be modified at will. This can include different colors for the players, different win animations, and even different rules.
Step 4: Manufacturing
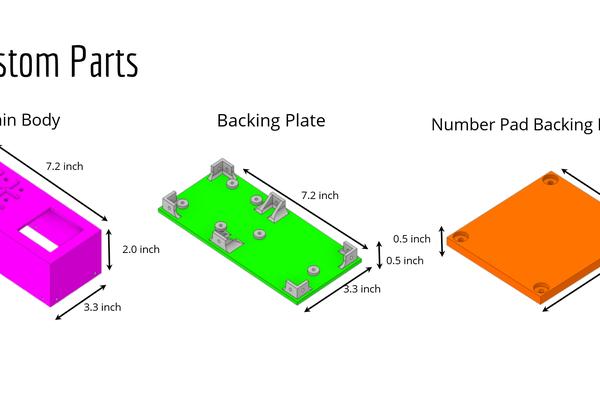
The stl files were designed by Jacob Fisker-Anderson. The spacers are designed to raise the Arduino Uno up off of the back plate. The stl files will work in most slicing software, allowing the file to be turned into G-Code that the 3D printer will use to complete the print. The figure is for referencing how the pieces all fit together.
Step 5: Assembly
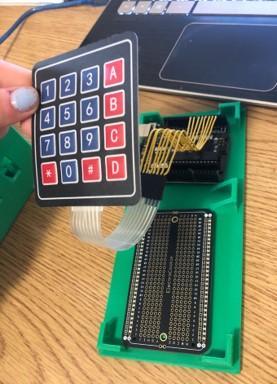
Here are some of the pictures of the assembly process. Depending on wire management the housing can run out of room quickly. We recommend that everything is tested prior to assembly to avoid any errors from faulty equipment. Additionally, whenever a joint is soldered it should be checked for continuity to ensure that the solder was successful and the piece is still functional.
Source: Neo Pixel Tic Tac Toe (Arduino Uno)