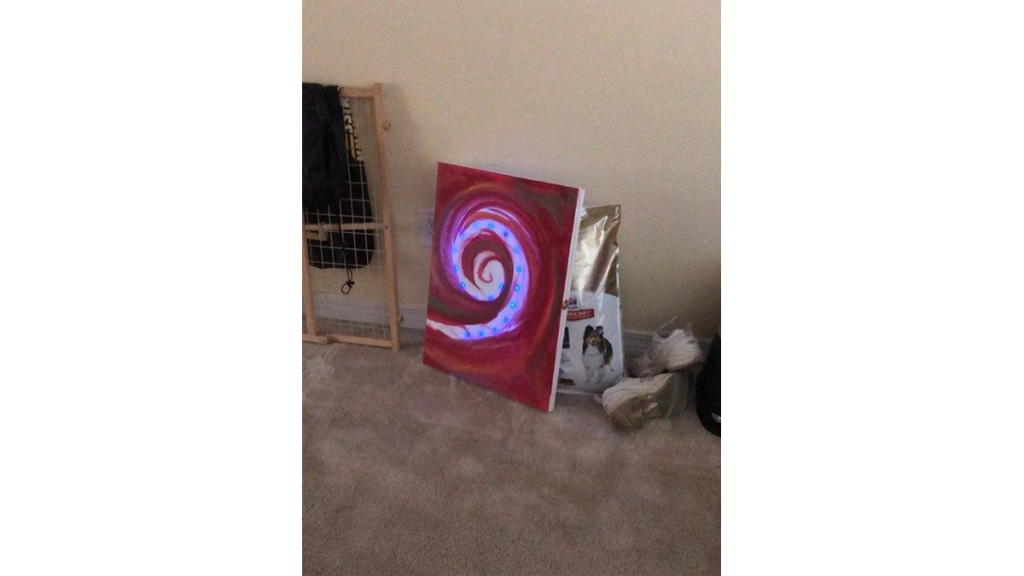
This is how I made my project for Electronic Art. This project was to focus on using an Arduino Uno to make a wearable. I did not focus so much on the wearable, I more so focused on playing around with an IR sensor and your average remote controller. This project evolved from wanting to do a dualing wands project to making a target practice for witches and wizards. This is what I have made and how I made it.
First things first.. We need a:
Both female to male, male to male wires for your breadboard
Small Remote Controller that can be found anywhere around the house that isn’t used anymore
Will need your computer to install the Arduino app to your computer
acrylic paint for the canvas and your wand
latch to keep canvas closed
2 hinges to keep both canvases together
Step 1: Downloading Libraries to Arduino

Because we are using an Infrared sensor and a Neopixel strip, you will need to find where to get the libraries for these in order to get this to work.
For the Neopixels, all it takes is to go through the Sketch Tab > Include Libraries > Manage Libraries and a window will pop up featuring other libraries. Search for Neopixel… The screenshot tells you exactly which one to pick.
Another library you will need will actually be downloaded from this website on a zip file which you go to the sketch tab> include libraries> add .zip library.
https://github.com/z3t0/Arduino-IRremote
We used the IRremote.h which states it uses Lego Power Functions.
Step 2: Setting Up Breadboard and Arduino
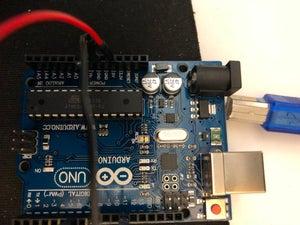
Use the female to male and male to male wires to plug into both Arduino and the breadboard.These photos will show you exactly what goes where.
Step 3: Mash Up the Codes
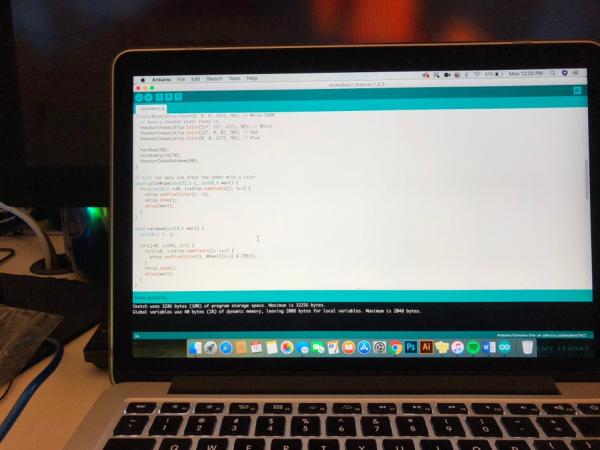
We used both the IRtest sketch that was in the IRremote.h library… and we used the strandtest sketch in the Neopixel library. We just took both of them and mashed them together. Below is the example that I used in my code. Something to note when you get to the bottom you will see the code that was received from my personal remote controller. This will need to be edited for your controller when you use the Serial Monitor window… or the magnifying glass button on the right of the Arduino Program. When using this there is a more open window to use the different functions that Neopixel features. Notice I did not use a rainbow wipe or any of the rainbow sequences at all. You are more than welcome to add those into your strip and make it your own. Something I noticed with my remote controller is that there was a code that often interrupted the buttons I pressed which was the code “ffffffff”. I used that annoying code and turned it into just another flashy led light show. If this does happen to you, this is how I solved that problem instead of letting it interrupt the color I wanted to press.
I also want to add the cheat sheet I used to get the colors that I wanted my Neopixels to be.
/*
* IRremote: IRrecvDemo – demonstrates receiving IR codes with IRrecv
* An IR detector/demodulator must be connected to the input RECV_PIN.
* Version 0.1 July, 2009
* Copyright 2009 Ken Shirriff
*/
#include
int RECV_PIN = 11;
IRrecv irrecv(RECV_PIN);
decode_results results;
//This is the global varieables for neopixel
#include
#ifdef __AVR__
#include
#endif
#define PIN 6
Adafruit_NeoPixel strip = Adafruit_NeoPixel(55, PIN, NEO_GRB + NEO_KHZ800);
//close for globel variables for neopixel
void setup()
{
Serial.begin(9600);
// In case the interrupt driver crashes on setup, give a clue
// to the user what’s going on.
Serial.println(“Enabling IRin”);
irrecv.enableIRIn(); // Start the receiver
Serial.println(“Enabled IRin”);
// set up for neopixel
#if defined (__AVR_ATtiny85__)
if (F_CPU == 16000000) clock_prescale_set(clock_div_1);
#endif
// End of trinket special code
strip.begin();
strip.show(); // Initialize all pixels to ‘off’
}
void loop() {
if (irrecv.decode(&results)) {
Serial.println(results.value, HEX);
irrecv.resume(); // Receive the next value
String code = String(results.value, HEX);
Serial.println(” this is the teh constructed string ” + code);
if(code==”9d62e11e”){
colorWipe(strip.Color(255, 0, 0), 50); // Red up
}
else if(code==”9d62619e”) {
colorWipe(strip.Color(255,255,0), 50); // Yellow down
}
else if(code==”9d6250af”) { colorWipe(strip.Color(153,0,153), 50); // Purple left }
else if(code==”9d62d02f”) { colorWipe(strip.Color(0,255,0), 50); // Green right }
else if(code==”ffffffff”) { theaterChase(strip.Color(0,0,255), 50); // blue whenever it interupts the codes from other buttons }
else if(code==”9d62708f”){ theaterChase(strip.Color(255,000,153), 50); //we will see middle button }
else{
colorWipe(strip.Color(0,0, 0), 50); // no color}
}
}
delay(300);
}
void colorWipe(uint32_t c, uint8_t wait) {
for(uint16_t i=0; i
strip.setPixelColor(i, c);
strip.show();
delay(wait);
}
}
void theaterChase(uint32_t c, uint8_t wait) { for (int j=0; j<10; j++) { //do 10 cycles of chasing for (int q=0; q < 3; q++) { for (uint16_t i=0; i < strip.numPixels(); i=i+3) { strip.setPixelColor(i+q, c); //turn every third pixel on } strip.show();
delay(wait);
for (uint16_t i=0; i < strip.numPixels(); i=i+3) { strip.setPixelColor(i+q, 0); //turn every third pixel off } } } }
Step 4: Screw Hinges and Latch to Canvases
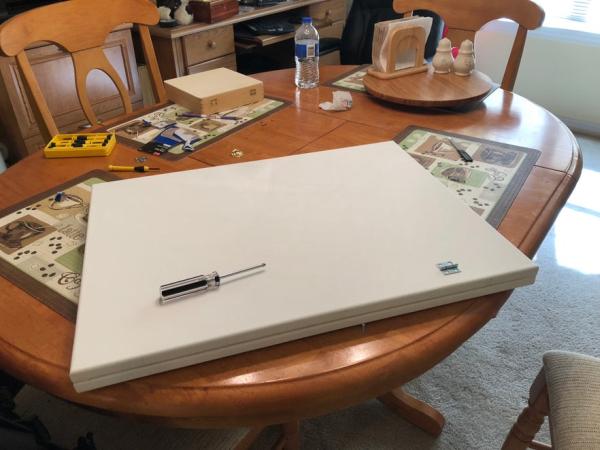
The purpose of this is when you want to hang your work, the Arduino isn’t exposed, and I invisioned sewing the arduino to the canvas, but I didn’t want to do it to the canvas I was painting on. So I bought the hinges from Walmart for like 3 dollars, and the latch I took off of a cigar box that was laying around the house. The hinges are 3 inches away from the edge. I estimated the length for the sake of my canvas, it will vary for the size of canvas you want to use.
Step 5: Make a Wand!
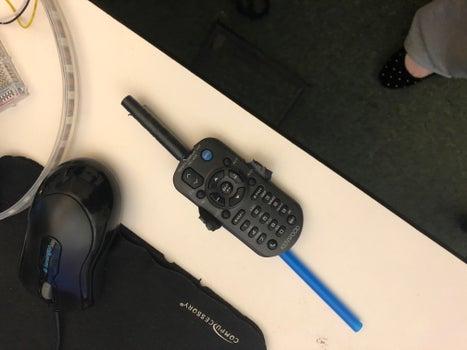
I used masking tape to put over the remote controller, and I also used one of the hard plastic straws. Just make sure when you do this to NOT COVER UP THE LED ON THE REMOTE OR IT WILL NOT READ IT. I promise you’ll be a sad person that your remote controller doesn’t work. After covering up your wand with the air dry clay and sculpting it how you want, let it sit for several days. After that you can paint it however you like. I painted over the buttons I wanted to use for this project, so I painted the colors in correlation of what the light would show on the canvas.
Source: Magic Wand Target Practice (IR Arduino Project)