Summary of LM35 and Arduino – Temperature Measurement and Display on LCD
This article presents a tutorial on interfacing an LM35 temperature sensor with an Arduino Uno to create a real-time temperature display system. The project utilizes the LM35's analog output, which varies linearly with temperature, and leverages the Arduino's built-in 10-bit ADC to convert signals for processing. The measured data is then visualized on a 16×2 LCD module, providing continuous monitoring within the sensor's -55°C to +150°C range.
Parts used in the LM35 Temperature Display Project:
- Arduino Uno
- LM35 Temperature Sensor
- 16×2 LCD Module
In this article, we are presenting a tutorial on how to interface LM35 and Arduino along with its program. Once we successfully interface arduino and lm35, we will go on to build a temperature display using arduino and a 16×2 LCD module which constantly monitors temperature around the measurement field/range of LM35 and displays the same on LCD module. So lets get to building the project!
LM35 is an analog, linear temperature sensor whose output voltage varies linearly with change in temperature. LM35 is three terminal linear temperature sensor from National semiconductors. It can measure temperature from-55 degree celsius to +150 degree celsius. The voltage output of the LM35 increases 10mV per degree Celsius rise in temperature. LM35 can be operated from a 5V supply and the stand by current is less than 60uA. The pin out of LM35 is shown in the figure below.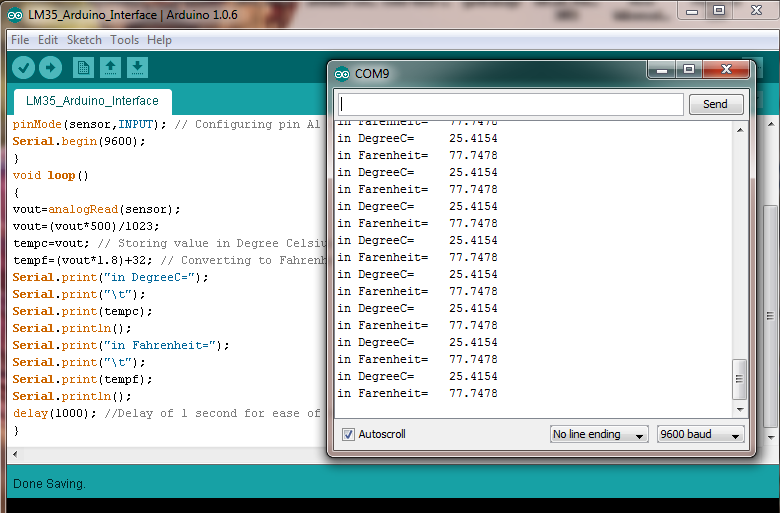
So that’s all info you need about LM35 for this particular temperature display project using arduino uno. So lets get to LM35 temperature sensor interfacing with arduino!
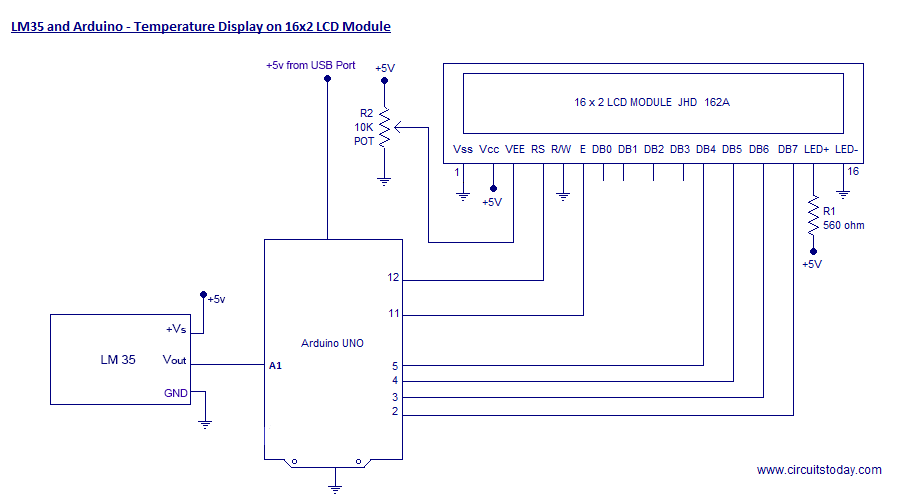
We are using Arduino Uno as our board and LM35 can be connected to arduino as shown in circuit diagram.
Note:- LM35 is an analog temperature sensor. This means the output of LM35 is an analog signal. Microcontrollers dont accept analog signals as their input directly. We need to convert this analog output signal to digital before we can feed it to a microcontroller’s input. For this purpose, we can use an ADC( Analog to Digital Converter).If we are using a basic microcontroller like 8051, we need to use an external ADC to convert analog output from LM35 to digital. We then feed the output of ADC ( converted digital value) to input of 8051. But modern day boards like Arduino and most modern day micro controllers come with inbuilt ADC. Our arduino uno has an in built 10 bit ADC (6 channel).
If we are using a basic microcontroller like 8051, we need to use an external ADC to convert analog output from LM35 to digital. We then feed the output of ADC ( converted digital value) to input of 8051. But modern day boards like Arduino and most modern day micro controllers come with inbuilt ADC. Our arduino uno has an in built 10 bit ADC (6 channel).
Read More: LM35 and Arduino – Temperature Measurement and Display on LCD
- What is the operating voltage of the LM35 sensor?
The LM35 can be operated from a 5V supply. - How does the output voltage of the LM35 change with temperature?
The voltage output increases by 10mV per degree Celsius rise in temperature. - Does the Arduino Uno require an external ADC for this project?
No, the Arduino Uno has an in-built 10-bit ADC that handles the conversion. - What is the measurement range of the LM35 sensor?
The sensor can measure temperatures from -55 degrees Celsius to +150 degrees Celsius. - Why is an ADC necessary when using the LM35 with a microcontroller?
An ADC is needed because microcontrollers do not accept analog signals directly and require digital conversion. - What type of signal does the LM35 produce?
The LM35 produces an analog, linear temperature signal. - How many channels does the Arduino Uno's internal ADC support?
The Arduino Uno has a 6-channel internal ADC. - What is the standby current consumption of the LM35?
The standby current is less than 60uA.