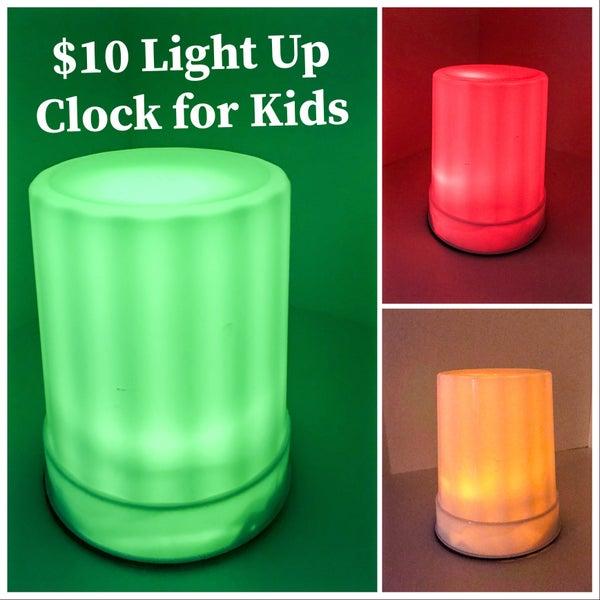
We were going crazy without enough sleep!!! Our 2-year-old could not understand how to “wait for the 7” on the clock before coming out of his room morning after morning. He’d wake up early (I mean like 5:27am – “there’s a 7!!!” he’d say) and just assume time to get up, come out of his room, and be awake for the day. Since ages 2-4 have a very difficult time reading clocks, this simple light up clock was a HUGE solution to our problem!!!
GREEN MEANS GO!!! RED, STAY IN BED!!! This simple, inexpensive Arduino real time clock can be set to light up LEDs at whatever time necessary. For us that means at 6:00am it turns RED, STAY IN BED. Then 10 minutes before 7:00am it turns YELLOW giving the indication it is almost time to come out and to play in your room. Then at 7:00am… “The light is GREEN!!!”, he says, as he bursts into our room each morning no earlier than 7:00am. What a lifesaver!!!
Step 1: Gather the Materials
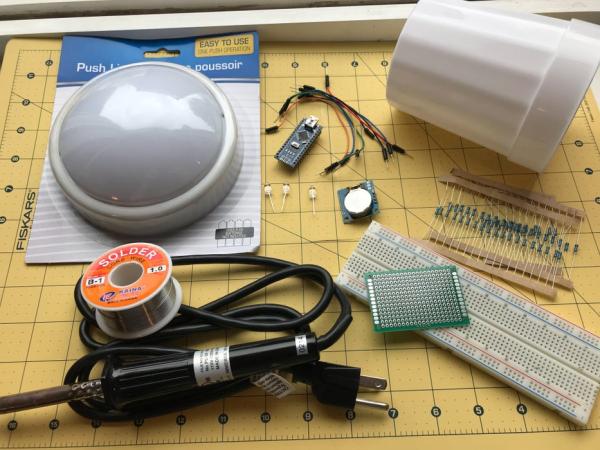
Parts
- 1 x Arduino Nano ($2.70 on AliExpress)
- 1 x DS1307 Real Time Clock ($0.60 on AliExpress)
- 1 x Double-sided Prototype Board ($1.45 for 5 on AliExpress)
- 1 each Green, Red, Yellow 5mm LED ($0.94 for 100 on AliExpress)
- 1 each 270 Ohm, 680 Ohm, 1K Ohm Resistors ($2.35 for 600 assorted on AliExpress)
- White Fluted Stadium Cup ($1 Walmart or Dollar store)
- Push Light or 3-4 AA battery holder ($1 Dollar Store or $0.50 on AliExpress)
Tools
- Soldering Iron and Solder
- Solderless Breadboard
- Wire and Jumper Wires
- Glue Gun
Note: Instructable to get Chinese Nano Drivers to work 🙂
Step 2: Setting the Clock
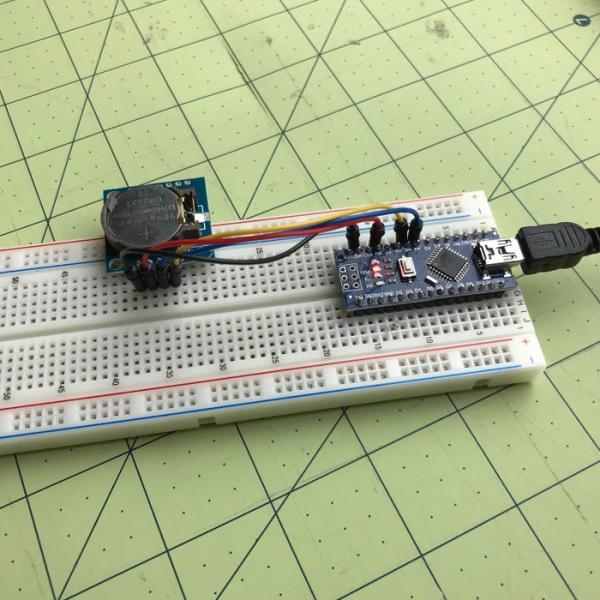
The DS1307 RTC is like a watch and uses a battery to operate and keep time even when the Arduino loses power or resets. The RTC uses the I2C interface to communicate with the Arduino. SCL (clock) is attached to A5 and SDA (data) is attached to A4. The RTC does best with 5V for VCC but I found it ran fine down at 3.3V.
- Using a breadboard, hook up the Real Time Clock to the Arduino according to the schematic.
- Next, download the DS1307RTC Library on github here or in the attachments.
- If you’ve never downloaded a library, click “Clone or Download” and choose “Download ZIP” option.
- Import the library into the Arduino Editor by choosing “Import” and selecting the ZIP.
- Next, download the attached Program_Clock_RTC.ino sketch and import similarly into the editor.
- Set the current date/time in the sketch and run the program to set the clock.
- Verify the correct time is returning.
Congratulations!! You now have a working clock!!
Step 3: Adding the LEDs and Programming
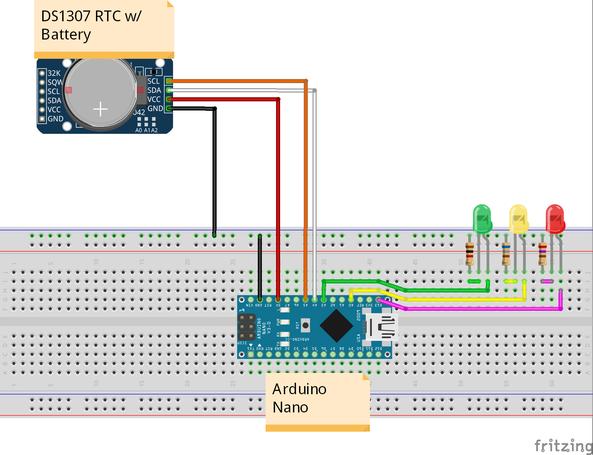
LED Test
Now, hook up the LEDs and resistors according to the schematic.
Download the Light_Up_Clock_for_Kids.ino sketch and upload. In the loop you will see commented out the “setLEDs(tm.Hour, tm.Minute);” function and uncommented just below a “testLEDs();” function that cycles through each LED for 8 seconds.
Verify cycling through the LEDs works and uncomment the serial.print lines if you need to validate the RTC is still outputting the correct time.
Programming the Times
Once you verify everything is working, uncomment the setLEDs() function and comment out the testLEDs() function. In the setLEDs() body of the function set the times you want to display the various colors following the examples.
NOTE: You will probably have to play around with the resistor values to get the right brightness for your LEDs (and also the power draw you want). I found the following works well for my 5mm LEDS since Green has the highest forward voltage and is the brightest naturally, then dimmer for the other colors:
- Green: 1K Ohm
- Yellow: 680 Ohm
- Red: 270 Ohm
Step 4: Building a Lamp Enclosure
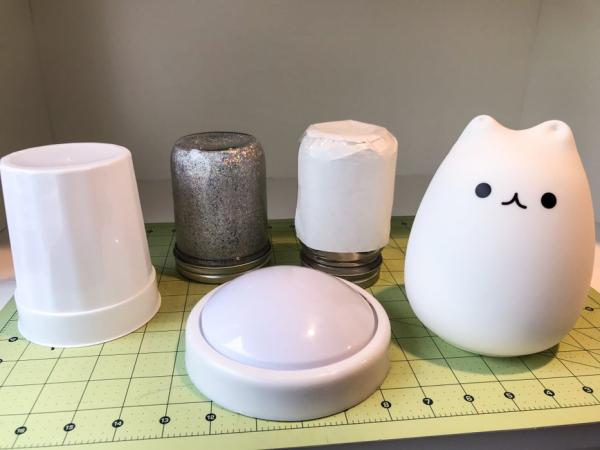
Options
In order to diffuse the light the LEDs emit I tried a few different mediums to enclose the lights. With varying levels of effectiveness I tried a Push Button (LEDs end up too close to diffuse well), Mason Jar with parchment paper or glitter glue painted inside, and the white stadium cup. You need something to diffuse the light and reduce the harshness of the LEDs to give a soft, even glow.
Best Option
I found the basic white stadium cup ($1 for 3) with wax paper taped just inside (as shown) gave off a good even light. Without the wax paper the LEDs shine directly at the top of the cup creating uneven light patches. Since I plan to use this long term, I even grabbed a silicone nursery lamp I will be re-purposing and adding the Arduino to in the future ($10 on AliExpress).
Step 5: Low-power and Batteries
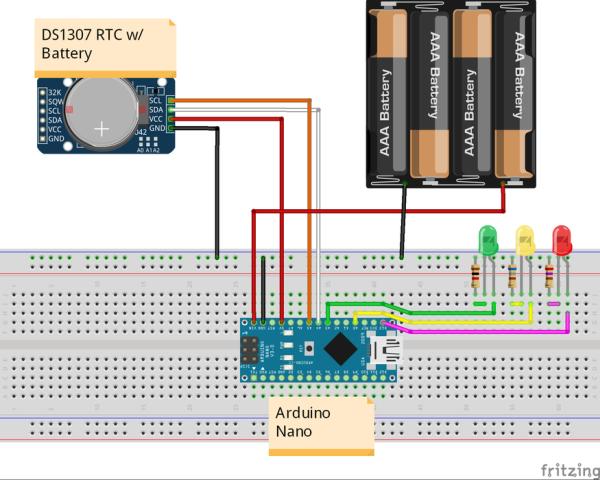
I wanted to make this more permanent and use batteries to operate. This next part is optional as you can just stick a cup on top and power with a wall plug or portable USB charger.
Low Power and Removing Built-in LEDs
The code already includes putting the Arduino in Low-Power sleep for 8 seconds, waking to check the time, then going back to sleep. For more power-saving and to not have the Power LED displaying at all times, you can get rid of the built-in LED on the Arduino Nano (and since I used pin D13 also decided to get rid of the built-in LED on that pin).
Use a soldering iron to heat the sides of the built-in LEDs labeled POW and L, then pull or cut to remove them. There are many other power-saving options you can try by googling, but this lasts multiple months on batteries and works great for now!
Prototype Board and Battery Case
Soldering all of the parts to a prototype board reduces the size and allows it to fit easily on top of the battery pack inside the cup.
Use a 3 or 4 AA battery case and solder the positive (+) to Vin on the Arduino and negative (-) to GND.
I didn’t have any battery cases, but did have a $1 push light already taken apart that had a 4 AA battery case perfectly ready for my needs. I placed the white cup over the battery case and marked the black plastic, then cut with a utility knife.
Hot glue the board to the battery pack base, then hot glue the white cup over top of it. You can easily cut the hot glue when needed to open it up and reprogram the LED light up times.
This sits on the top of the kids’ dresser next to the door and now no more early-morning disturbers!!!
Source: Light Up Clock for Kids – Green Means Go! Red, Stay in BED!!!
