
Summary of IoT Pet Feeder: Use circuito.io to build a smart food dispenser for your pet
This article introduces an IoT pet feeder project using circuito.io, demonstrating how to build a smart food dispenser. The device uses a PIR sensor to detect pets and triggers a servo to dispense food, while also allowing mobile control via a Freeboard dashboard connected through an ESP8266-01 Wi-Fi module. The tutorial guides users through circuit setup, code customization, and internet connectivity.
Parts used in the IoT Pet Feeder:
- PIR sensor
- Arduino Uno (or other compatible board)
- Servo motor
- Speaker
- ESP8266-01 Wi-Fi module
- Power source
Story
This IoT pet feeder is our first IoT project with circuito.io! We are happy to share it with our community to demonstrate how simple it can be to make basic IoT projects with circuito.io. We are also excited to share this project with you because it’s based on a product that we worked on in the past called Playdog. You can make the feeder for your pets at home – it’s both fun JPand useful.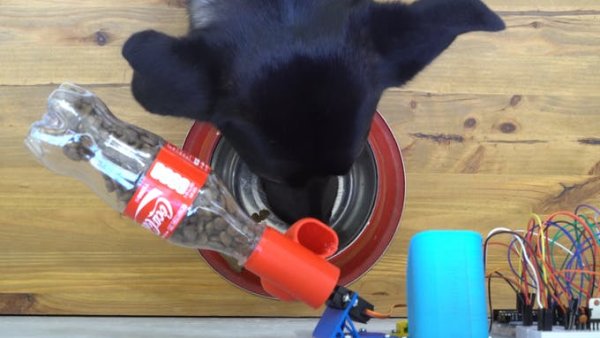
How does it work?
There are many ways to implement a pet feeder: you can set it to fill up the bowl at a certain time, you can command it to fill up whenever it gets empty, or maybe to give your dog food after they follow a set of orders that you taught them.
In this specific project, we set the feeder to start beeping from time to time. Once the dog comes closer to the device, the PIR sensor recognizes it and the servo is triggered.
In addition, we also decided to add the option to control the pet feeder from our mobile phone, using a pre-defined dashboard made with Freeboard. We saw this as a great opportunity to introduce you to the option of connecting your circuito project to the internet with ESP8266-01 – the wifi module currently available on circuito.io.
Setting up the circuit
When clicking on this magic link, you’ll be redirected to circuito.io, where you’ll find that we’ve already selected for you the components we used in this project.
The components you need are: PIR sensor, Arduino uno (or other), servo, speaker, esp8266-01, and a power source. This is the basic circuit for this project but you can also add many different sensors and other components to the circuit for example, you can add a weight sensor to monitor the amount of food in the bowl or add LEDs that will change according to different parameters.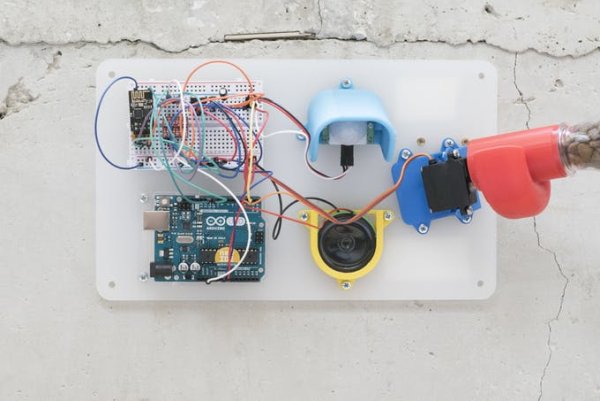
Once you’ve selected the components you waLunant, click on Generate and our engines will start working on your circuit and will generate your circuito reply. The reply has three parts:
1. BoM – A list of all the components you’ll need for the project, including auxiliary parts such as resistors and capacitors.
2. Step-by-step wiring guide – shows you how to connect all your components to the Arduino board using a breadboard.
3. Code – a sample code for your circuit. This code is not specific for the pet feeder project, but rather it is a sample code that creates an interaction between the different components in your circuit.
To Upload the code, follow these steps:
- Download the code from the circuito.io reply
- Extract it to your computer
- Open with Arduino IDE
- Upload to your Arduino
4. Once everything is set up, replace the sample code from the circuito reply with the code in this tutorial. Make sure to leave the //Include Libraries and //Pin Definitions at the top of the code, and also keep all the libraries that are on the original code from circuito.io.
4. Connectivity – this section will guide you how to configure the connection of your project to the internet.
- Download the dashboard.json file from this tutorial
- In the circuito.io reply click “Connect” then “Create Your Dashboard”
This will redirect you to freeboard.io and give you a basic dashboard, already connected to your Arduino sketch using a unique ‘thingName’. You can see your thingname in the firmware.ino provided.
- Click on “clone” – if you don’t have a Freeboard account, you’ll have to create one at this point. But don’t worry, it’s free.
- After sign-up you’ll see the following screen:
For more detail: IoT Pet Feeder: Use circuito.io to build a smart food dispenser for your pet
-
How does the feeder detect when to dispense food?
The PIR sensor recognizes when the dog comes closer, triggering the servo to start dispensing. -
Can I control the feeder from my mobile phone?
Yes, you can control the pet feeder using a pre-defined dashboard made with Freeboard. -
Which Wi-Fi module is used for internet connectivity?
The project uses the ESP8266-01 module currently available on circuito.io. -
What are the three parts generated by the circuito.io engine?
The reply includes a BoM list, a step-by-step wiring guide, and sample code. -
Do I need to create a Freeboard account?
You must create a free account if you do not already have one to clone the dashboard. -
How do I upload the custom code to the Arduino?
Download the code, extract it, open it with Arduino IDE, and upload it to your Arduino. -
Is the sample code specific to this pet feeder project?
No, the sample code is generic and creates interaction between components but must be replaced with the tutorial code. -
Where can I find the thingName for the dashboard connection?
You can see your thingName in the firmware.ino file provided in the tutorial.
