Story
This project uses the Arduino 101, a battery and an LED strip to make a gesture-controlled Wizard’s Walking Staff. We’ll define three different light-display “spells” you can summon by moving the staff in one of three gestures.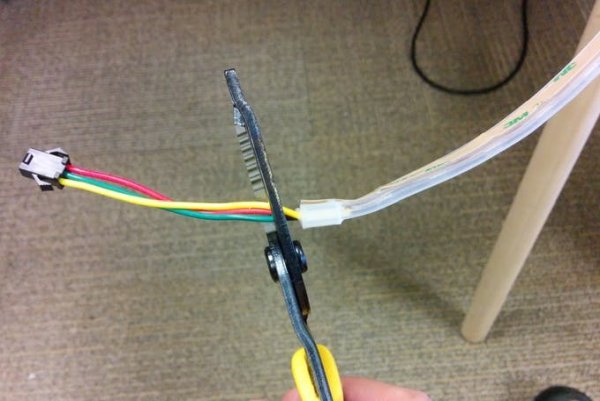
Tech:
The code uses the Inertial Measurement Unit in the Arduino 101 to read G-forces, but does not use the Pattern Matching Engine (for an example using the PME, check out Kitty Yeung’s PME project). Instead, this code counts quick impulses in the X, Y, and Z directions and summons spells when you perform a certain combination in a short time.
Casting Spells:
Two quick vertical taps starts a spell, then you can either move the staff sharply forward, left/right, or tap a third time to select one of the three spells, then a final tap casts the spell.
Visual Feedback:
To help you understand where you are in your gesture, the example code includes visual feedback from the LED strip. When you first perform a double-tap, the lights will quickly flash white, telling you that a spell is started. You’ll get visual feedback for each step so you know which spell will be selected.
Casting Spells (in detail):
Hold the staff with the Arduino 101 facing you. First double-tap the staff (gently!) on the ground, or do two quick vertical pulses in the air. When you see the white flash, move the staff sharply forward or back to select Spell 1, or tilt the staff left or right to select Spell 2, or move vertically a third time to select Spell 3. When a spell is selected, the lights will glow solid green (spell 1,) blue (spell 2) or red (spell 3.) Once the lights are solid, summon the spell with a final vertical tap. The lights will shimmer and flash in the selected color.
Gestures are time sensitive! You have only 1 second between each step in a gesture or the spell will reset. That means if you mess-up or select the wrong spell, you can just wait a second and start over. Accurately summoning spells is a little tricky to master, but the good news is that spells won’t be accidentally called when you’re just walking around with the staff.
Building the Electronics:
This is basically just an Arduino 101, a battery, and a strip of NeoPixel LEDs.
There are several ways to configure power. The quickest would be to use a 9v battery and run the LEDs right off the Arduino 101- but the battery life would be very short. You could also use a LiPo battery to maximize power/weight for a more “pro” build- but you would need a safe way to charge the battery. For me, a good balance between battery life and simplicity is to use 3 AA batteries and a $4 voltage regulator. This is the same electronics setup as in the Shadow Theater and Kaleidoscope Infinity Mirror.
Step 1
Collect the end harness from your LED strip by cutting about 1 cm from the end of the lights. Strip the wire ends.
Step 2
Break apart the bent header pins that came with your voltage regulator, and solder two of them to the ends of the green and yellow wires. This will let you easily plug them into the pins of the Arduino 101.
Step 3
Next solder the red wire to the VIN terminal on the voltage regulator, and solder two straight headers into the GND and VOUT pins
Step 4
Now connect the barrel jack adapters. First strip the ends of the wires coming from your battery case, then mount them in the terminals of the male barrel jack and tighten with a screwdriver. RED goes to the (+) terminal, BLACK goes to the (-) terminal.
Next connect the female barrel jack adapter onto to the loose wires coming from the beginning of the LED strip. YELLOW goes to the (-) terminal, and RED goes to the (+).
Step 5
Now connect your harness to the Arduino 101. The GREEN wire goes to PIN 6, the YELLOW wire goes to the GND pin near #13. With the two header pins on the voltage regulator, GND goes to GND and VOUT goes to the “VIN” pin on the Arduino 101. Don’t get this wrong! Plugging in backwards leads to smells and burns. I know this.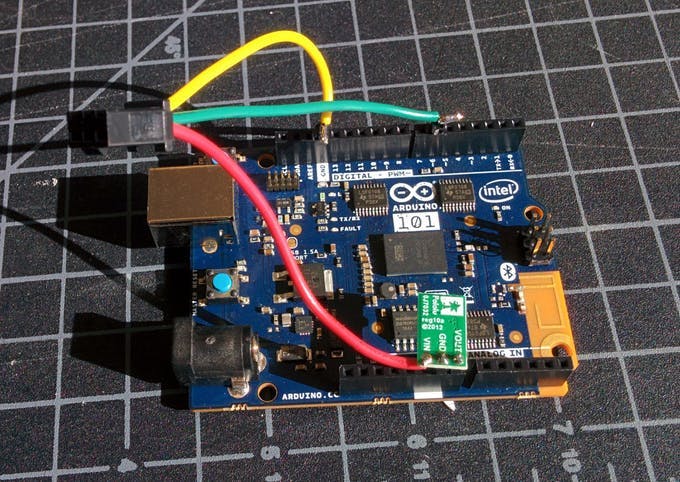
Uploading the Example Code:
Step 1
With the battery-pack turned off, use a USB cable to connect your Arduino 101 to a computer, and upload the attached example code using the Arduino IDE.
If you’ve never programmed an Arduino 101 before, there are great instructions on the Arduino website here: https://www.arduino.cc/en/Guide/Arduino101
Once the example code is loaded successfully, you can disconnect the USB, and test the code by turning on the battery pack and trying some of the spell
For more detail: Make your own gesture-controlled Wizard’s Walking Staff