Summary of Intro to Arduino
Summary (under 100 words): Arduino is an open-source microcontroller platform for reading sensors and controlling devices like motors and lights. Boards (Uno, Mega, LilyPad, ADK, legacy versions) vary in size, pins, and features. The Arduino Uno is common, offering USB connectivity, voltage regulation, ATmega328 microcontroller, 32 KB flash, digital and analog pins, ICSP, and a built-in LED on pin 13. To use it, install the Arduino IDE, connect the board via USB A to B cable, select board and serial port in Tools, then upload example sketches (like Blink) to run programs on the board.
Parts used in the Arduino Getting Started Project:
- Arduino board (example: Arduino Uno)
- ATmega328 microcontroller (onboard)
- USB A to USB B cable (male to male)
- Computer with Arduino IDE installed
- Power source (USB or external up to 12V)
- Built-in LED on digital pin 13 (onboard)
- ICSP connector (onboard)
- Optional: FTDI-USB TTL serial programming cable (for LilyPad)
An Arduino is an open-source microcontroller development board. In plain English, you can use the Arduino to read sensors and control things like motors and lights. This allows you to upload programs to this board which can then interact with things in the real world. With this, you can make devices which respond and react to the world at large.
For instance, you can read a humidity sensor connected to a potted plant and turn on an automatic watering system if it gets too dry. Or, you can make a stand-alone chat server which is plugged into your internet router. Or, you can have it tweet every time your cat passes through a pet door. Or, you can have it start a pot of coffee when your alarm goes off in the morning.
Basically, if there is something that is in any way controlled by electricity, the Arduino can interface with it in some manner. And even if it is not controlled by electricity, you can probably still use things which are (like motors and electromagnets), to interface with it.
The possibilities of the Arduino are almost limitless. As such, there is no way that one single tutorial can cover everything you might ever need to know. That said, I’ve done my best to give a basic overview of the fundamental skills and knowledge that you need to get your Arduino up and running. If nothing more, this should function as a springboard into further experimentation and learning.

Step 1: Different types of Arduinos
There are a number of different types of Arduinos to choose from. This is a brief overview of some of the more common types of Arduino boards you may encounter. For a full listing of currently support Arduino boards, check out the Arduino hardware page.
Arduino Uno
The most common version of Arduino is the Arduino Uno. This board is what most people are talking about when they refer to an Arduino. In the next step, there is a more complete rundown of its features.
Arduino NG, Diecimila, and the Duemilanove (Legacy Versions)
Legacy versions of the Arduino Uno product line consist of the NG, Diecimila, and the Duemilanove. The important thing to note about legacy boards is that they lack particular feature of the Arduino Uno. Some key differences:
- The Diecimila and NG use an ATMEGA168 chips (as opposed to the more powerful ATMEGA328),
- Both the Diecimila and NG have a jumper next to the USB port and require manual selection of either USB or battery power.
- The Arduino NG requires that you hold the rest button on the board for a few seconds prior to uploading a program.
Arduino Mega 2560
The Mega is the second most commonly encountered version of the Arduino family. The Arduino Mega is like the Arduino Uno’s beefier older brother. It boasts 256 KB of memory (8 times more than the Uno). It also had 54 input and output pins, 16 of which are analog pins, and 14 of which can do PWM. However, all of the added functionality comes at the cost of a slightly larger circuit board. It may make your project more powerful, but it will also make your project larger. Check out the official Arduino Mega 2560 page for more details.
Arduino Mega ADK
This specialized version of the Arduino is basically an Arduino Mega that has been specifically designed for interfacing with Android smartphones.
Arduino LilyPad
The LilyPad was designed for wearable and e-textile applications. It is intended to be sewn to fabric and connected to other sewable components using conductive thread. This board requires the use of a special FTDI-USB TTL serial programming cable. For more information, the Arduino LilyPad page is a decent starting point.
Step 2: Arduino Uno Features
Some people think of the entire Arduino board as a microcontroller, but this is inaccurate. The Arduino board actually is a specially designed circuit board for programming and prototyping with Atmel microcontrollers.
The nice thing about the Arduino board is that it is relatively cheap, plugs straight into a computer’s USB port, and it is dead-simple to setup and use (compared to other development boards).
Some of the key features of the Arduino Uno include:
- An open source design. The advantage of it being open source is that it has a large community of people using and troubleshooting it. This makes it easy to find someone to help you debug your projects.
- An easy USB interface . The chip on the board plugs straight into your USB port and registers on your computer as a virtual serial port. This allows you to interface with it as through it were a serial device. The benefit of this setup is that serial communication is an extremely easy (and time-tested) protocol, and USB makes connecting it to modern computers really convenient.
- Very convenient power management and built-in voltage regulation. You can connect an external power source of up to 12v and it will regulate it to both 5v and 3.3v. It also can be powered directly off of a USB port without any external power.
- An easy-to-find, and dirt cheap, microcontroller “brain.” The ATmega328 chip retails for about $2.88 on Digikey. It has countless number of nice hardware features like timers, PWM pins, external and internal interrupts, and multiple sleep modes. Check out the official datasheet for more details.
- A 16mhz clock. This makes it not the speediest microcontroller around, but fast enough for most applications.
- 32 KB of flash memory for storing your code.
- 13 digital pins and 6 analog pins. These pins allow you to connect external hardware to your Arduino. These pins are key for extending the computing capability of the Arduino into the real world. Simply plug your devices and sensors into the sockets that correspond to each of these pins and you are good to go.
- An ICSP connector for bypassing the USB port and interfacing the Arduino directly as a serial device. This port is necessary to re-bootload your chip if it corrupts and can no longer talk to your computer.
- An on-board LED attached to digital pin 13 for fast an easy debugging of code.
- And last, but not least, a button to reset the program on the chip.
For a complete rundown of all the Arduino Uno has to offer, be sure to check out the official Arduino page.
Step 3: Arduino IDE
Before you can start doing anything with the Arduino, you need to download and install the Arduino IDE (integrated development environment). From this point on we will be referring to the Arduino IDE as the Arduino Programmer.
The Arduino Programmer is based on the Processing IDE and uses a variation of the C and C++ programming languages.
You can find the most recent version of the Arduino Programmer on this page.
Step 4: Plug it in
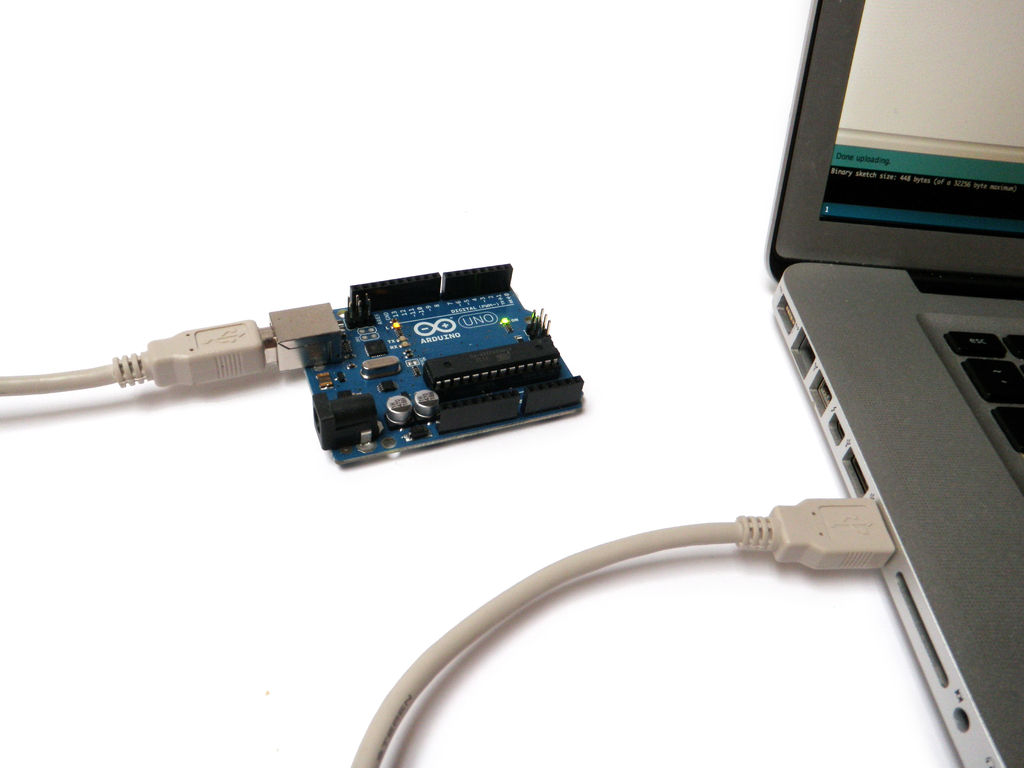
Connect the Arduino to your computer’s USB port.
Please note that although the Arduino plugs into your computer, it is not a true USB device. The board has a special chip that allows it to show up on your computer as a virtual serial port when it is plugged into a USB port. This is why it is important to plug the board in. When the board is not plugged in, the virtual serial port that the Arduino operates upon will not be present (since all of the information about it lives on the Arduino board).
It is also good to know that every single Arduino has a unique virtual serial port address. This means that every time you plug in a different Arduino board into your computer, you will need to reconfigure the serial port that is in use.
The Arduino Uno requires a male USB A to male USB B cable.
Step 5: Settings
Before you can start doing anything in the Arduino programmer, you must set the board-type and serial port.
To set the board, go to the following:
Select the version of board that you are using. Since I have an Arduino Uno plugged in, I obviously selected “Arduino Uno.”
To set the serial port, go to the following:
Select the serial port that looks like:
Step 6: Run a sketch
Arduino programs are called sketches. The Arduino programmer comes with a ton of example sketches preloaded. This is great because even if you have never programmed anything in your life, you can load one of these sketches and get the Arduino to do something.
To get the LED tied to digital pin 13 to blink on and off, let’s load the blink example.
The blink example can be found here:
The blink example basically sets pin D13 as an output and then blinks the test LED on the Arduino board on and off every second.
Once the blink example is open, it can be installed onto the ATMEGA328 chip by pressing the upload button, which looks like an arrow pointing to the right.
Notice that the surface mount status LED connected to pin 13 on the Arduino will start to blink. You can change the rate of the blinking by changing the length of the delay and pressing the upload button again.
- What is Arduino used for?
Arduino is used to read sensors and control devices like motors and lights, allowing programs to interact with the real world. - Which Arduino is the most common?
The Arduino Uno is the most common version. - How do I power an Arduino?
An Arduino can be powered via USB or an external power source up to 12V which it regulates to 5V and 3.3V. - What cable do I need to connect an Arduino Uno to a computer?
The Arduino Uno requires a male USB A to male USB B cable. - What software do I need to program an Arduino?
You need to download and install the Arduino IDE (Arduino Programmer). - How do I select the board and serial port in the IDE?
In the Arduino IDE go to Tools -> Boards to select your board and Tools -> Serial Port to select the virtual serial port for the connected Arduino. - What is a sketch?
A sketch is an Arduino program; the Arduino IDE includes example sketches like Blink. - How do I run the Blink example?
Open Files -> Examples -> Basics -> Blink in the Arduino IDE and press the upload button to install it onto the ATmega328 chip.