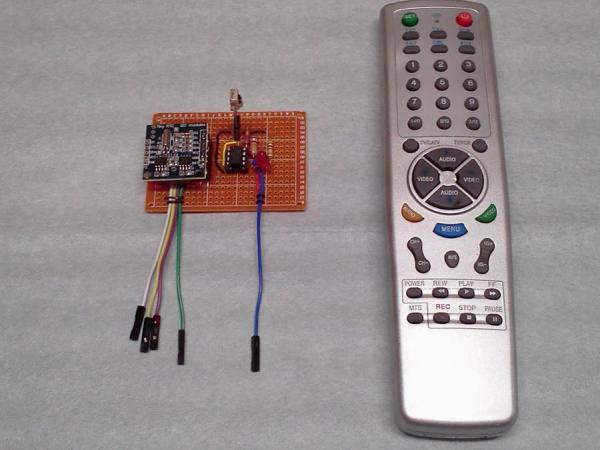
Infrared Dedicated Decoder

Hardware components:
Attiny85
Atmel ATTiny85
× 1

Infrared Dedicated Decoder

Attiny85 IR code for Sony protocol

Attiny85 IR code for Sony protocol
/*
  IR remote control (Sony) detection for Arduino, M. Burnette
  Binary sketch size: 2,794 bytes (of a 8,192 byte maximum)

  ☺  20130103 MRB Modified for interface to Mega2560
      Europa codebase for menu system
      
  ☺  20121230 MRB Modified for Tiny85 Google Tiny library
      Tiny85 Internal RC 16MHz

  ☺  20121230 MRB modifications to adapt to numeric input, avoid dupes,
      and to generally "behave" consistently
  ☺  Used with Electronic Goldmine IR detector MIM 5383H4
      http://www.goldmine-elec-products.com/prodinfo.asp?number=G16737
  ☺  IR detector:
      Pin 1: To pin D4 on Arduino ATtiny85
      Pin 2: GND
      Pin 3: 5V through 33 Ohm resistor
  
  ☺  This is based on pmalmsten's code found on the Arduino forum from 2007:
      http://www.arduino.cc/cgi-bin/yabb2/YaBB.pl?num=1176098434/0

*/
// Pins 2/3 used for Software serial
int irPin     = 4;       //Sensor pin 1 wired to Arduino's pin D4
int statLED   = 0;       //Toggle the status LED every time Power is pressed
int start_bit = 2200;    //Start bit threshold (Microseconds)
int bin_1     = 1000;    //Binary 1 threshold (Microseconds)
int bin_0     = 400;     //Binary 0 threshold (Microseconds)

void setup() {
  pinMode(statLED, OUTPUT);
  digitalWrite(statLED, LOW);

  pinMode(irPin, INPUT);

  Serial.begin(9600);
  Serial.println("IR/Serial Initialized: ");
}

void loop() {
  int key = getIRKey();   //Fetch the key
  
  if(key != 0)            //Ignore keys that are zero
  {
    switch(key)
    {
      case 128: Serial.print("1"); break;
      case 129: Serial.print("2"); break;
      case 130: Serial.print("3"); break;
      case 131: Serial.print("4"); break;
      case 132: Serial.print("5"); break;
      case 133: Serial.print("6"); break;
      case 134: Serial.print("7"); break;
      case 135: Serial.print("8"); break;
      case 136: Serial.print("9"); break;
      case 137: Serial.print("0"); break;
      
      case 144: Serial.print("A"); break;  // CH Up
      case 145: Serial.print("B"); break;  // CH Down
      case 146: Serial.print("C"); break;  // VOL Right
      case 147: Serial.print("D"); break;  // VOL Left
      case 148: Serial.print("E"); break;  // Mute
      case 165: Serial.print("F"); break;  // AV/TV
      case 149: Serial.print("P");         // Power == MENU ACTIVE
        //This toggles the statLED every time power button is hit
        if(digitalRead(statLED) != 1)
          digitalWrite(statLED, HIGH);
        else
          digitalWrite(statLED, LOW);
        break;

      //default: Serial.println(key); // for inspection of keycode
    }

    delay(400);    // avoid double key logging (adjustable)
  }
}

int getIRKey() {
  int data[12];
  int i;

  while(pulseIn(irPin, LOW) < start_bit); //Wait for a start bit
  
  for(i = 0 ; i < 11 ; i++)
    data[i] = pulseIn(irPin, LOW);      //Start measuring bits, I only want low pulses
  
  for(i = 0 ; i < 11 ; i++)             //Parse them
  {	    
    if(data[i] > bin_1)                 //is it a 1?
      data[i] = 1;
    else if(data[i] > bin_0)            //is it a 0?
      data[i] = 0;
    else
      return -1;                        //Flag the data as invalid; I don't know what it is! Return -1 on invalid data
  }

  int result = 0;
  for(i = 0 ; i < 11 ; i++)             //Convert data bits to integer
    if(data[i] == 1) result |= (1<<i);

  return result;                        //Return key number
} 

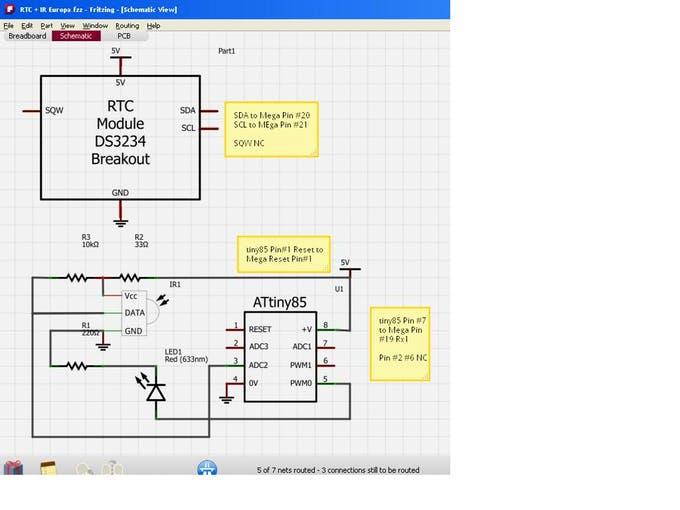
Schematics

Schematics of Infrared Dedicated Decoder

Notes

Attiny85 core files used:
http://code.google.com/p/arduino-tiny/

You must select the correct “board” type… ATtiny85@16MHz (internal PLL)>9600 BAUD serial output comes out the ATtiny on physical pin# 7

Why?

Using a dedicated Attiny85 microcontroller to monitor and decode the IR detector (MIM5383H4) frees the main uC from having to do this nasty and inefficient job.  This makes for nimble IR operation on the host microcontroller where only a serial port needs to be monitored for traffic which originates from the tiny85.

My implementation uses the Sony IR protocol which is available on almost every inexpensive Universal Remote Control.  The algorithm for this decode was developed and put in the public domain by Arduino Forum member pmalmsten.  Full links to his work is provided in my source code.  This is an Open Source implementation, so you can easily change the tiny85 to decode NEC or other remote protocols by changing the decode algorithm – but you are on your own for this effort; however there are many IR decode algorithms freely available for the searching on Google.

The main program is more efficient and requires less resources because the IR polling and decoding is eliminated and the host simply receives the decoded digits and commands on the serial port at 9600 BAUD in my example.  This solution is also microcontroller agnostic: I have used it for AVR and for PIC.  You can even feed the serial output of the ATtiny85 to your PC over a USB/serial converter and host software on the PC to do magic stuff.

On the Arduino, all that is necessary is a single statement in the loop():
if (Serial1.available() > 0)    >If  nothing is in queue, then the host Arduino microcontroller does not need to be concerned about IR messages.  It cannot get much simpler!

Resources

I have a full write-up of this technique on the main Arduino.cc Forum:
http://forum.arduino.cc/index.php?topic=139907.0

Read More: Infrared Dedicated Decoder


About The Author

Ibrar Ayyub

I am an experienced technical writer holding a Master's degree in computer science from BZU Multan, Pakistan University. With a background spanning various industries, particularly in home automation and engineering, I have honed my skills in crafting clear and concise content. Proficient in leveraging infographics and diagrams, I strive to simplify complex concepts for readers. My strength lies in thorough research and presenting information in a structured and logical format.

Follow Us:
LinkedinTwitter

Leave a Comment

Your email address will not be published. Required fields are marked *

Scroll to Top