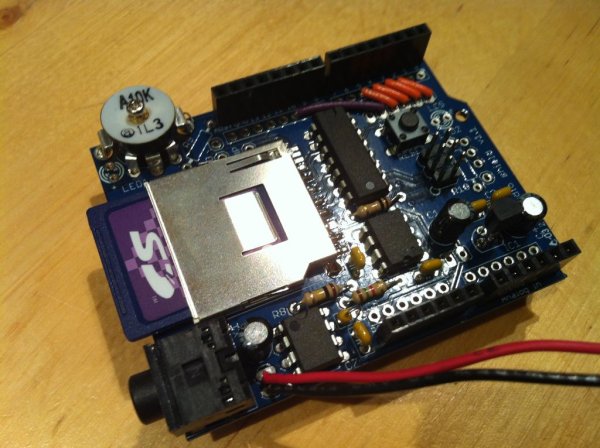
This Instructable will demonstrate how to make a remotely activated sound file player.
It uses an Electric Imp, an Adafruit Wave shield and an Arduino Uno
The Electric Imp enables you to quickly connect devices (including arduinos) to the internet through your Wifi network.
The Adafruit Wave shield makes it simple to play audio files from an SD card using an arduino.
When I first came across the Electric Imp I started wondering how I could combine it with an Arduino and make a fun remotely activated project. At around the same time I was also tinkering with the Adafruit wave shield and realised they’d make perfect companions.
In the end I decided to record myself saying a few different messages such as “I’m on my way home – get the kettle on!” so that I could trigger the messages as I left work. I figured this would be much more fun than the usual text message.
I built my “Imp-ersonator” into a photo frame in the living room so that I can trigger a message to be heard by whoever’s at home when I’m leaving work (usually my wife or children but it occasionally freaks out visiting friends which is an added benefit…)
To build your own you’ll need the following things:
1) Electric Imp Card
2) Electric Imp Shield for Arduino
3) a few jumper wires
4) Arduino Uno
5) Adafruit Wave Shield
6) 8 Ohm Speaker
7) soldering kit (solder, soldering iron, etc)
8) USB cable (A-B) for uploading code to the arduino
9) Photo frame that is deep enough to fit everything in
Step 1: Build the Wave Shield
The best way to build your Adafruit Wave shield is to follow Ladyada’s fantastic tutorial.
You need to take care to format your SD card properly and then save your sound files onto it and make a note of the file names.
Obviously, they need to be .wav sound files.
If you are using iTunes there’s information here on how to convert songs to the .wav format.
Solder your speaker to the shield as shown by the red and black wires in the photo.
Step 2: Add Jumper Wires to Imp Shield
Now you need to add some jumper wires to the Imp Shield so that the pins attached to the Imp will provide a signal to the appropriate pins on the arduino.
Because we’re using an arduino Uno and the wave shield and imp shield use up quite a few pins there are only 3 left for triggering sound files. If you choose to use an Arduino Mega you’ll be able to trigger a load more messages.
Connect the following pins:
Imp pin 5 to Arduino pin 0
Imp pin 7 to Arduino pin 7
Imp pin 9 to Arduino pin 6
If you want to use different pins that’s fine but check which pins are used by the shields as some of them cannot be changed.
For more detail: IMP-ERSONATOR


