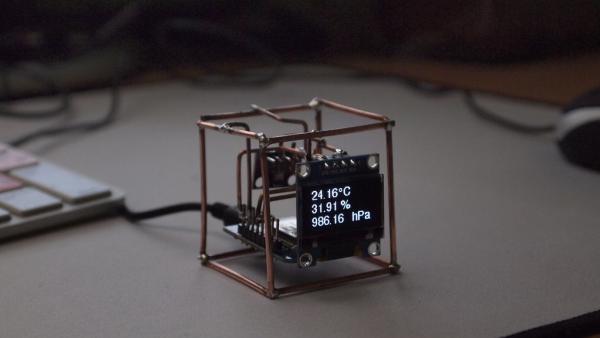
In this post, we will learn you How-to-Make-Pocket-Sized-IoT-Weather-Station: In this instructable, you will learn how to make small Weather Cube using the D1 mini(ESP8266) which is connected to your home WiFi, so you can look at its output anywhere from the earth, of course as long as you have an internet connection. Overall making this project isn’t too difficult nor resource-heavy, so it will be perfect as your first IoT project. So let’s get started.
Steps How to Make Pocket Sized IoT Weather Station
Step 1: Resources
As I mentioned in the introduction, this project is very easy to construct and doesn’t require too many components. Here is the parts list:
Electronic Components:
WeMos D1mini
BME280
I2C OLED Display(128×64)
1.5mm Brass Rod or Iron Rod
NOTE: If you want more info about these parts forex. where to get them, you can look into Step 7!
Tools for prototyping and testing the circuit:
Breadboard
Jumper wires
USB wire – Micro USB Type B to USB Type A
Tools:
Soldering iron
Bench vice – not mandatory
Small hammer – not mandatory
Step 2: Prototyping on Breadboard (Skip to Step 3 If You Want to Go Straight to Code and Assembly)
If you don’t have your pins soldered on your D1mini/OLED/BME280, now is the time to do it!
First of all, let’s place all our components on the breadboard. We will start by placing the D1mini on 2 separate rails(picture no.1). After that, we will place the BME280 fair distance from it(picture no.2). And finally, we will place the OLED on the opposite side of the BME280(picture no.3). Now, let’s connect them together.
Here are all the connections:
D1 pin to SCK pin on the OLED and SCL pin on the BME280
D2 pin to SDA pin on the OLED and SDA pin on the BME280
G pin to GND pin on both, the OLED and BME280
3.3V pin to BME280 VCC pin
And finally 5V pin to OLED VCC
Check your connections again before connecting it to your computer and uploading code to it! You don’t want to burn anything.
Step 3: IoT Part
This part is really simple. First of all, go to AppStore and download the Blynk app. After that, open it and sign up. Next, create a new project. I called mine WeatherStation but you can name it anything you want. After that, set the device option to ESP8266 and connectivity type to WiFi(picture no.1). Next tap creates a project. You should get an email with your verification token. Now jump into the code(download link below) and replace highlighted parts. After that, jump back into the Blynk app project workspace, tap on the screen to open the widget box(picture no.2). Now place 3 labeled value boxes by tapping on them(picture no.3). To set them up, tap on the first one and set its name. I called it temperature (this is not mandatory but it makes everything simpler and more organized). As input select virtual pin 1 and in the label part type “°C”(picture no.4). After that, you can go and set up the other labeled values.
Read Full Post