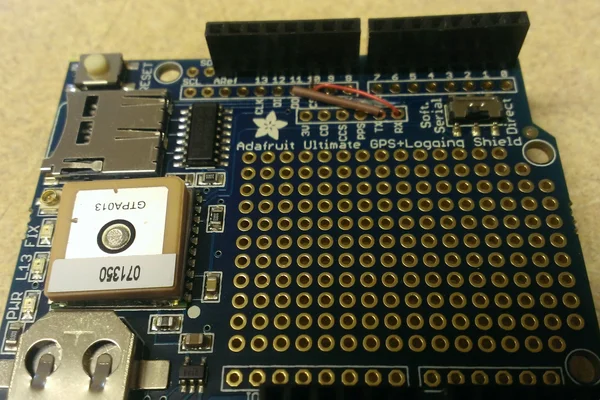
This device was created for a final project for a class by a group of students at Indiana University. As sport fans, we thought it would be really useful to create a tool that would measure distance between two points. This could be used for many different sports, but we focused on golf. A handheld unit that could measure distance in yards from where a ball is hit and where it ends up is really what we were motivated to construct. Distance markers on golf courses are not always accurate and it is very important to know correct yardages to play well. This system could be used to keep track of the average distance for a certain club or to check the accuracy of yardage markers at the course.It works by recording latitude and longitude points of where the ball was hit from, and then calculate the distance from that location to wherever the ball lands.
The materials needed for this project are as follows :
- Arduino Uno
- Ultimate GPS logger shield
- LCD screen w/ buttons shield
- Barrel jack to 9v battery converter and 9v battery
- Enclosure
- Soldering Iron
- Lead-free Solder
- Solder sucker
- Protective eyewear
- Small amount of wire
- Exacto knife

Additionally you will need to install the Arduino IDE and a couple of libraries for it.
Also you can use:
Step 1: Solder Headers
The Ultimate GPS Logger and LCD Screen w/ Buttons each come with headers to be soldered on to allow them to be stacked onto your Arduino. Interestingly enough, the GPS shield came with male headers, and the LCD shield came with female headers. For this project, the LCD screen should have the male pins and the GPS should have female pins. This may have been a mistake by the company that sent us the LCD screen, as it doesn’t make much sense to put something on top of the screen, but it worked out to our advantage.
Warning: Soldering can be dangerous, and all precautions should be taken. Use lead-free solder to be extra safe, wear protective eye-wear, and do not inhale any of the fumes! This is melting / burning metal, and it is not something to take lightly if you are not experienced.
When soldering the GPS headers, what we did was let it balance on the female pins upside down, and soldered each pin. We found that the best technique was to heat up the solder at the top of the pin, and use the soldering iron to keep the metal liquid and let it slide down the pin instead of soldering right at the board. As you can see in the picture, the board can take quite a bit of damage from touching it with the iron. To solder the male pins to the LCD screen, it is easiest to plug in the headers and set the screen on top of them and then solder it.
Step 2: Test each shield
The next thing to do is make sure that all of the soldering you just did actually works by testing each shield individually with code provided in the libraries that you have downloaded. Any of the sample files can be used to verify your work. When testing the GPS shield, you need to make sure that the device has a satellite fix, this can be observed by the flashing red light on the shield. If there is no fix it will flash red about every other second, and once it gets a connection, it will flash red once every 15 seconds. Testing the LCD screen should be very straightforward, simply plug it into the Arduino and upload a provided file and it should work.
Hint: Make sure the switch on the GPS shield is switched to software serial, and if there are still issues try switching it to direct and back to soft serial. The switch on this shield seemed to not serve its purpose, and sometimes seemed to cause issues.
For more detail: GPS Distance Calculator (for golf)
