Summary of *duino Keg Temp Monitor, or the Quest for the Perfect Pint
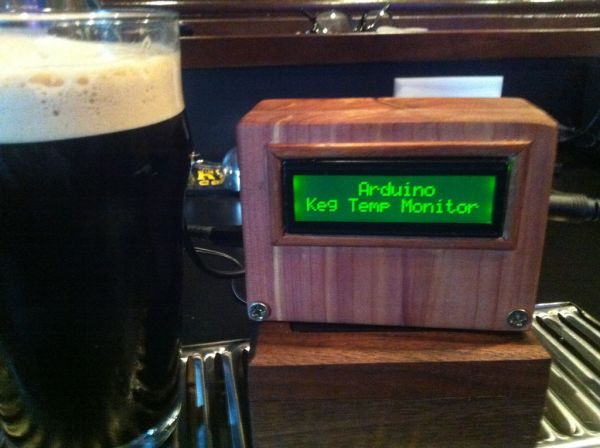
This article details a DIY project to build a portable kegerator temperature monitor using an Arduino Nano and DS18B20 sensors. The author aims to maintain optimal beer serving temperatures (around 3°C) by tracking internal and simulated beer temps without opening the unit. The device features a custom walnut enclosure, an LCD display for readings, and modular sensor inputs via 3.5mm jacks, allowing users to easily adjust settings and verify cooling performance for their homebrew or store-bought beer.
Parts used in the Kegerator Temperature Monitor:
- Project Box (Walnut)
- Arduino Nano
- 16x2 LCD display
- Adafruit i2c/SPI LCD backpack
- DS18B20 temp sensor (x2)
- 3.5mm TRS female stereo connector jack (x2)
- 3.5mm TRS stereo connector cords (x2)
- Mini rocker switches
- 9v DC wall wart
- 2.5mm DC power plugs
- 2.5mm DC power jack
- Small PCB
- Hookup wire/cables
I was looking for a project that combined my three favorite things – working in my shop, building cool stuff for my bar and of course, drinking beer. After a couple of weeks in the old country drinking “the Guinness”, I decided my I’d put a keg of “Moothers’ milk” in my kegerator and prolong my vacation until the next visit…which led me down this path.
Despite conventional wisdom, the Guinness is usually NOT served warm on the Emerald Isle – there were few places I drank in that relied on “cellar” temp to cool their beer. According to the Guinness Storehouse, the Guinnness should be servedat 8° C (46°F), which means it needs to be colder than that in the kegerator, as thelaws of thermodynamics definitely apply to beer kegs. A guy in Donegal (where they serve the finest pints!) told me he keeps his kegs at 3°C (37.4°F), figuring by the time the pour ends it’ll be close to factory specs.
Usually we keep fine homebrewed kegs of ales, pale ales, barley wines and stouts on tap at the Check 6, but lately the Guinness has become de rigeuer. The problem is, I never really paid that much attention to the temp of my kegerator. My beer always seemed cold enough and no one ever complained, but when I stuck an old school fridge themometer in there recently, I was shocked at how warm it was 🙂
So why build this? Fridge thermometers work just fine but you have to open the kegerator every time you want to check the temp. And every time you open the door it screws up the controlled thermal environment. Using this little guy allows you to track inside temps which will help you find the proper setting for your kegerator thermostat.
Enter the Arduino + DS18B20…
Step 1: Find a Project Box
Any old project box could do, but not at the Check 6 Saloon – we need something a little more elegant. v1.0 was hacked out from a hunk of Eastern Cedar, which has some nice character but didn’t match the dark woods in the Check 6 Saloon. A few days ago my partner (no, not that kinda partner) and I went over to his Grandad’s house to pick up some walnut that had fallen and been roughly boarded. Absolutely beautiful stuff to work! After several runs through the table saw, planer, chop saw, router and mill, we came up with project box v2.0, which is roughly 4″x 3.5″. This oughtta fit the guts nicely.
Step 2: Choose an Arduino and Collect Your Parts
You have several choices here, so choose your board according to your needs . In my case, I needed something I could program using the Arduino IDE — I say “program” but I really mean borrow open source code and hack to my needs 🙂 I had a few Arduino Unos laying around but they have a rather large footptint and after all, we just need to run a couple of temp sensors and print out the readings on an LCD screen. IMHO, a full-up Arduino is a bit of overkill — why use a $30 microcontroller when you can use something that does the same thing for a lot cheaper?
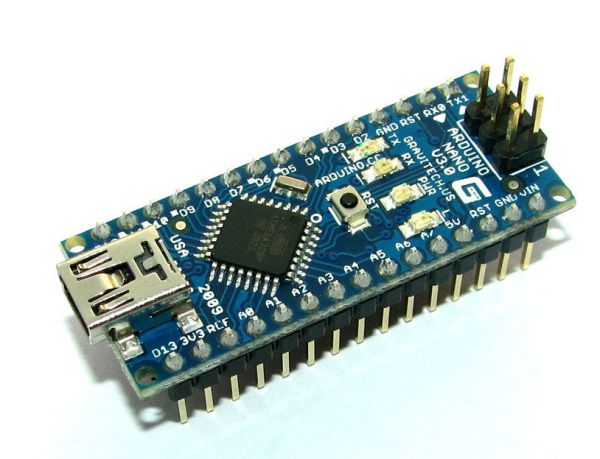
Originally I thought I’d use an ATTiny85 – I have a whole sleeve of them I ordered just to have for stuff like this – but I was too lazy to hook them up to my breadboard and mess with the code. So…I ordered a Digispark development board (which uses the ATTiny85), thinking that would do the trick. Wrong-o! While these boards are pretty cool, they are limited by the ATTiny memory of 8k (6k after the bootloader is jammed into the thing). Coding guys could probably find a way to make the Digispark work for this, but unfortunately I’m not one of them. And, I needed to get this thing up and running before I swapped out my Guinness keg with a new one! After a quick bit of googling I decided I’d use the Arduino Nano, which uses the same chip as the Uno (AT328 w/32k) and has a much smaller footprint.
Here’s a list of all the parts I used for this build. A lot of this stuff I had in my parts rack that I bought a while ago, just waiting for projects like this:
Project Box (see Step 1)
Brains:
Arduino Nano
16×2 LCD display
Adafruit i2c/SPI LCD backpack
Sensors:
DS18B20 temp sensor (x2)
3.5mm TRS female stereo connector jack (x2)
3.5mm TRS stereo connector cords (x2)
Power:
Mini rocker switches
9v DC wall wart
2.5mm DC power plugs (We’ll need to solder one of these onto the wall wart)
2.5mm DCpower jack
Misc:
Small PCB to hookup switch, PWR inputs and sensors
Hookup wire/cables
Hardware for case, as required
This build is very easy to make portable by using a battery pack (>5V) instead of the external DC power scheme I used.
Step 3: Sensors
This build is easily modifed to fit your needs. Once you have your Arduino, you need a couple of temperature sensors. I opted for the Dallas Semiconductor (now Maxim) DS18B20, a programable digital temp probe that’s used a lot for these kind of projects. These babies are pretty accurate with a tolerance of +/- 0.0625°C, and there is an awesomely simple arduino library out there that makes things tolerable on the programming end. The bonus is you can string a bunch of them together and run them off of one input pin, which will come in handy when it comes to pouring the perfect pint.
Originally I ordered a few waterproof DC18B20’s from a supplier on eBay, four to be exact. Unfortunately none of them worked – cheapo-Chicom copies of the real thing. I ended up ordering the real deals from Digispark and tested them using the Arduino 1-Wire Address Finder to confirm they were good. These things need a 4.7Ω pullup connected between pin 2 and 3 to get them to work (see diagram).
While you could hardwire the sensors into the arduino, I made mine modular – I can plug and unplug them at will and make the box portable. (This comes in very handy for checking the mash temp while brewing beer.) So I wired a male TRS (tip-ring-sleeve) 3.5mm stereo plug to each sensor. The tip we’ll use for data, the sleeve for power and the ring is GND (see pic). I carefully encased the 3 pins from each sensor in epoxy – right where they go into the casing – making them waterproof.
For this build I’m using two sensors – one for the kegerator temp and one for the ‘beer’ temp, which I’ll talk about in a minute. The “Box” probe is routed throught the top of the tower into and into the kegerator, where it just hangs in midair as close to the middle of the box and not touching anything. It reports the keg temp to the arduino. The “Beer” is wired in parallel and pigtailed off the box probe line. It sits in a glass of salt water and gives a rough approximation of the beer temp.
Short of stuffing a probe into the middle of the keg, there’s really no way to get a dead-on reading of the beer temp itself. Another option — if you use a cooling fan that draws cold air up into the tower (which I do) — is taking a temp in the glass just after the pour, which will be somewhat accurate. Either way, you’re not going to get true beer temperature.
Going forward, my plan is to log the temps from the sensor in the salt water and in the glass directly after the pour. Once I find the correlation between the two, I should be able to tweak the code to adjust for the difference. But for now, I’m content with the setup I have.
For more detail: *duino Keg Temp Monitor, or the Quest for the Perfect Pint
- Why did the author decide to build this device?
To track inside temps without opening the kegerator door every time, which disrupts the thermal environment. - What microcontroller was chosen over the Digispark board?
The Arduino Nano was selected because the Digispark's memory was too limited for the code required. - How are the temperature sensors connected to the system?
Sensors are wired to male TRS 3.5mm stereo plugs to allow for modular plug-and-play connections. - What is the purpose of the second sensor placed in salt water?
It provides a rough approximation of the beer temperature since direct measurement inside the keg is difficult. - What tolerance do the DS18B20 sensors have?
The sensors have a tolerance of plus or minus 0.0625 degrees Celsius. - How should the sensors be wired to the Arduino?
A 4.7 ohm pullup resistor must be connected between pin 2 and pin 3 for the sensors to function. - Can this project be made portable with a battery?
Yes, the build can be modified to use a battery pack greater than 5V instead of an external DC power scheme. - What material was used for the final version of the project box?
The final version v2.0 was crafted from fallen walnut wood.