Summary of How to Build a Robot – The BeetleBot
This article guides readers through building a simple, programmable-free beetle robot using basic components like motors and SPDT switches. It covers parts sourcing, assembly steps, the robot's mechanical operation, and troubleshooting tips. The project emphasizes recycling old electronics and safety precautions during construction.
Parts used in the BeetleBot:
- 2 - 1.5V motors
- 2 - SPDT switches mechanically easy to trigger
- 2 - AA batteries
- 1 - AA battery holder
- 1 - plastic or wooden pearl
- 1 - heat shrink that will fit over the motor shaft
- 1 - safety glasses
- 1 - soldering iron
- 1 - glue gun
- 1 - wire strippers
- 1 - side cutter
- Scissors, knife, x-acto
Welcome!
I have been in robotics since I was a kid and I am very passionate by robotics. I learn BEAM robotics around 1997-98 and started building robots for a science faire project call “Insectroides” in 2001. http://robomaniac.solarbotics.net ( they change server and the website links does not work anymore it is on Linux and it is CASE SeNsiTIve! ) here is the old one
http://members.tripod.com/robomaniac_2001/index.htm
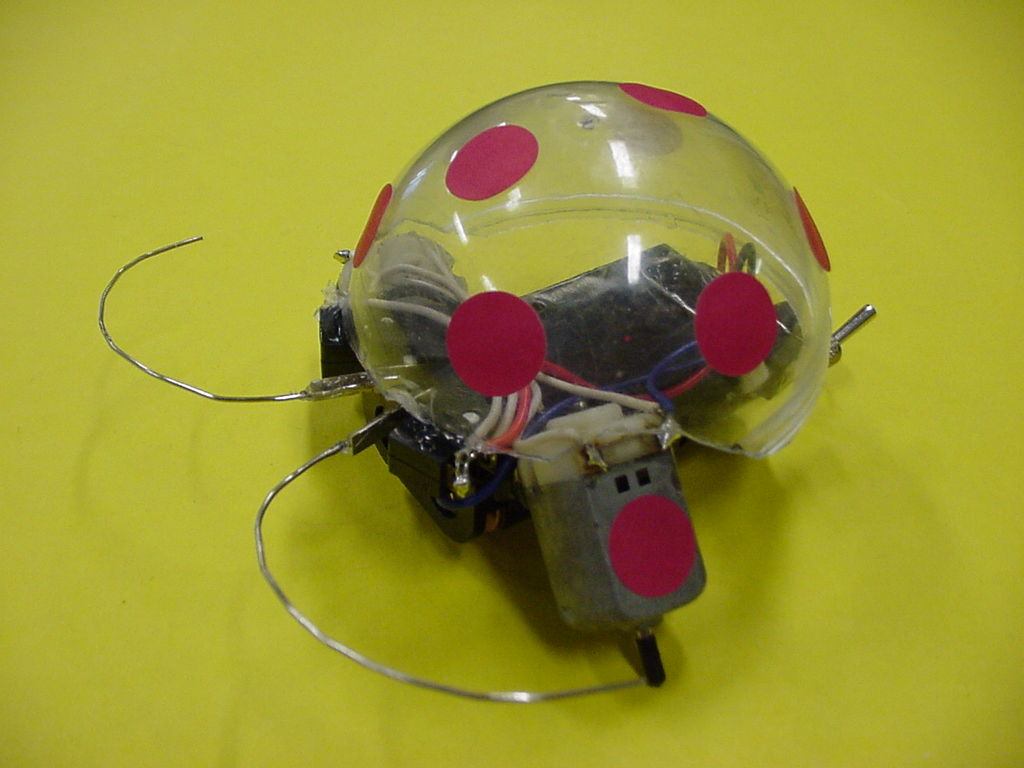
One of my many robots was the beetle robot, a VERY simple robot that can avoid obstacles on the floor without ANY silicon chip! ( the red ladybug, second picture, is my FIRST beetlerobot )
the red ladybug use a home made PCB carve with a dremel and two playstation motors with rubber wheel from a walkman!
– NO PROGRAMMING
– NO ELECTRONIC COMPONENT
It use
2 – motors
2 – SPDT switch
1 – AA battery holder
I has 16 years old when my uncle showed me the principal of the SPDT switch ( Simple Pole Double Throw). I then took this idea and incorporated the design into the (world famous) beetle robot 😛
Now I am 22 and want to show you step by step instructions how YOU can make this simple robot!
here are some videos of my beetlerobot in action!
The beetlerobot in the video is made using a Printed Circuit Board ( PCB ).
This design will be use if I make a kit one day!
Check them all out here!
http://www.youtube.com/jeromedemers
This Instructable is divided into three parts
– You will learn how to build the robot
– I will explain how the robot works
– I will then teach you how to fix your robot if it does not work ( Debugging )
Don’t forget to read the complete tutorial before starting! And remember to wear safety glasses at all time because eye injuries ain’t worth the risk! It will happen in a blick of an eye.
Have a great time!
ps- Check out Gareth Branwyn book, I made a one motor walker and he made a complete chapter with my robot!! He send me the book call ” Absolute beginner’s guide to building robots” A very great book!
Maybe I should write a book…
Jerome Demers aka ROBOMANIAC!
Updated july 2007 – I have added some pictures of the inside of my first beetlerobot. Home made AAA battery holder! I have also added some videos on youtube! http://www.youtube.com/jeromedemers
Updated 22 july 2007 – I added a picture and text on step 19 if your robot does not work 😛
Step 1: All the parts you need
Here ar the parts you will need:
the robot parts’
2 – 1,5V motors
2 – SPDT switchs mechanically easy to trigger
2 – AA battery
1 – AA battery holder
1 – plastic or wooden pearl
1 – heat shrink that will fit over the motor shaft
This might cost you less then 10$ cdn.
1,98$ for both motors
1$ for the battery holder
1,98$ for both SPDT switchs
ok ok maybe 10$ is a lot!
I like to buy my stuff here
http://www.solarbotics.com/
http://allelectronics.com/
http://www.goldmine-elec.com/default.htm
http://www.bgmicro.com/
If you recycle it might be all FREE! Try searching old VCR, PS2, old toys, printer, etc
Back then, I use to recycle EVERYTHING, I got everything FREE, old VCR are very good for gears and something SPDT switchs!!! Playstation have great super good motors, the one that makes the laser move.
the tool to complet the robot
1 – safety glasses
1 – soldering iron
1 – glue gun
1 – wire strippers
1 – side cutter
1 – scissors, knife, x-acto, etc
You need some 1,5Volts motor, not 3V or no event 12V!!
Each motors are powered by a SINGLE AA battery! You will draining your battery if you use bigger motor. You can find them in toys or even at your local dollarrama, in little car, fans, etc! ( beware, they might really suck you battery down )
the SPDT swiths need to be really sensitive! I have order some the order day that where to hard to activated, that might cause some problems and the robot might not even avoid obstacles but rather hug them until death. These swiths are the most expensive part of the robot… around 1$ to 4$ each. The one I use are from Cherry.
http://www.cherrycorp.com/english/switches/sealed/dcjk.htm
You should check http://www.solarbotics.com for some great motors. They even have a SPDT switch in store! I have never tried them but Grant did.
Here is a picture of the Solarbotics switchs in use. The beetlerobot was build by Grant McKee, the engineer for Solarbotics but currently works for WOWWEE in Hongkong ( poor Grant! :P)
http://grant.solarbotics.net/images/MISC/Beetle_bot-IMG_3138.jpg
http://grant.solarbotics.net/Misc.htm
Step 2: Preparing the parts
Cut 13 pieces of 2,5inch long electric wire.
ps- cut 14 if you are supertisious
Step 3: Preparing the parts
Now just remove around 1cm to each extremity of the wire.
In other word, strip the wire at both end.
That is 0.3935 inch to be precise.
After that you need to thin the end of each wire with your soldering iron.
Oups, I forgot to tell you to plug your soldering iron, HAHA you need to wait now!
sorry…
For more detail: How to Build a Robot – The BeetleBot
- What is the main function of the beetle robot?
The robot avoids obstacles on the floor without any silicon chip or programming. - How many motors are required for this project?
You need two 1.5V motors, each powered by a single AA battery. - Can I use 3V or 12V motors instead of 1.5V?
No, you must use 1.5V motors because larger motors will drain your battery too quickly. - What type of switches should I use?
You need two SPDT switches that are mechanically easy to trigger. - Where can I find free parts for this robot?
You can recycle old VCRs, PS2 consoles, old toys, or printers to find gears and switches. - Is it safe to build this robot without supervision?
No, you must wear safety glasses at all times to prevent eye injuries. - How long should the electric wires be cut?
Cut 13 pieces of wire to be exactly 2.5 inches long. - What should I do if my robot hugs obstacles instead of avoiding them?
This may happen if the SPDT switches are too hard to activate; ensure they are sensitive enough.