Summary of Arduino Sprinkler System plus Web control
This article describes a solder-free smart sprinkler system using an Arduino. By stacking shields, users can remotely control garden watering via any web-enabled device without complex wiring. The project supports scheduling and manual operation through a push button, offering a simplified alternative to previous designs while maintaining open-source features like Twitter integration.
Parts used in the Smart Sprinkler System:
- 1 x arduino board
- 1 x ethernet shield (e.g. Ethernet Shield V1.0)
- 1 x relay shield
- 1 x 10vDC adaptor (recycled phone charger)
- 1 x momentary push button
A smart sprinkler system for the rest of us… No soldering involved ! Just pile up a couple of shields on top of an arduino and control your sprinkler system from anywhere.
A couple of friends wanted to replicate the sprinkler system presented in this instructable but were scared by the complexity of it.
Well, it truly isn’t complicated and it does not even require to solder anything if you pick the right parts… Since I long wanted to make the system more compact, I took the opportunity to make this solder-free arduino instructable. The system is very similar to (exactly the same as?) the previous instructable and just as open (supports scheduling, twitter etc…).
Connecting this arduino to your sprinkler system will allow you to remotely turn your garden watering on and off from any web-enabled device. From there you can make it as fancy or as simple as you wish.
Enjoy !
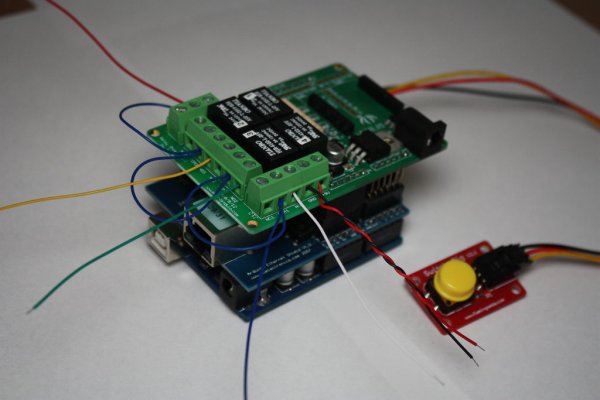
Step 2: Put it together
To put everything together, just follow the pictures, it should be fairly self-explanatory…
The push button is optionnal, it allows you to cycle manually through the sprinklers. Otherwise your only mean of control is the web interface… which is good too !
Step 3: Arduino sketch
The sketch is very close to the one posted in my original instructable (here)
Quick comments:
– The following code turns on the pull-up resistor of the analog input. A good thing to know.
pinMode(analogInPin, INPUT);
digitalWrite(analogInPin, HIGH); // turn on pull-up resistor
– I added a check on the size of the buffer that holds the page, so you have an indication that bad things happened if the buffer was too small.
– The manual button cycles through the valves (and uses A0,A1,A2 for convenience reasons).
Step 1: Collect parts
For this instructable you will need:
– 1 x arduino board
– 1 x ethernet shield (e.g. Ethernet Shield V1.0 for Arduino from http://www.nuelectronics.com )
– 1 x relay shield (http://seeedstudio.com/wiki/Relay_Shield)
– 1 x 10vDC adaptor (a recycled phone charger)
– 1 x momentary push button
You will not need:
– a soldering iron.
For more detail: Arduino Sprinkler System plus Web control
- Does this project require soldering?
No, the project does not require a soldering iron if you pick the right parts. - How can I control the sprinkler system remotely?
You can connect the Arduino to your sprinkler system to turn it on or off from any web-enabled device. - What is the function of the push button?
The optional push button allows you to cycle manually through the sprinklers. - Can I use a recycled phone charger for power?
Yes, a 10vDC adaptor such as a recycled phone charger can be used. - Does the system support scheduling?
Yes, the system is open and supports features like scheduling. - What happens if the buffer holding the page is too small?
The code includes a check that provides an indication that bad things happened. - Which pins are used for the manual button?
The manual button uses A0, A1, and A2 for convenience reasons. - Is the code similar to previous versions?
Yes, the sketch is very close to the one posted in the original instructable.