Summary of Arduino PMW enabled high power shield or non-shield on the cheap
This article guides readers through building a custom Arduino motor driver shield using the L293N chip. It details two methods: etching a PCB via toner transfer or using a prefabricated board with wires. The process covers preparing copper boards, printing circuit layouts on photo paper, transferring toner with an iron, and chemically etching the board using sodium persulfate. Finally, it outlines assembling components like headers and screw terminals to create a high-power interface for controlling motors beyond standard LED capabilities.
Parts used in the Arduino Motor Driver Shield:
- Arduino Uno/Mega
- Power supply capable of delivering sufficient power
- Headers
- Screw terminals
- Normal red LED
- 330 ohm resistor
- 16 pin socket (DIP)
- L293N motor driver
- Copper board
- Sodium persulfate
- Photo paper
- Laser printer
- Dremel/hacksaw
- Soldering iron/solder
- Iron
- Etch tank
- 1mm drill
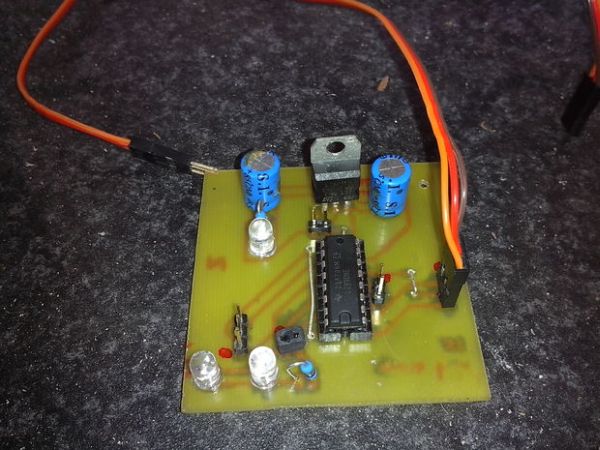
Micro controllers are great, but have you ever wanted to control something bigger then, lets say an LED? If you have, look no further (unless you want more then 0.6Amps for 4 channels, or 2.4Amps for 1 channel), unless you don’t mind spending more money. This instructable will be all about building your own, preferably etched, driver shield for the Arduino. It’s highly recommended to etch your shield, but not necessary, etching just makes it a lot neater. If you want to etch, but have never done it before, just follow this instructable, I’ll made a few steps about etching the shield as well.
It seems like I can’t upload any files other than pictures, so here’s a link to my dropbox, original files included: http://www.dropbox.com/sh/ihua115tbmmy9h8/6tvqm0G5Ue . The non-shield driver has been made with Diptrace, the shield driver with Fritzling.
This is my very first instructable, so well commented “criticism” is welcome.
Step 1: Things you will need
First of all, the photo’s I used are from another etched board. I lost the micro SD card with the photos from this PCB and my etchant isn’t working anymore (as you can see by the deep blue color), so I can’t make another shield right away.
– Arduino Uno/Mega/all others with similar pin configurations
– A power supply that can deliver enough power
– Headers, a lot of them
– Screw terminals
– Normal red LED + 330 ohm resistor
– 16 pin socket (DIP)
– L293N motor driver
– Dremel/hacksaw
– Soldering iron/ solder
If you are going to etch the board (Toner Transfer Method):
– a copper board
– sodium persulfate (or anything else that is used for etching, like ferric chloride, ammonium persulfate, so on)
^- mark the bottle you are storing your etchant in, so people know NOT to drink it!
– Photo paper
– Laser printer capable of printing thick paper
– Something to heat the etch solution (I used a 4ohm resistor salvaged from a car, on a 12V battery, use a BIG resistor or it will melt)
– Very fine sanding paper
– Thinner/acetone
– Iron
– Etch tank/something NOT make out of metal in which you can etch (I used a plastic Chinese food thing)
– A 1mm drill
If you can’t/won’t etch:
– Prefboard
– Wires
Step 2: (Etching) printing on the photo paper
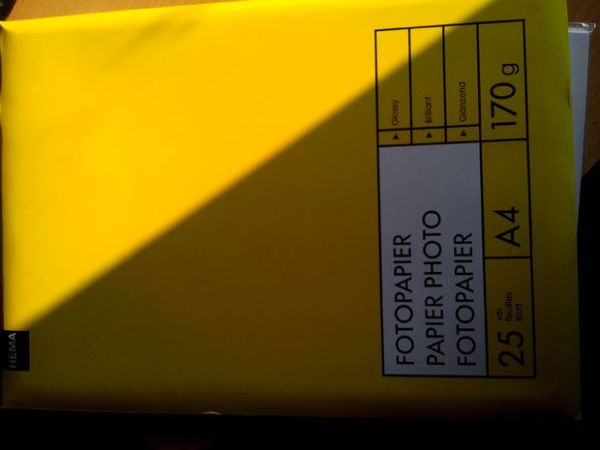
For the people that live in Holland: use photo paper from HEMA, it works like a charm!
First set your printer to manually feed it the photo paper, if possible. Then push the photo paper into the manual feed opening, now go to your computer and go to the printer settings.
Set the printer to: Thicker paper, 600 DPI and leave the rest as it is, these are the settings that work best for me. Now print the file included onto the photo paper. If all goes well you should have the photo paper coming out with the toner on it.
Step 3: (Etching) tranfering the toner onto the copper clad board
First cut the copper clad board to the dimensions of the shield, do this by first cutting the paper to size. Try not to touch the paper on the piece where the toner is. Now get a marker and outline the dimensions on the copper clad. Then get a dremel/hacksaw and cut the board to the right size. Now sand the copper board with very fine sanding paper until it shines.
Then lay your paper with the toner on top of the copper board. Make sure it aligns and then start pushing on it with the iron set to the hottest setting. Use the tip of the iron on the edges, other ways the toner won’t transfer properly. Now put the copper clad with the paper on it into a bowl of water, just plain water. Try peeling of the paper, and after that start rubbing to remove the remaining paper.
If all goes well, all of the paper (make sure there is none left in between the black lines) will rub of the copper clad. Now your copper clad is ready for etching.
Photo description: the top one is sanded, and the bottom one is full of grease from fingers and such. Sand it well, or your toner transfer won’t be successful!
Step 4: Etching the copper clad board
Don’t insert any type of metal into the etch solution, it will dissolve!
Now get your etchant and mix it with some regular water. The ratio of the mix depends on the etchant you are using, I’m using Sodium persulfate and I mix 250 gram of etchant with 1L of water. Now pour it into the etch tank. If you are using a heater, this will be the time to turn it on. Set it to about 40/45 degrees Celsius. The hotter, the faster it will go, but above 50 degrees the etchant will degrade. I manually switched the 12 volt going to my resistor by a switch, if you do the same, you will need a temperature gauge.
When the solution of water and etchant reached their target temperature, insert the copper clad with the toner on it. Don’t walk away now, you should take a look at the board every half a minute. When all of the bare copper has been etched away, etched board out of the etch solution, and place it in the bowl of water you used to remove the paper. Shake the bowl a bit, until the etchant that came out of the etch tank dissolves into the water.
For people using Sodium Persulfate, if the color is like in one of my photo’s, add baking soda to neutralize the pH value. Then you have a pH-neutral solution which you can dispose of correctly
For more detail: Arduino PMW enabled high power shield or non-shield on the cheap
- What is the maximum current this driver can handle?
The driver handles up to 0.6Amps for 4 channels or 2.4Amps for 1 channel. - Can I build this shield without etching a board?
Yes, you can use a prefboard and wires if you choose not to etch. - Which software was used to design the non-shield driver?
The non-shield driver was made with Diptrace. - How do I prepare the copper board before etching?
You must sand the copper board with very fine sanding paper until it shines. - What is the recommended temperature for the etchant solution?
The solution should be set to about 40/45 degrees Celsius, as temperatures above 50 degrees will degrade the etchant. - What printer settings work best for the toner transfer method?
Set the printer to thicker paper mode at 600 DPI. - How should I dispose of the Sodium Persulfate solution?
Add baking soda to neutralize the pH value before disposal. - What material should the etch tank be made of?
The etch tank must be made of something not made out of metal, such as plastic.