
Summary of Using a USBASP v2.0 as a cheap ATmega8 Arduino platform
The article details setting up USBASP v2.0 boards as Arduino programmers on Windows. It highlights purchasing cheap boards, soldering JP2 for re-flashing, and updating firmware to resolve IDE warnings. The process involves linking two boards via a cable, configuring one as the programmer by closing JP2, and using command-line tools to upload code.
Parts used in the USBASP v2.0 Programming Project:
- Three USBASP v2.0 boards
- Short 5x2 socket cables
- ATmega8 chip
- JP2 header
- JP3 header (deprecated)
- Windows computer
- Arduno IDE
- USBASP driver
- Latest firmware
- WinAVR-20100110-install software
- avrdude tool
finally got round playing with my AVRASP v2.0 boards. The ones Sleepwalker3 mentioned. Thanks mate!
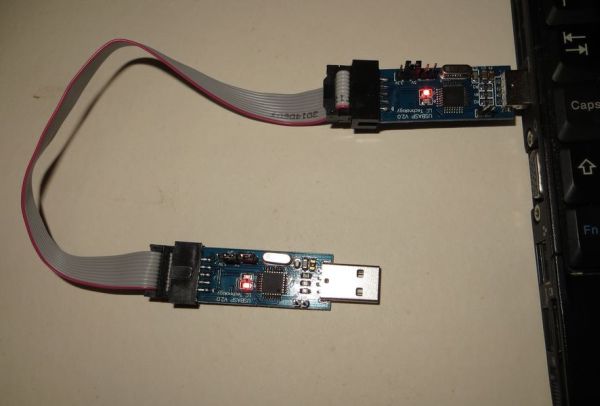
I bought three USBASP v2.0 on ebay for under £1.50 each. They each came with a short cable (5×2 sockets at each end). However, they do not come with the JP2 header soldered on. Solder it or you won’t be able to re-flash the on-board ATmega8 chip. JP3 on the other hand has been deprecated. It may still have some use in your own projects. You decide!
Then download some software (this is for Windows):
To use the USBASP programmer with the Arduino IDE, you will need to download the driver, latest firmware and WinAVR-20100110-install.
Small setback, my boards came pre-installed with an older firmware, so I needed to upload the latest. This is to avoid complaints from the Arduino IDE. avrdude: warning: cannot set sck period. please check for usbasp firmware update.
So let’s do this, shall we? Link two boards using one of the provided cables. Close JP2 on the board you intend to program. The other board, and ONLY the other board, goes into the USB port. This is the board that will be used as the programmer.
Type the following command in the appropriate folder.
For more detail: Using a USBASP v2.0 as a cheap ATmega8 Arduino platform
- Why must I solder the JP2 header?
You must solder JP2 to be able to re-flash the on-board ATmega8 chip. - What is the status of the JP3 header?
The JP3 header has been deprecated but may still have some use in your own projects. - Which software is required for Windows users?
Users need the driver, latest firmware, and WinAVR-20100110-install. - How do I fix the avrdude warning about sck period?
You need to upload the latest firmware to avoid this complaint from the Arduino IDE. - How should two boards be connected for programming?
Link two boards using one of the provided cables and put only one board into the USB port. - Which board should have JP2 closed?
You must close JP2 on the board you intend to program, not the one acting as the programmer. - Can I buy these boards for under £1.50 each?
Yes, the author bought three USBASP v2.0 boards on eBay for under £1.50 each.