
Summary of Doorbell alert with pushmessage and mail with webcam footage
This article details a Raspberry Pi project that sends push notifications and emails with webcam footage when the doorbell is pressed. The system uses a relay to connect the doorbell circuit to the Pi's GPIO pins, triggering Python scripts via Pushover for alerts and email for visual verification. It includes hardware modifications like LEDs, capacitors, and diodes to ensure safe operation alongside the software logic for capturing images and sending messages.
Parts used in the Doorbell alert with pushmessage and mail with webcam footage:
- Raspberry Pi
- Pushover app
- Wireless transmitter
- Relay
- LED
- 330R resistor
- 100u capacitor
- Flyback diode
- Test switch
- Logitech C270 webcam
Pi-files: Doorbell alert with pushmessage and mail with webcam footage
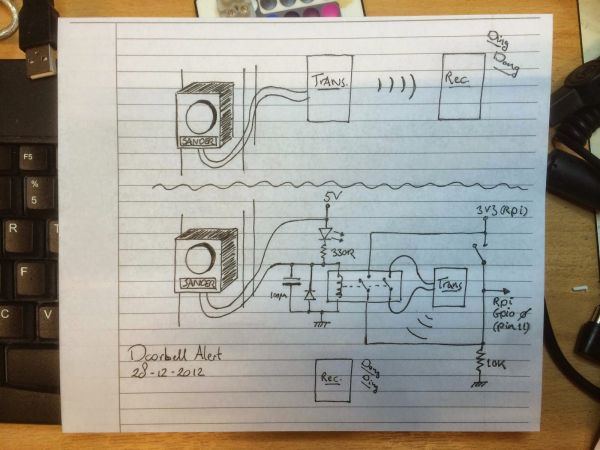 t functionality. I used a relay to combine the transmitter with a switch on the GPIO header of the Raspberry Pi.
import time
from time import sleep, localtime, strftime
GPIO.setwarnings(False)
GPIO.setmode(GPIO.BOARD) #alternative is GPIO.BCM (Broadcom names)
#set pin 11 as input
GPIO.setup(11, GPIO.IN) #Input: doorbell (relay)
push_user = ‘yyy’
conn = httplib.HTTPSConnection(“api.pushover.net:443”)
conn.request(“POST”, “/1/messages.json”,
urllib.urlencode({“token”: push_token,
“user”: push_user,
“message”: text,}),
conn.getresponse()
The main loop checks for the GPIO input regularly. I added a tiny bit of delay (sleep) to relieve the CPU. When the doorbell is pressed, it takes the current date and time and adds that to the push message.
while 1:
sleep(0.1) #relieves CPU load big time!
#if doorbell is pressed…
if GPIO.input(11):
#determine date/time and add to message
timestr_date = strftime(“%a %d %b %Y”, localtime())
timestr_time = strftime(“%H:%M:%S”, localtime())
mess = “Doorbell pressed on {}, {}.”.format(timestr_date,timestr_time)
print “\n”
print mess
push(mess)
When this all worked it was time to extend the doorbell alert feature. Not only I want to know that there is someone at the door, I also would like to know who was at the door, especially when I am not at home. I added a Logitech C270 webcam to the setup to capture snapshots and a short movie.
- How did the author start their Raspberry Pi adventures?
The author started by finding a Python script on the Pushover website to send custom push messages to an iPhone. - Can the original wireless transmitter functionality be kept?
Yes, the author used a relay to combine the existing transmitter with a switch on the GPIO header while keeping its functionality. - What components are used to limit voltage peaks when using the relay?
A 100u capacitor and a flyback diode are installed to limit voltage peaks during relay operation. - Which GPIO pin is connected to the relay and test switch?
The relay and test switch are connected to pin 11 (GPIO0) of the Raspberry Pi. - Does the code add the date and time to the notification message?
Yes, the main loop determines the current date and time and adds it to the push message when the doorbell is pressed. - Why was a Logitech C270 webcam added to the setup?
The webcam was added to capture snapshots and short movies to identify who is at the door when the user is not home. - How were multiple attachments handled in the email script?
The author modified the mail function found on Kutuma's Ramblings to support sending multiple attachments. - What library is imported to configure the GPIO header?
The RPi.GPIO library is imported and configured to set the board pin numbers mode. - Does the sleep function in the main loop affect CPU load?
Adding a small delay using sleep relieves the CPU load significantly.