
Summary of Simplest and Cheapest Arduino
This article details how to build a "Tiny Arduino" using an ATtiny85 chip for approximately $3.00. By utilizing the internal oscillator, the project achieves five usable I/O pins, replacing the need for an external crystal. The guide explains configuring an Arduino Duemilanove as an In-System Programmer (ISP) to upload sketches to the ATtiny85, enabling a compact and cost-effective microcontroller solution.
Parts used in the Tiny Arduino:
- 5V power supply
- Breadboard
- ATtiny85 microcontroller
- Arduino Duemilanove
- 10 uF capacitor
- 5 LEDs
- 5 Resistors
- Wires
Use a ATTiny85 (can be ATTiny45, ATTiny44) to make an Arduino just for US3.00 and name it as Tiny Arduino.
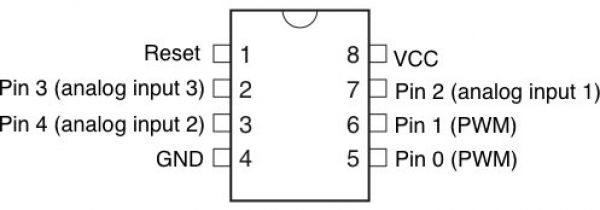
Tiny Arduino have only eight pins as shown in figure above, Pin4 is ground (Gnd), Pin8 is 5V (Vcc), Pin1 is Reset, Pin2 and Pin3 originally used to connecting the Crystal. In order to utilize all the IO, the internal oscillator (RC Oscillator) is used to replace the external clock which require a crystal. Therefore the Tiny Arduino is now come with five IO. Below shows the Arduino IO functions.
1. There are five IO, each IO can be Input or Output
2. Among the five IO, two of the IO can perform as PWM
3. Among the five IO, three of the IO can perform as Analog Input
I2C may require to extend the features of Tiny Arduino.
Tiny Arduino have only eight pins as shown in figure above, Pin4 is ground (Gnd), Pin8 is 5V (Vcc), Pin1 is Reset, Pin2 and Pin3 originally used to connecting the Crystal. In order to utilize all the IO, the internal oscillator (RC Oscillator) is used to replace the external clock which require a crystal. Therefore the Tiny Arduino is now come with five IO. Below shows the Arduino IO functions.
1. There are five IO, each IO can be Input or Output
2. Among the five IO, two of the IO can perform as PWM
3. Among the five IO, three of the IO can perform as Analog Input
I2C may require to extend the features of Tiny Arduino.
Step 1: Materials
1 x 5V power supply power supply
1 x Breadboard (Project board)
1 x ATtiny85 (This is our Tiny Arduino)
1 x Arduino Duemilanove (use to upload Sketch to ATTiny85)
1 x 10 uF capacitor (prevent Arduino duemilanove from automatically reset)
5 x LED
5 x Resistors
and some Wires
1 x Breadboard (Project board)
1 x ATtiny85 (This is our Tiny Arduino)
1 x Arduino Duemilanove (use to upload Sketch to ATTiny85)
1 x 10 uF capacitor (prevent Arduino duemilanove from automatically reset)
5 x LED
5 x Resistors
and some Wires
Step 2: Using an Arduino Duemilanove as an ISP
An ISP (in-system programmer) is required to upload sketch to the ATtiny85 since ATtiny85 does not come with serial interface. Here we use an Arduino Duemilanove as an ISP to upload sketch to the ATtiny85.
1. Connect the Arduino Duemilanove to the computer
2. Open the Arduino software , I’m using arduino-0023
3. Select File> Examples> ArduinoISP from menu as shown in figure
4. Select Tools> Board> Arduino Duemilanove or Nano w/ATmega328 or Arduino UNO from menu
5. Click on the Upload icon to begin upload Sketch to Arduino Duemilanove
Now the Arduino Duemilanove is becoming an ISP
For more detail: Simplest and Cheapest Arduino
-
What is the cost of building a Tiny Arduino?
The project can be made for US$3.00. -
How many IO pins does the Tiny Arduino have?
The Tiny Arduino has five IO pins after utilizing the internal oscillator. -
Can the IO pins on the Tiny Arduino perform PWM?
Yes, two of the five IO pins can perform as PWM. -
How do you upload a sketch to the ATtiny85?
You must use an Arduino Duemilanove configured as an ISP since the ATtiny85 lacks a serial interface. -
Why is a 10 uF capacitor required in this project?
The capacitor prevents the Arduino Duemilanove from automatically resetting. -
Which pin serves as the ground on the ATtiny85?
Pin 4 is ground (Gnd). -
Does the Tiny Arduino support Analog Input?
Yes, three of the five IO pins can perform as Analog Input.
