
Summary of Build your own Arduino Uno
This article details a cost-effective DIY project to build a standalone Arduino Uno for prototyping. The author explains the benefits of creating custom boards, such as saving money and learning PCB design. The guide lists essential components like the Atmega328P microcontroller and crystal oscillator, along with optional parts for voltage regulation and reset functionality. It also emphasizes the necessity of a USB to UART converter for programming the device from a computer.
Parts used in the DIY Arduino Uno:
- Atmega328P microcontroller with UNO Bootloader
- 16MHz Crystal
- 22pF ceramic capacitor x2
- LM7805 voltage regulator
- 100uF capacitor
- 10uF capacitor
- Tact switch (For reset)
- 10k ohm resistor (For reset)
- LED (For pin13 indicator)
- 330 ohm resistor (LED)
- 28 pins IC Socket
- USB to UART converter
I often use Arduino to test out my project prototype before complete it. Sometimes, I wanted to test more than one project at the same time. I would need more Arduino, but the original Arduino is over my budget for prototyping purpose. Therefore, I decided to make my own Arduino. Some of the benefits of making your Arduino (at least for me) are it is cheap, easy, learn to design PCB and electronics at the same time. Although there are a lot of guides on how to make your own Arduino, I decided to make one so as I can share with my readers, and at the same time document it for myself.
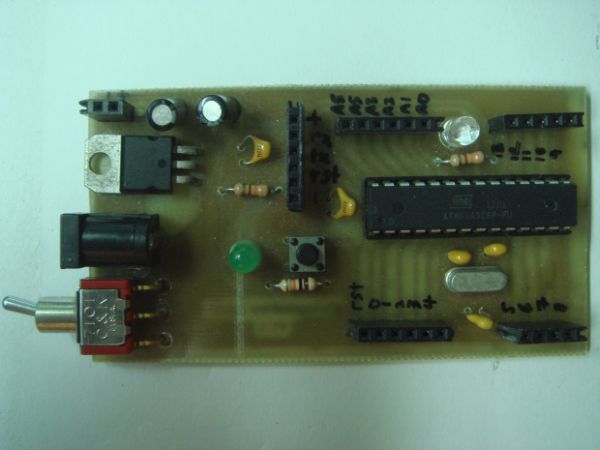
First, I am going to list a few basic items and parts required for standalone Arduino.
– Atmega328P microcontroller with UNO Bootloader ( An empty chip will do if you have an Arduino and burn the bootloader on your own)
– 16MHz Crystal x1
– 22pF ceramic capacitor x2
Optional
– LM7805 voltage regulator x1
– 100uF capacitor x1
– 10uF capacitor x1
– Tact switch x1 (For reset)
– 10k ohm resistor (For reset)
– LED (For pin13 indicator)
– 330 ohm resistor (LED)
– 28 pins IC Socket
Besides, the parts mentioned above, another important part that you need is a USB to UART converter. You would need this to program your Arduino from your computer. There are a few USB to UART converter available to you, most of them uses FT232RL IC, but I will also show you the one that I am using, which uses PL2303 IC.
For more detail: Build your own Arduino Uno
- Why should I make my own Arduino?
Making your own Arduino is cheap, easy, and helps you learn to design PCBs and electronics. - What is the main microcontroller required?
The project requires an Atmega328P microcontroller with a UNO Bootloader. - Can I use an empty chip instead of a pre-burned one?
Yes, an empty chip will work if you have an existing Arduino to burn the bootloader on it yourself. - What components are needed for the reset circuit?
You need a Tact switch and a 10k ohm resistor for the reset function. - How do I program the Arduino from my computer?
You need a USB to UART converter to program the Arduino from your computer. - Which ICs are commonly used in USB to UART converters?
Most converters use FT232RL IC, though the author uses one with a PL2303 IC. - What is the purpose of the LED in this project?
The LED serves as an indicator for pin13. - Do I need a voltage regulator for this project?
The LM7805 voltage regulator is listed as an optional part for the standalone Arduino.
