
Summary of DIY Digital Desk Clock with Temperature Display – Part 1
This article details the construction of a DIY digital desk clock featuring a temperature display, designed using SoloPCB tools. The project utilizes a Microchip PIC18F252 microcontroller as its core, interfacing with a DS1307 real-time clock for timekeeping and an LM335 sensor for temperature readings. Data is visualized on a four-digit seven-segment display driven by a MAX7219CNG. Power management involves converting 12VDC to 5VDC via an LM2574N-5.0 step-down converter. User interaction is facilitated through buttons, while status indicators are provided by two LEDs.
Parts used in the DIY Digital Desk Clock with Temperature Display:
- Microchip PIC18F252 microcontroller
- DS1307 real time clock
- Four digit 38 mm seven-segment display
- MAX7219CNG display driver
- LM335 temperature sensor
- LM2574N-5.0 step-down converter
- Two LEDs (power and functional status)
- User adjustment buttons
- SoloPCB design software
One of the most enjoyable part of being an electronics person is creating your own gadgets and using them in daily life. In this article, we are building one of those with the help of SoloPCB design tools, a digital desk clock with temperature display feature.
The brain of the circuit is a Microchip PIC18F252 microcontroller. It acquires precise time information from DS1307 real time clock via I2C interface and displays it on four digit 38 mm seven-segment display with the help of MAX7219CNG display driver. The temperature data is read by the on-chip ADC module of the microcontroller from LM335 temperature sensor which outputs 10mV per kelvin degree linearly. The temperature data is also displayed periodically.
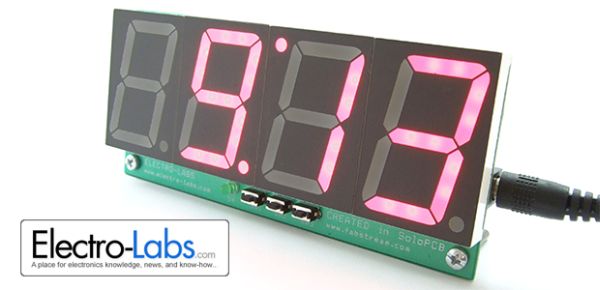
The PIC microcontroller and the peripheral ICs mentioned above needs 5V regulated supply to operate. The step-down converter in the power section of the circuit, LM2574N-5.0, converts 12VDC input voltage to 5VDC and lets to draw 500mA without any significant heating problem.
There are two LEDs on the board indicates power and functional status and the buttons let the user adjust the time and display the temperature manually.
The Circuit and the PCB Design
The circuit and the PCB of the project are drawn in SoloPCB. SoloPCB is a very powerful tool which integrates the circuit design to the PCB design and the fabrication. You can download SoloPCB from FabsSream for free. The circuit and the PCB files of the project are provided in SoloPCB format. You can download the design files including the symbol and the footprint libraries by using the download link below.
The following video demonstrates how to import the project libraries, open and synchronize the schematic and PCB files.
DIY Digital Desk Clock with Temperature Display
One of the most enjoyable part of being an electronics person is creating your own gadgets and using them in daily life. In this article, we are building one of those with the help of SoloPCB design tools, a digital desk clock with temperature display feature.
The brain of the circuit is a Microchip PIC18F252 microcontroller. It acquires precise time information from DS1307 real time clock via I2C interface and displays it on four digit 38 mm seven-segment display with the help of MAX7219CNG display driver. The temperature data is read by the on-chip ADC module of the microcontroller from LM335 temperature sensor which outputs 10mV per kelvin degree linearly. The temperature data is also displayed periodically.
The PIC microcontroller and the peripheral ICs mentioned above needs 5V regulated supply to operate. The step-down converter in the power section of the circuit, LM2574N-5.0, converts 12VDC input voltage to 5VDC and lets to draw 500mA without any significant heating problem.
There are two LEDs on the board indicates power and functional status and the buttons let the user adjust the time and display the temperature manually.
The Circuit and the PCB Design
The circuit and the PCB of the project are drawn in SoloPCB. SoloPCB is a very powerful tool which integrates the circuit design to the PCB design and the fabrication. You can download SoloPCB from FabsSream for free. The circuit and the PCB files of the project are provided in SoloPCB format. You can download the design files including the symbol and the footprint libraries by using the download link below.
The following video demonstrates how to import the project libraries, open and synchronize the schematic and PCB files.
There are also video tutorials available in the Videos category showing how to use the SoloPCB tools.
The circuit schematic of the digital desk clock and a screenshot from its PCB can be seen below.
For more detail: DIY Digital Desk Clock with Temperature Display – Part 1
-
What is the main microcontroller used in this project?
The brain of the circuit is a Microchip PIC18F252 microcontroller. -
How does the clock acquire precise time information?
It acquires time from a DS1307 real time clock via an I2C interface. -
What component drives the four digit seven-segment display?
A MAX7219CNG display driver is used to display time on the 38 mm seven-segment display. -
How is temperature data read by the system?
The on-chip ADC module of the microcontroller reads data from the LM335 temperature sensor. -
What voltage conversion is required for the circuit components?
An LM2574N-5.0 step-down converter converts 12VDC input to 5VDC regulated supply. -
Which software tool was used to design the circuit and PCB?
The circuit and PCB were drawn using SoloPCB design tools. -
What do the two LEDs on the board indicate?
One LED indicates power status and the other indicates functional status. -
Can users manually adjust the time and view temperature?
Yes, buttons let the user adjust the time and display the temperature manually.
