Summary of Yoga Breathalyzer
This article describes the "Yoga Breathalyzer," a biofeedback project using Arduino to visualize breathing patterns. Developed at a Silicon Women's Hardware Hackathon, it connects a wind sensor on a headset to an LED strip on a cup, translating breath into visual light output for meditation and yoga practice.
Parts used in the Yoga Breathalyzer:
- Arduino Uno
- Soldering equipment
- Break-away header pins
- Rainbow cable wire
- Anemometer (wind sensor)
- Wireless headset
- Zipties
- WS2812 LED strip
- Plastic cup
- Single white sock
- 9V DC barrel jack power source
- Cup or bowl for calibration
The yoga breathalyzer is a breath visualization tool to help you understand and get in touch with your breathing. Breath is the basis of yoga and meditation, and this biofeedback tool is one way to develop a deeper understanding of your own breath. Using Arduino, a headset-mounted wind sensor, and an LED strip, it’s simple to translate your breathing into visual output.

This project was created at the Silicon Chef Women’s Hardware Hackathon by:
Bonnie Barrilleaux
Sachi Decou
Jamie Piazza
Melanie Goetz
Amanda Galvin
Step 1: Collect supplies
For this project, you will need:
Arduino Uno
Soldering equipment, break-away header pins, and wire (rainbow cable works great)
Anemometer (wind sensor) such as this one: http://moderndevice.com/product/wind-sensor/
Wireless headset
Zipties
2 meters WS2812 LED strip, such as this one: http://www.adafruit.com/products/1138
Plastic cup and a single white sock (great use for that lonely sock that lost its partner)
9V DC barrel jack power source
A cup or bowl to cover the sensor so there’s no wind during calibration
Step 2: Solder wires to the wind sensor and LED strip
For the wind sensor, solder wires to the Gnd, +5V, Out, and Tmp contacts. We won’t be using the RV contact for this project, so it doesn’t matter whether you solder a wire to it. These wires should be at least 5 feet long, since they’ll need to stretch from the headset to the Arduino.
For the LED strip, solder wires to the three contacts (Gnd, +5V, and DIN). Note that these strips are directional — they have a right end and a wrong end to solder the data line to, although you could supply power to either end if you wanted to. So be sure to solder wires to the DIN (data in) and not the DO (data out) side.
At the opposite end of each wire, solder a breakaway header pin, so that the wires can be inserted into the Arduino. There should be a total of 7 wires, 4 from the wind sensor and 3 from the LED strip.
Step 3: Mount the sensor to the headset
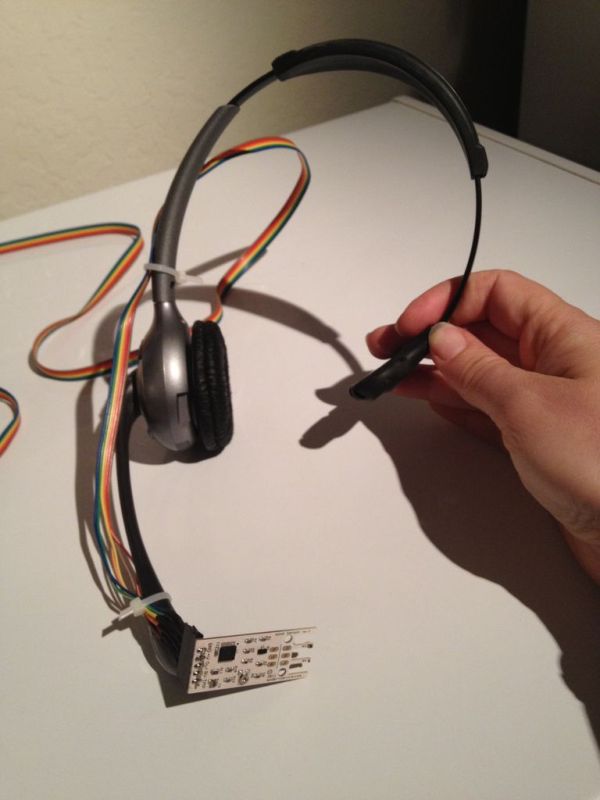
Use zipties to secure the wind sensor onto the headset, attaching the wires up to the earpiece.
Step 4: Mount the LED strip onto the cup
Wrap the LED strip around a plastic cup and use clear packing tape to secure it in place. Cover the cup with a white sock; cut to size if necessary. This will diffuse the light from the LEDs.
Step 5: Load code
Download the code from https://github.com/biobonnie/YogaBreathalyzer
Also download and install the LED strip library from http://code.google.com/p/fastspi/
Connect the Arduino to your computer with a USB A-to-B cable and load the sketch.
For more detail: Yoga Breathalyzer
- What is the primary purpose of the Yoga Breathalyzer?
It is a breath visualization tool designed to help users understand and get in touch with their breathing through biofeedback. - How does the device translate breathing into visual output?
It uses an Arduino connected to a headset-mounted wind sensor and an LED strip to create visual representations of breath. - Where was this project created?
The project was created at the Silicon Chef Women's Hardware Hackathon. - Can you supply power to either end of the LED strip?
Yes, while the strips are directional regarding the data line, you can supply power to either end if desired. - Which contact should be avoided when soldering the wind sensor wires?
The RV contact should not be used for this project, though soldering to it does not matter. - What is the function of the white sock in the assembly?
The white sock covers the plastic cup to diffuse the light from the LEDs wrapped around it. - How long should the wires connecting the sensor to the Arduino be?
The wires should be at least 5 feet long to stretch from the headset to the Arduino. - What specific library must be downloaded to run the code?
You must download and install the LED strip library from code.google.com/p/fastspi/.