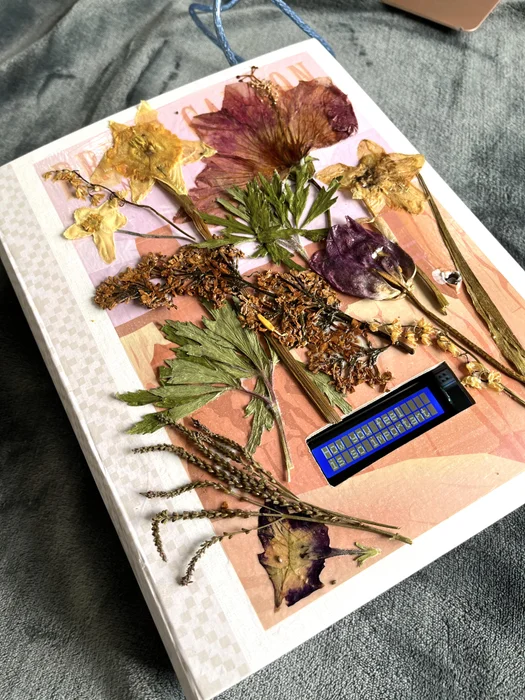
In moments of hypo- or hyperarousal, when the thinking brain is offline, this Arduino-based Calming Book Box will prompt self-regulation with a wave of the hand. Inspired by Tinkercad’s Crystal Ball project and Instructable user cah65‘s Arduino Powered Fortune Teller, a liquid crystal display reveals a series of nervous systems regulation activities each time the photoresistor reads a decrease in light. This beginner-intermediate level project is highly customizable in terms of its purpose, code, and visual end product.
Supplies
I am notorious for not practicing this myself, but truly– gather your supplies first and reduce your frustration. For my version, I needed:
Circuitry
- Arduino Uno Rev3
- USB-A to USB-B Cable
- computer
- breadboard
- jumper wires in assorted lengths & colors
- 220Ω resistor
- 330Ω resistor
- 5 kΩ resistor
- photoresistor
- crystal LED display
Software
Tools
- safety glasses
- drill with 1/4″ bit or device to poke holes
- utility knife or scroll saw
- engineer square or ruler
Art Supplies (can be modified/personalized)
- book box (alternatively, cardboard or cigar box)
- pencil
- Mod Podge glue
- foam paintbrush
- dried flowers
- plastic bag
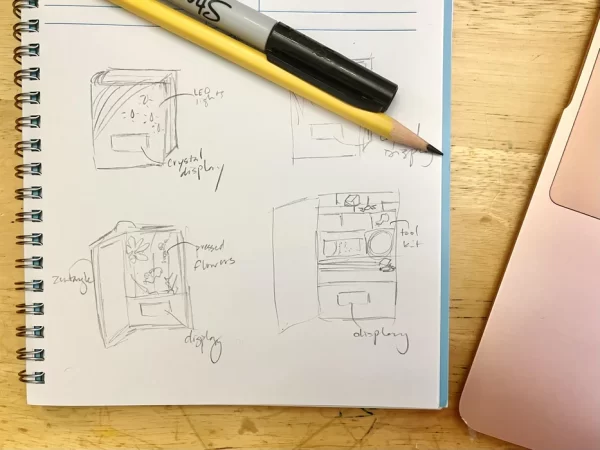
Step 1: Develop Theme
Step 2: Set Up the Circuit
If you are new to Arduino, before attempting this custom project, I highly recommend practicing with Tinkercad’s Project 11: Crystal Ball while simultaneously viewing @Mr.DudaSTEM’s video tutorial.
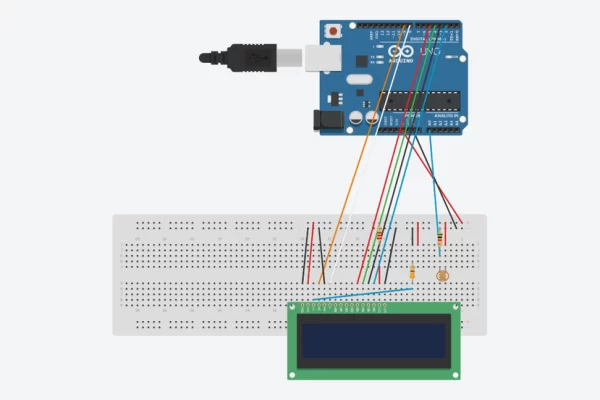
If you are ready to dive into this project, this is the customized setup for the Calming Book Box.
- On Arduino, attach red wire to 5V and black to GRD.
- On breadboard, attach red to + and black to -.
- Position photoresistor in row F.
- Add new jumper wire on row F and connect to 5V rail.
- Place 5 kΩ resistor on row I and connect to – (GRD) rail.
- Add blue jumper wire from A0 input pin on Arduino to row H near photoresistor.
- To set up the contrast of the crystal LCD screen, add a 330Ω resistor in from row E to row G.
- Connect to GRD rail with black wire from row J to – rail.
- Add red jumper wire from row J to + (5V) rail.
- Wire the resistor to the V0 pin on the crystal LCD with a blue wire from row D.
- Power the LCD
- There are 16 metal pins on the crystal LCD. Use 3 black wires and ground the display at pins 1, 5, and 16.
- To input power to the LCD screen, connect red wire from pin 2 to the 5V rail.
- At pin 15, connect another red wire from row E to F. Then, power pin 15 by adding a 220Ω resistor from row J to the 5V rail.
- Set up data communication
- Connect LCD pin 11 with a red wire to Arduino digital pin 5
- Connect LCD pin 12 with a green wire to digital pin 4
- Connect LCD pin 13 with a black wire to digital pin 3
- Connect LCD pin 14 with a blue wire to digital pin 2
- Connect LCD pin 4 with an orange wire to digital pin 9
- Connect LCD pin 6 with a white wire to digital pin 8
Step 3: Code Your Sketch
Code Notes
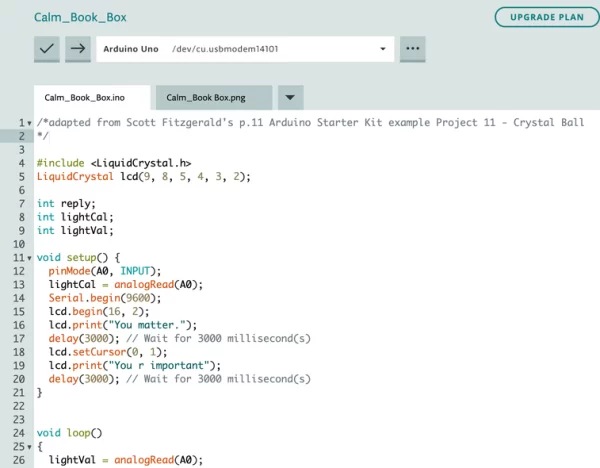
This code is easily customizable to myriad purposes, whether for a classroom, family, personal use, or other randomized response systems.
To adjust the total number of options, go to
reply = random(32); //pick a number from 0 to 32 and change the number accordingly
To change a response,
case 4: lcd.print(“glitter jar”); find the case reply you want to change and alter the content inside the quotation marks on that line (max 16 characters)
Link to Arduino Web Create Sketch
https://create.arduino.cc/editor/mbbluma283/d477eaf1-e3c9-49be-a2db-f77bba6b082c/preview
Copy/Paste of Code
#include <LiquidCrystal.h>
LiquidCrystal lcd(9, 8, 5, 4, 3, 2);
int reply;
int lightCal;
int lightVal;
void setup() {
pinMode(A0, INPUT);
lightCal = analogRead(A0);
Serial.begin(9600);
lcd.begin(16, 2);
lcd.print(“You matter.”);
delay(3000); // Wait for 3000 millisecond(s)
lcd.setCursor(0, 1);
lcd.print(“You r important”);
delay(3000); // Wait for 3000 millisecond(s)
}
void loop()
{
lightVal = analogRead(A0);
if (lightVal < lightCal – 50) {
reply = random(32); //pick a number from 0 to 32
lcd.clear();
lcd.setCursor(0, 0);
lcd.print(“Coping idea:”);
lcd.setCursor(0, 1 );
switch (reply) {
case 0: lcd.print(“tree pose”);
delay(7000); // Wait for 7 second(s)
break;
case 1: lcd.print(“ice pack”);
delay(7000); // Wait for 7 second(s)
break;
case 2: lcd.print(“5-4-3-2-1 senses”);
delay(7000); // Wait for 7 second(s)
break;
case 3: lcd.print(“4-7-8 breath”);
delay(7000); // Wait for 7 second(s)
break;
case 4: lcd.print(“glitter jar”);
delay(7000); // Wait for 7 second(s)
break;
case 5: lcd.print(“rip paper”);
delay(7000); // Wait for 7 second(s)
break;
case 6: lcd.print(“dance”);
delay(7000); // Wait for 7 second(s)
break;
case 7: lcd.print(“playdoh or clay”);
delay(7000); // Wait for 7 second(s)
break;
case 8: lcd.print(“take a lap”);
delay(7000); // Wait for 7 second(s)
break;
case 9: lcd.print(“get a tight hug”);
delay(7000); // Wait for 7 second(s)
break;
case 10: lcd.print(“hum or sing”);
delay(7000); // Wait for 7 second(s)
break;
case 11: lcd.print(“look at nature”);
delay(7000); // Wait for 7 second(s)
break;
case 12: lcd.print(“learn something”);
delay(7000); // Wait for 7 second(s)
break;
case 13: lcd.print(“remember details”);
delay(7000); // Wait for 7 second(s)
break;
case 14: lcd.print(“lift weight”);
delay(7000); // Wait for 7 second(s)
break;
case 15: lcd.print(“wall sit”);
delay(7000); // Wait for 7 second(s)
break;
case 16: lcd.print(“talk to someone”);
delay(7000); // Wait for 7 second(s)
break;
case 17: lcd.print(“jumping jacks”);
delay(7000); // Wait for 7 second(s)
break;
case 18: lcd.print(“list the why”);
delay(7000); // Wait for 7 second(s)
break;
case 19: lcd.print(“snuggle pets”);
delay(7000); // Wait for 7 second(s)
break;
case 20: lcd.print(“clean”);
delay(7000); // Wait for 7 second(s)
break;
case 21: lcd.print(“sensory checkin”);
delay(7000); // Wait for 7 second(s)
break;
case 22: lcd.print(“check HALT needs”);
delay(7000); // Wait for 7 second(s)
break;
case 23: lcd.print(“tapping”);
delay(7000); // Wait for 7 second(s)
break;
case 24: lcd.print(“very sour candy”);
delay(7000); // Wait for 7 second(s)
break;
case 25: lcd.print(“read and cuddle”);
delay(7000); // Wait for 7 second(s)
break;
case 26: lcd.print(“take a bath”);
delay(7000); // Wait for 7 second(s)
break;
case 27: lcd.print(“make something”);
delay(7000); // Wait for 7 second(s)
break;
case 28: lcd.print(“treat yourself”);
delay(7000); // Wait for 7 second(s)
break;
case 29: lcd.print(“balloon breathe”);
delay(7000); // Wait for 7 second(s)
break;
case 30: lcd.print(“write about it”);
delay(7000); // Wait for 7 second(s)
break;
case 31: lcd.print(“Zenimal meditate”);
delay(7000); // Wait for 7 second(s)
break;
case 32: lcd.print(“garden”);
delay(7000); // Wait for 7 second(s)
break;
} //end of switch
} //end of nested if()
else {
lcd.clear();
lcd.begin(16, 2);
lcd.print(“How you feel”);
delay(1000); // Wait for 1 second(s)
lcd.setCursor(0, 1);
lcd.print(“is so important”);
delay(3000); // Wait for 3 second(s)
} //end of else
} //end of loop()
Upload .ino from Arduino Web Create to Arduino microcontroller.
Attachments
Step 4: Cut Shape to Insert LCD Display
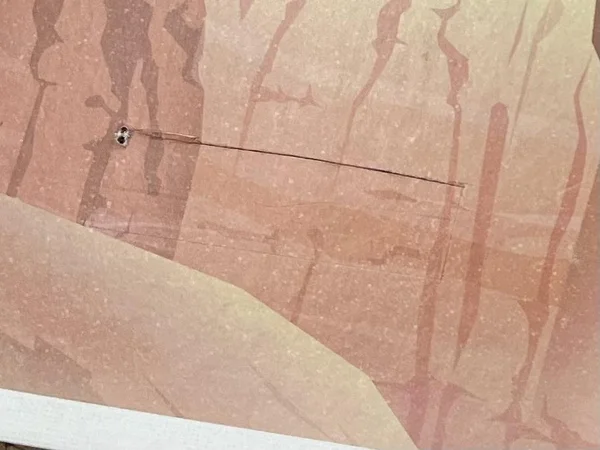
I positioned the crystal LCD screen component on my book box roughly where I wanted it. I measured its size and used an engineer square to place it more precisely. Then, I outlined the space I would need to cut away to show the LCD display.
Using a small drill, I made a hole in the corner of the rectangle I needed to cut out. At this point, you can cut out your shape using whatever cutting tools you have available. I ended up using a scroll saw for an easy, precise cut. I also had some metal rasps handy for quickly shaping to a neat rectangular shape. An Exacto knife, sandpaper, and patience would yield similar results.
Step 5: Design Internal Space
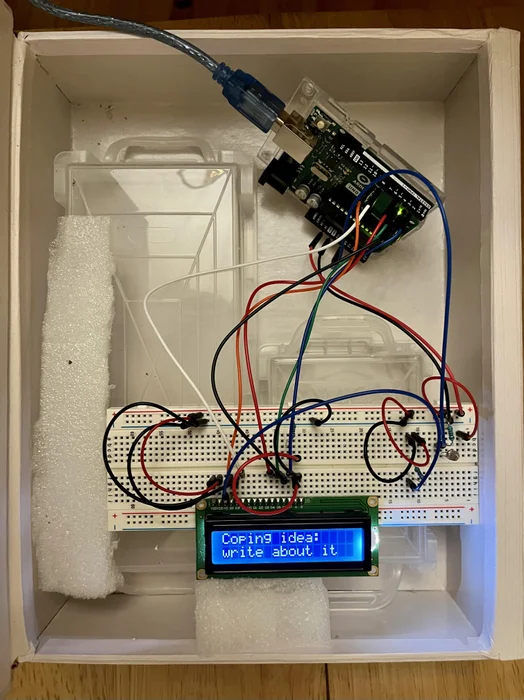
Because I chose not to solder, I needed to find a way to bolster my breadboard off the floor of the book box without bumping too high into the cover. It was also crucial that the equipment did not slide around. I used a combination of some plastic pencil cases and spare packing foam to position my Arduino and components.
Alternatively, you could enclose the components more discretely and use the second part of the book box to store self-regulation supplies like a lavender eye pillow, balloons to blow up, aromatherapy mist, etc.
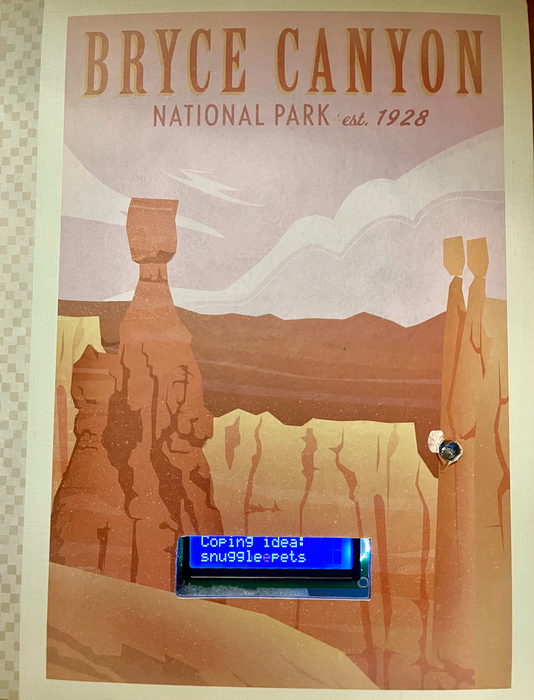
Step 6: Drill Hole for Photoresistor
Source: Calming Book Box (Arduino)

