
Summary of Intrusion Detection System Using Arduino Based Embedded Platform
This DIY Intrusion Detection System secures valuables using an ultrasonic sensor to detect movement and triggers a buzzer and LEDs for alerts. The project utilizes an evive board as the central controller, connected to an Arduino environment with custom code to monitor distance thresholds. When an object enters the restricted zone, the system activates visual and audio alarms to notify the owner immediately.
Parts used in the DIY Intrusion Detection System:
- evive board
- Ultrasonic Sensor
- LEDs
- Ice Cream Sticks
- Hot Glue
- Foam sheet
- Copper Wire
Safety of valuables is something everybody has on their minds constantly. Losing them out of sight for even a few minutes only to find out that they’re gone is bound to scare the living daylights out of anybody and transform the best day ever into a bad one or a bad one into worse! Well, nobody wants to feel that way, like EVER, do they?
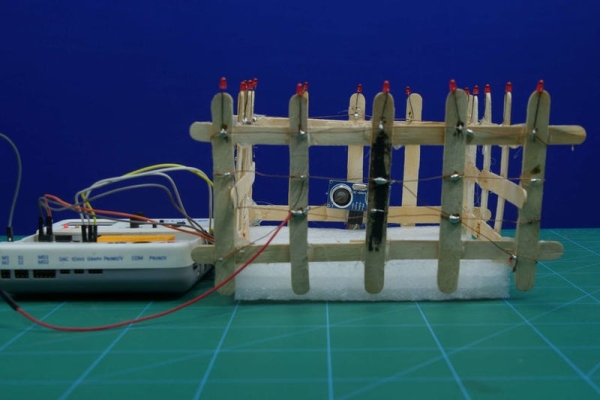
Fret not people! Bringing you a trouble free DIY protection system that is definitely going to go easy on your pockets. The DIY Intrusion Detection System, with its smart ultrasonic sensor that detects everytime someone tries their luck with your valuables and a buzzer that goes off to alert you, is going to take care of your stuff while you’re taking care of other things. B-)
Hop on board to know how to make one for yourself and protect your stuff!
Step 1: Things You Need:
- evive
- Ultrasonic Sensor
- LEDs
- Ice Cream Sticks
- Hot Glue
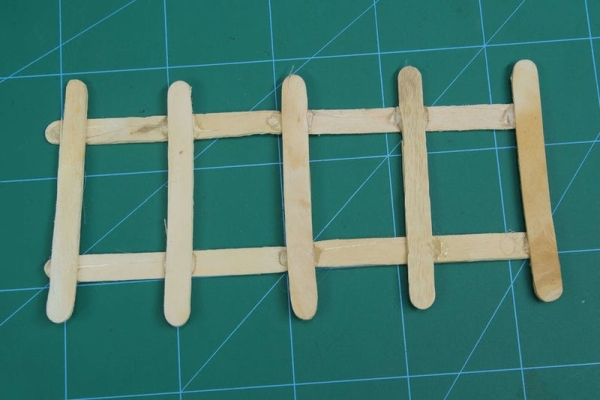
Step 2: Making of the Restricted Area
Step 3: The Heart of the System
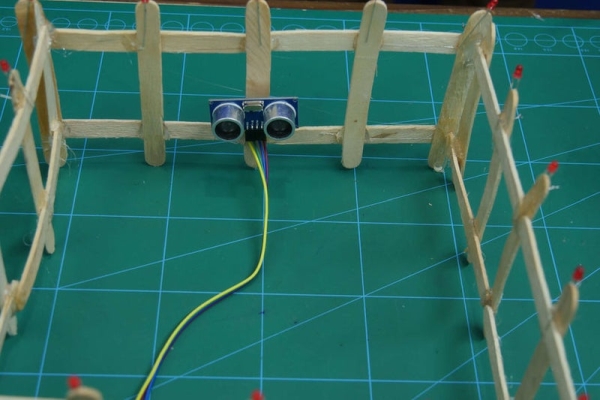
We will install the Ultrasonic Sensor in such a way that it covers the personal belongings.
Glue the Ultrasonic Sensor on one of the walls.
To make the base we will be adding a small piece of the foam sheet.
Step 4: The System
Once we have attached the sensor and it has detected Intrusion, it is only successful if the owner gets aware of the intrusion.
So do so, we will be installing LEDs at the walls.
Also, we will be using inbuild evive’s Buzzer
The LEDs will be in a parallel circuit. Solder the anodes of all the LEDs using Copper Wire and also solder all the cathodes to a single channel.
Step 5: Working
We have already known that Ultrasonic Sensors are one of the most popular sensors when comes to detecting the object.
The Sensor detects as soon as the object is stolen and the signal is sent to evive. Which in turn sends the signal to the LEDs and starts the buzzer.
As the LEDs are in parallel connection, all of them starts glowing together. Along with the constant sound of the buzzer. Both LEDs and buzzer are enough to notify the neighbor or the owner of the system.
Step 6: Connection With Evive
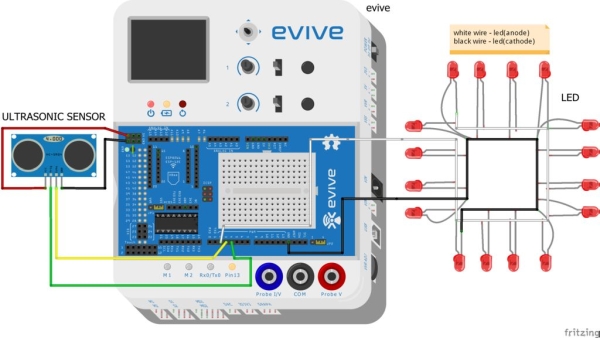
Make the connections of Ultrasonic Sensor and LEDs to evive.
Step 7: Arduino Code
Upload the Arduino Code for the same Intrusion Detection System and make your house theft proof.
include
const unsigned int ultrasonic_threshould = 10;
const int buzz=46;
const int led =2;
const int trig = 4;
const int echo = 3;
// Variables for the duration and the distance
long duration;
int distance;
void setup() {
// put your setup code here, to run once:
Serial.begin(9600);
tft_init(INITR_GREENTAB);
tft.setRotation(1);
tft.fillScreen(1);
tft.setCursor(25,10);tft.setTextSize(2);
tft.setTextColor(ST7735_WHITE,ST7735_BLACK);
tft.print(“STEMpedia”);
tft.setCursor(15,50);
tft.setTextSize(1.8);
tft.setTextColor(ST7735_GREEN,ST7735_BLACK);
tft.print(“INTRUSION DETECTION “);
tft.setCursor(55,60);
tft.print(“SYSTEM”);
tft.setTextColor(ST7735_GREEN,ST7735_BLACK);
tft.setCursor(0,105);
tft.setTextSize(1.8);
tft.print(“FOR MORE INFORMATION VISIT”);
tft.setCursor(30,115);
tft.setTextColor(ST7735_WHITE,ST7735_BLACK);
tft.print(“thestempedia.com”);
pinMode(buzz,OUTPUT);
pinMode(led,OUTPUT);
pinMode(trig, OUTPUT); // Sets the trigPin as an Output
pinMode(echo, INPUT); // Sets the echoPin as an Input
}
void loop() {
// put your main code here, to run repeatedly:
distance = calculateDistance();
Serial.print(“distance = “);
Serial.println(distance);
if(digitalRead(40)==HIGH)
{
if(distance > ultrasonic_threshould)
{
siren();
}
}
}
void siren()
{
for(int hz = 440; hz < 1000; hz+=25)
{
tone(buzz, hz, 50);
delay_ms();
     }
 // Whoop down
for(int hz = 1000; hz > 440; hz-=25)
    {
       tone(buzz, hz, 50);
       delay_ms();
    }
}
void delay_ms()
{
for(unsigned int k =0;k<5;k++)
{
digitalWrite(led,HIGH);
delay(1);
digitalWrite(led,LOW);
}
}
int calculateDistance()
{
      digitalWrite(trig, LOW);
      delayMicroseconds(2);
      // Sets the trigPin on HIGH state for 10 micro seconds
      digitalWrite(trig, HIGH);
      delayMicroseconds(10);
      digitalWrite(trig, LOW);
      duration = pulseIn(echo, HIGH); // Reads the echoPin, returns the sound wave travel time in microseconds
      distance= duration*0.034/2;
      return distance;
 }
Source: Intrusion Detection System Using Arduino Based Embedded Platform
-
How does the system detect intrusion?
The Ultrasonic Sensor detects objects as soon as they are stolen or enter the range, sending a signal to the evive board. -
What components alert the owner during an intrusion?
The system uses LEDs that glow together and an inbuilt buzzer on the evive to notify the owner or neighbors. -
How are the LEDs connected in this project?
The LEDs are connected in a parallel circuit where all anodes are soldered using Copper Wire and cathodes connect to a single channel. -
What is the role of the foam sheet in the assembly?
A small piece of the foam sheet is added to create the base for the Ultrasonic Sensor installation. -
Where should the Ultrasonic Sensor be installed?
The sensor must be glued to one of the walls in such a way that it covers the personal belongings. -
How is the buzzer activated when theft occurs?
When the sensor detects an object closer than the threshold, the evive sends a signal to start the constant sound of the buzzer. -
What code is required to make the system functional?
You must upload the specific Arduino Code provided which includes functions for calculating distance and triggering the siren. -
Does the system use any external power source mentioned?
The article does not specify an external power source beyond the standard setup for the evive and Arduino connection.
