Summary of SDWebServer – enc28J60 and Arduino
Summary: This article explains building a complete Arduino webserver using an ENC28J60 Ethernet module and an SD card module on the SPI bus. Static files (HTML, images) are served from the SD card, while dynamic requests (AJAX) are handled by the Arduino sketch. It covers SPI wiring, use of separate chip-select pins for each module, and sending large static resources using the method from the previous post.
Parts used in the SDWebServer project:
- Arduino (Uno or compatible)
- ENC28J60 Ethernet module
- SD card module
- MicroSD card
- Jumper wires for SPI connections
- 5V power supply
In the previous blog post, you learned how to send big files (html pages, images…) with your ENC28J60 shield. Today I’m going to show you a complete webserver!3
Description
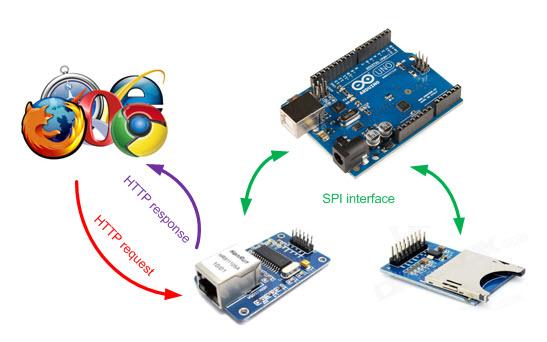
The user’s browser sends a request, through the network, to the ENC28J60 module. The request is analyzed by the sketch that is running on the Arduino, which also prepares the response. Both the ENC28J60 module and the SD card one are connected to the Arduino via SPI bus:
The webserver handles both static and dynamic resources:
- the static resources (html pages, images…) are fetched from the SD card
- the dynamic resources (AJAX requests…) are handled by the sketch itself
The sketch leverages the method described in my previous post to send static resources of any size.
Connections
Both the SD module and the ethernet one uses the SPI bus. That bus allows to connect more than one device at a time; thanks to a PIN (called chip-select) Arduino can decide which device will handle the command it is sending on the bus. You therefore need to connect the CS PINs of the different modules to different PINs of your Arduino and to configure the libraries accordingly.
Unfortunately I noticed that often the shields use the same PIN (for example PIN 10) as CS PIN or that – worse – they don’t allow to stack other SPI shields.I was forced to use two modules (instead of shields) and to connect them using wires:
The connections are:
- power supply (5V and ground);
- MOSI (Arduino->Device), PIN 11
- MISO (Device->Arduino), PIN 12
- CLK (clock), PIN 13
- CS (chip select) ->for the SD module PIN 4, for the ENC28J60 modyule PIN 10
The two PINs I chose to be chip select PINs are configured at the top of the sketch:
For more detail: SDWebServer – enc28J60 and Arduino
- How are static resources served by the webserver?
Static resources such as HTML pages and images are fetched from the SD card. - How are dynamic resources handled?
Dynamic resources like AJAX requests are handled by the Arduino sketch itself. - Can both SD module and ENC28J60 share the SPI bus?
Yes, both modules share the SPI bus; separate chip-select pins are used to choose the active device. - What SPI pins are used for MOSI, MISO, and CLK?
MOSI uses PIN 11, MISO uses PIN 12, and CLK uses PIN 13 on the Arduino. - Which chip-select pins are recommended in the article?
The article uses PIN 4 for the SD module and PIN 10 for the ENC28J60 module. - Why were separate modules used instead of stacked shields?
Because many shields use the same CS pin or do not allow stacking, the author used separate modules connected with wires.